A frame covered with heat shrink dacron or the like would
have fit the bill in terms of weight, but I can't get used to the idea of a hull material
I can see through, and the fear of holing it on the first sharp stick or rock that happens
along leaves me very uneasy. Using 1/8" plywood in lapstrake fashion would work well
also, but I didn't want the project taking any longer than necessary, and that is a very
labor intensive technique.
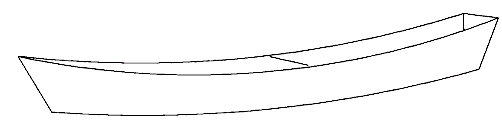
The boat I designed fit my criteria to a tee. The finished weight
was 28 pounds, the total time to build was about 16 hours, (not counting time to let
varnish or resin dry), the total cost was around $75.00, and the finished boat is sturdy,
works well, and very important to me, looks good. (Every time I've had her out I've gotten
favorable reviews.)
She takes a pounding well, be it wave or rock, and can be powered
by oars, (if a seat is added to give a bit more sitting height), or a double paddle. She's
not quite as fast as a kayak, but a good bit more stable. The stability comes at the
expense of speed, because to get the stability, I designed in a fairly typical dory
"tombstone" transom. This gives extra bottom width aft, hence the stability, but
since the rocker was kept small in order to give directional stability, (to prevent
fishtailing while paddling with a double paddle), the boat drags a bit more transom than
it should for optimum speed. It's hard to get any real speed in boat this short anyway. As
with any boat design, compromise is the evil villian with whom we must do battle. There
are no perfect solutions, hence no perfect boats. But this one does what I set out for it
to do, so for that I raise my beer stein in a hearty salute.
This is the perfect project for a first time boat-builder. For
very little cost you can get your feet wet, (figuratively speaking), and have a handsome,
usable, and fun boat for your trouble. This is a good introduction to taped seam
construction, and the skills you hone here can be applied to larger craft in the future.
I'm currently finishing up a 12' dory style skiff for use with a 10 horsepower or so
outboard. It's also an inexpensive foray into the boat building arts, and should prove to
be alot of fun. I'll make plans available if it works out as well as I think it will.
Lofting
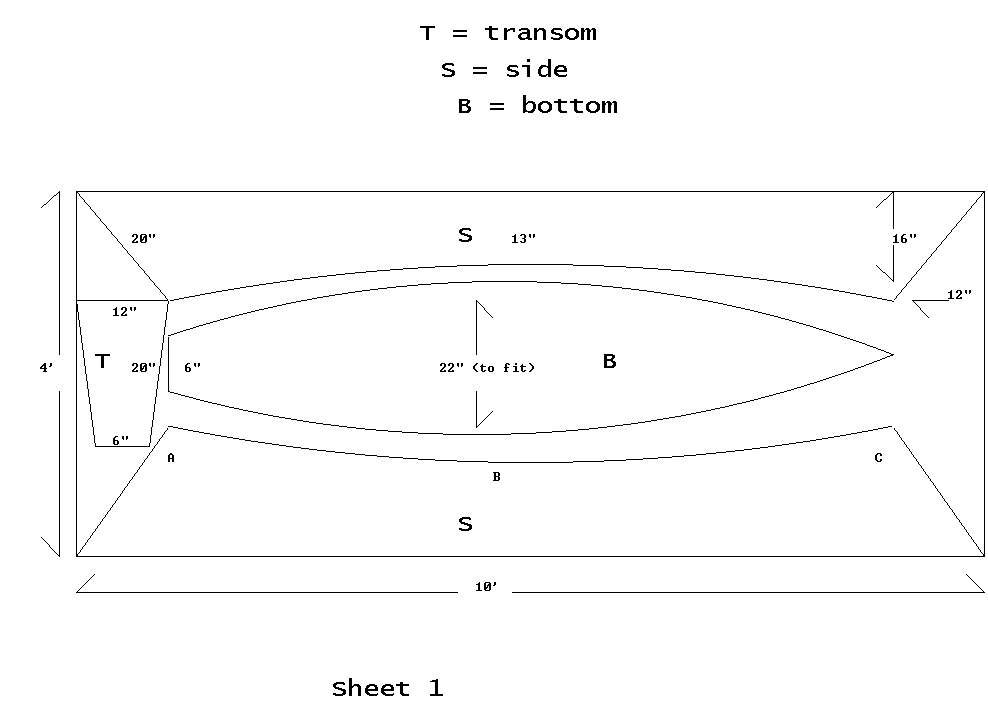
As with any boat, the first step is lofting. I use the term very
loosely, for the panel outlines are drawn directly on the plywood and can't be easier to
lay down. (see sheet 1) I used a 10' sheet of exterior luan
plywood and thus saved myself the trouble of scarfing a piece of plywood onto the end of a
standard 8' sheet. The 10 foot sheet of plywood can be ordered at most lumberyards and
will be a bit more expensive than buying two standard size sheets, but the boat is so
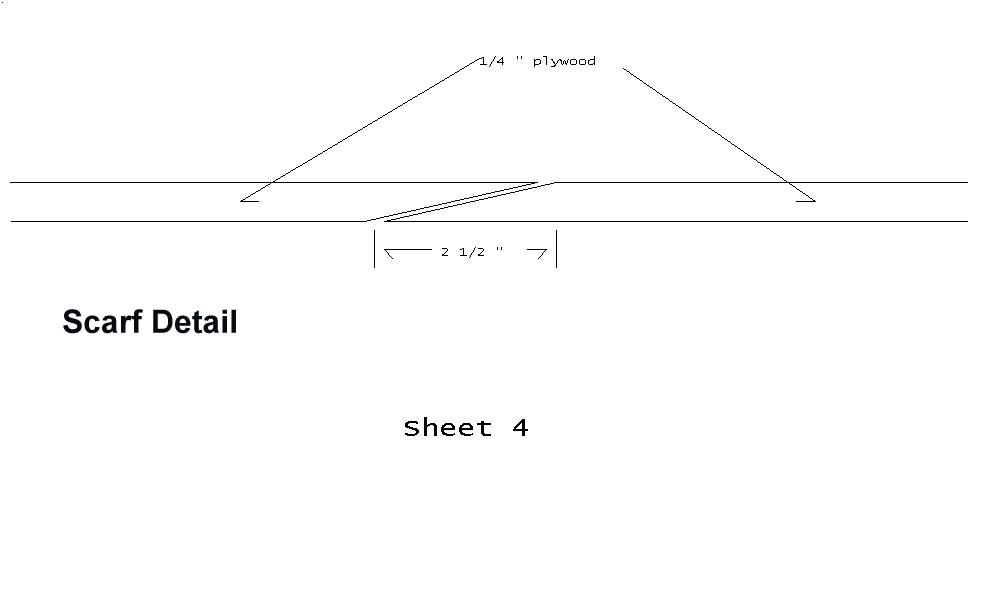
inexpensive, I felt it was worth the cost in saved labor time. Sheet 4
shows a detail of a standard 10:1 scarf, if you want to go that route. What scarfing
entails is planing and sanding the last 2 1/2" of each sheet of plywood to be joined,
so that the edge view looks like an elongated wedge. The two wedges are then epoxy glued
together to form a longer piece. If you're scarfing a piece onto a standard 8' sheet,
remember to make the extra piece 2' 2 1/2", not just the 2' you might think you need
to bring the length up to 10', because you lose the 2 1/2 extra inches when you glue the
two sheets together. If you need a bit more guidance for the scarfing, most boat building
books will give very clear instructions with pictures. The procedure isn't as complicated
as it might sound.
The toughest part of the lofting is getting a fair line for the
curved hull side. After you draw in the stem and stern lines for the first hull side, you
spring a batten between points A, B, and C as shown on sheet 1. A batten is just a thin
strip of wood held against two nails at points A and C and "sprung" downward at
point B, (the midpoint), untill the 13" mark is hit. Pencil in the line and you
should have a fair curve. What I used for the batten was a 1/2" strip I ripped off
the 12' 2" x 4" specified in the materials list. I later used this strip as one
of the gunwale strips. Buy the clearest, straightest grained 2" by 4" you can
find. Knots bigger than about 1/2" aren't acceptable.
Building
After you draw the panel outline for the first hull side, cut it
out with a saber saw and fair up the edges with a sander. This boat can certainly be built
without the use of power tools, but figure on at least double the 16 hour construction
time I talk about.) You can then use this hull side as a pattern for the other hull side.
The next step is marking, cutting out, and sanding the transom.
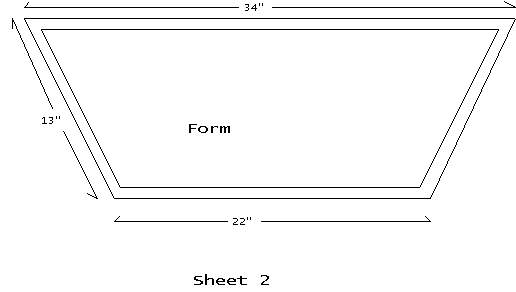
Now you want to construct the hull form, and because this is a
throw away after the boat is completed, use whatever you have laying around. I used for
the original boat an old 1" x 2" furring strip and it was more than adaquate.
Glue and screw the form together as per sheet 2.
Now tack the hull sides to the form at the midpoint of each hull
side. You can use a pair of saw horses or whatever might be convenient to hold the boat up
at a convenient working height. Tie the bow together with a few pieces of wire passed
through pre-drilled holes, then tack on the transom. The wire and the tacks, (1"
brads), will be left in place until after the wood flour/resin mixture and fiberglass tape
are cured, then removed. You can leave a bit of each brad sticking out so you have
something to pull out. As for the wire, just snip it off on the outside of the hull and
pull it through. After you’ve got everything to hold together, turn the boat over so
you can work on the inside joints.
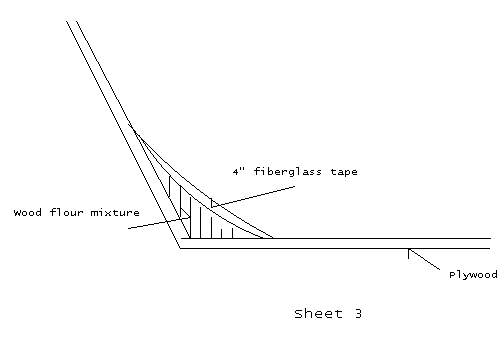
You're now ready to fill the two transom joints and the bow with
a mixture of resin and wood flour. I like to use wood flour because of its appearance.
It's a pleasant match to the wood when left bright.
("Bright" means stained and varnished or just
varnished, as opposed to painted.)
First mix up some resin and hardener. Start with about 8 oz., and
paint the three joints with the resin. Now mix in some wood flour until it's the
consistency of peanut butter. Spread this mixture into the joints with a plastic
applicator which is normally sold for auto body filler work. Cut a radius into the
applicator. You want to form a rounded fillet a couple of inches across, and maybe
½" thick in the center. See sheet 3. While the wood flour
mixture is still wet, bed some strips of fiberglass tape into the fillets, then mix up and
apply some new resin to wet out the tape. Be careful to press out any air bubbles that
might occur during the wetting out.
After this has cured, turn the hull over and lay on the remainder
of the plywood. Tack it down and check the hull for fairness. (The curves should look true
and "right" to the eye. From underneath, pencil in the outside line of the hull
sides onto the plywood, then use a saber saw to cut out the hull bottom. Tack the bottom
back on and carefully turn the hull over. Now finish the two fore and aft seams with
resin, the wood flour mixture, and tape. Allow to cure.
Next, carefully sand the hull bottom where it sticks out from the
sides, and round the edges of the bottom so the fiberglass tape will lay properly. Tape
the outside seams. You’ll only need to use a wood flour mixture where there are gaps,
or to fill holes in the hull where you tacked during earlier procedures. To tape, first
coat the wood with resin in the area the tape will go, lay on the tape, then wet out the
tape with more resin as you did earlier over the fillets of wood flour. Let it all cure.
Now, rip two ½" strips from the 2" x 4'. These, along
with the strip you earlier used as a batten, will form the gunwales-the strips of wood
running along the top of the dory on the outside of the hull. These serve to stiffen the
structure of the boat. Attach the gunwales to the outside of the hull and fasten them from
the inside of the hull with 5/8" brass or bronze wood screws. Round headed screws are
a nice touch. The screws should be spaced around 8" or so. Attach the first gunwale
strip whole, then trim the ends. Attach the second strip and do the same. Thetransom strip
should go last.
The attaching of the gunwale strips, the fitting of the thwart,
and the last step in the actual construction, the fitting of the skeg, are the only areas
of the project requiring any real joinery work. Since this is the case, try to take some
care here, but remember, on a project like this, microscopic tolerances aren't necessay or
called for. However, fits that are too sloppy will detract from the appearance of the
boat, and more importantly, since the boat gets much of its stiffness from the gunwales
and the thwart, a sloppy fit could also detract from its seaworthiness and longevity.
The point is, don't let a lack of woodworking ability or
experience stop you, but use some care. And let's face it, if the worst thing that happens
is that you have to spend another $4.00 on a 2" x 4' because you screwed the first
one up, we’re not talking major loss.
A problem I think most people have who would like to try a
project like this but don't, is that after looking at projects done by amateurs and
professionals in the glossy boat publications, they're scared off, because they don't
think they can recreate the perfection seen in the magazines. To that I say, well maybe
not, but you can turn out a reliable and functional boat anyway. And there is something
very rewarding about doing it yourself. As for appearance, if you use some care I think
you'll surprise yourself.
Now rip a 1" strip off the 2" x 4" for the thwart.
It's installed midship through the gunwales with a couple of 1 1/2" wood screws. See sheet 1. The thwart appears midship as a short line connecting
the two hull sides. Countersink them and fill the holes with a wood flour mixture. The
thwart should be around 34" long and beveled on the ends to fit the contour of the
hull sides.
Use the remainder of the 2" x 4" for the skeg. The skeg
is strip of wood extending downward from the bottom of the hull, starting around 2"
from the stem, running backward down the middle of the hull bottom, and ending around
2" from the transom. The skeg helps to give the boat directional stability and adds
stiffness. Cut the piece of wood to length, then plane the sides so they angle up from
what will be the base. The base will be around 3/4" wide 1 the top portion of the
skeg around ½". (See the cross section of the skeg on sheet 4.) You'll also have to
plane a bit of height from the skeg, leaving the finished skeg somewhere in the
neighborhood of an inch high. Attach this from the inside of the hull with 1"
woodscrews bedded in a bit of calking.
Step back now and admire your handiwork. You're now standing in
front of a boat! To finish things up, you'll want to sand both the interior and exterior
of the boat and seal it all with a coat of resin. Sand again, then give the boat a couple
of coats, (sanding between), of U.V. inhibiting polyurathane. To get a mirror finish will
require a bit more work at this point, but the boat will look good as is.
There you have it. A handsome, useable boat with under twenty
hours and about $80.00 invested. Use her with care and with pride.