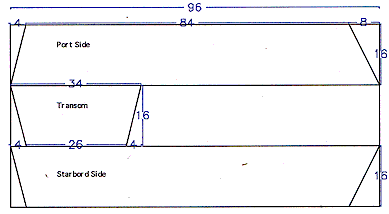
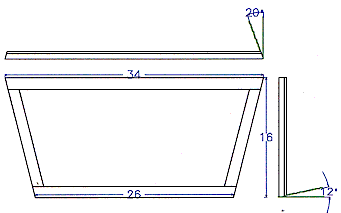
Cut diagram for side/stern pieces.
I cut the plywood as shown. If you think about this a
minute, you'll realize that the drawing doesn't make allowances for the saw kerf. I
cut the transom a little short and used the framing, the stern rub rail, and some
thickened resin to make up the difference.
transom diagram
I framed the transom with 1 x 2 to provide a nailing surface and
then beveled the edges to what I thought would be adequate for the sides to join evenly
once everything went together. I didn't allow enough and again had to fill with
thickened resin, but these are the angles I measured once the boat was finished. The
plywood goes on the outside.
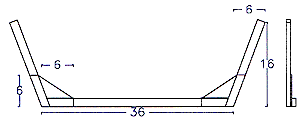
mid-ship frame diagram
I built a frame to form the boat around. The side pieces end
up being longer than necessary and get trimmed later in the building process. I drew
this out on a big piece of cardboard first to get the angles right, then cut the plywood
knees and used them to align the side angles. I probably lost some accuracy but it
still worked fine.
Both the transom frame and mid-ship frame were put together with
bronze ring nails and adhesive out of a caulk tube. Which adhesive one would use
depends on budget, projected use of the boat, and how long one wants it to last.
Finally I ripped a bevel on the sides of a piece of 2 x 4.

stem cut angle diagram
I could have done this thinner and had a sharper stem, but I put
an outer oak stem on later and it's sharp enough to cut the water but blunt enough to take
running into things gracefully. Regardless, the exact width is unimportant.
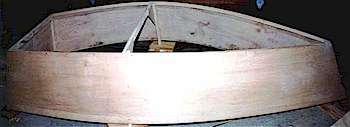 I assembled the whole thing by gluing and nailing the sides to the
transom, then to the mid-ship frame, and then using a spanish windlass to bring the bow
together and gluing and nailing to the stem, which was left oversize on the bottom until
after the glue dried. The mid-ship frame is installed 36" from the transom
along the rail, 32" from the transom along the chine. I assembled the whole thing by gluing and nailing the sides to the
transom, then to the mid-ship frame, and then using a spanish windlass to bring the bow
together and gluing and nailing to the stem, which was left oversize on the bottom until
after the glue dried. The mid-ship frame is installed 36" from the transom
along the rail, 32" from the transom along the chine.
I had also notched the corners of the mid-ship frame to accept
chine logs, which went in next. Much of the wood used was thin strips of clear grain
hardwood from a local cabinet shop waste pile. The chine logs were something fairly
soft for easy nailing and 1" x 1/2". I didn't steam anything. The
strips had to be thin enough to bend easily and have good enough grain to put up with this
treatment.
 If someone wanted to build one of these more easily they could put the
chine logs on the outside. I think it might have slightly more drag that way and
wouldn't look as good, but it would be easier to build. There's another
consideration too: After I put the bottom on I rounded the corners and taped them with
4" fiberglass tape. That would be harder to do with an exterior chine log.
Another option would be to do the bottom stitch and glue style and eliminate the
chine logs altogether. If someone wanted to build one of these more easily they could put the
chine logs on the outside. I think it might have slightly more drag that way and
wouldn't look as good, but it would be easier to build. There's another
consideration too: After I put the bottom on I rounded the corners and taped them with
4" fiberglass tape. That would be harder to do with an exterior chine log.
Another option would be to do the bottom stitch and glue style and eliminate the
chine logs altogether.
Before the bottom went on the sides had to be beveled to a
straight line. Putting a straight edge athwart ships, the chines and sides were
adjusted with a block plane and belt sander so the bottom would meet the chines flush,
rather than just at the outer corner. I trimmed the bottom of the stem to match at
this point too.
The bottom went on by flopping the sheet of plywood over the boat
as it rested upside down, tracing the outline onto that sheet, and then cutting it out
oversized.
Assuming the wood all bends at the same rate, the boat should be
symmetrical. A builder could measure from bow to the stern corners to make sure
before securing the bottom.
Again I used glue and nails. I started at the transom and
worked forward. I used a lot of nails for this on the transom, since pushing down
the area at the bow levers up the stern. I also had to concentrate on sending the
nails in parallel to the side rather than perpendicular to the bottom. When I failed
to do this, the nails poked out of the side of the thin chine log inside the boat.
Once the glue dried I cut off the excess plywood and sanded over the edge to about a
1" radius.
Next I installed the quarter knees and breast hook. These
are the most tricky parts, since they have multiple angles, none of which are square.
I used a piece of oak plank from a pallet I found for stock, measured the angles,
cut them slightly wrong, and then adjusted them with the belt sander. Once they fit
I adjusted them here and there to make them more comfortable to grab and fair into the
corners. Another way might have been to attach the inwales and gunwales, sand them
down to a flat plane, and screw the breast hook and quarter knees down to them flat.
 With those pieces on I attached the inwales and gunwales. This
was done in one maneuver using 3/8" x 1" oak strips (more cabinet shop scrap)
for both. I carefully cut the inwale to fit, and let the gunwale run a little long.
I applied glue, clamped everything in place, and drilled a pilot hole for each
bronze ring-shank nail before nailing it through gunwale, plywood side, and inwale, using
a small sledge hammer to back up the blows as I nailed. I put a nail about every
4". The advantage to this method was again that no steaming was needed.
The disadvantage was that it left the plywood edge exposed. With those pieces on I attached the inwales and gunwales. This
was done in one maneuver using 3/8" x 1" oak strips (more cabinet shop scrap)
for both. I carefully cut the inwale to fit, and let the gunwale run a little long.
I applied glue, clamped everything in place, and drilled a pilot hole for each
bronze ring-shank nail before nailing it through gunwale, plywood side, and inwale, using
a small sledge hammer to back up the blows as I nailed. I put a nail about every
4". The advantage to this method was again that no steaming was needed.
The disadvantage was that it left the plywood edge exposed.
As I said above, the outer stem was cut to match the angle of the
bow and attached, then the seams were reinforced with 4" fiberglass tape. The
whole outside of the hull was coated with resin, and then given three coats of oil based
paint over a coat of primer. I keep meaning to paint on a fake shear strake but
haven't gotten to it yet. The rails I left bright with four coats of spar varnish.
So far the plywood is darkening only slightly. If I had a boat house or
stored it covered there would be less of a problem.
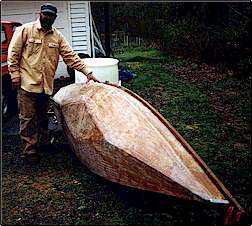
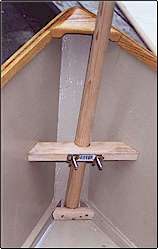
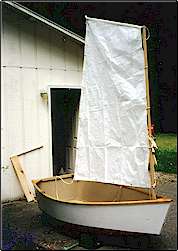
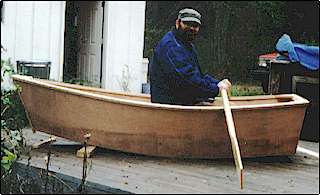
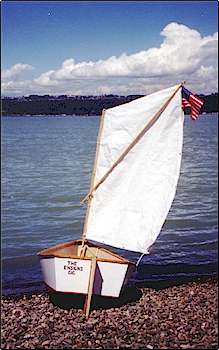
I had some crazy notion of sailing so I installed a keel, a mast
step and partners, and a rudder. I didn't want to mess around with a dagger board,
so I put on a long keel made from a cedar 5/4 x 6. On the bottom of the keel I put
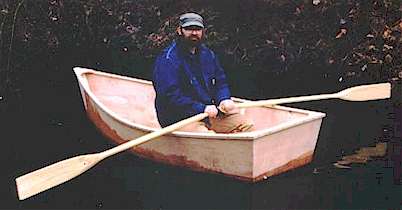
an oak wear strip so that I could drag her over beaches and rocks. The picture at
the top of this article shows launching day, with the boat resting on its keel, and its
bottom well off the cobble beach. There are also rub strips on each side so that on
a flat surface, the boat rests with no plywood on the ground. The keel stiffens the
bottom quite a bit too.
|

 One side
of my wife's family comes from a Maine lobster-fishing town. Katey grew up used to
the local fisherman's skiffs looking a certain way. To her eyes, that was the proper
way a small boat should look. I, on the other hand, appreciate just about anything
that floats and have been known to experiment with putting a keel on an inner tube to see
what happens. (It doesn't help.) So when I finally got a long put off boat
building project done she christened the new craft "Swamp Thing", as in "If
you're not careful you're going to swamp that thing!"
One side
of my wife's family comes from a Maine lobster-fishing town. Katey grew up used to
the local fisherman's skiffs looking a certain way. To her eyes, that was the proper
way a small boat should look. I, on the other hand, appreciate just about anything
that floats and have been known to experiment with putting a keel on an inner tube to see
what happens. (It doesn't help.) So when I finally got a long put off boat
building project done she christened the new craft "Swamp Thing", as in "If
you're not careful you're going to swamp that thing!"