A pod of dolphins have taken up residence off the southern coast of
the Boso Peninsula, Yamazaki said, and showed me the pictures. They were
underwater shots of bottlenose dolphins, taken by a kayaker.
Underwater shots? Yes. He'd find the dolphins, usually only a kilometer or
so offshore. Then he'd capsize the kayak, take his photos, and eskimo roll
upright again. Simple.
I was intrigued.
Now, I've been a sailor for more than three decades, but I didn't take up
diving or skiing until I turned 50. Ok, so I'm 58, so why not become a
kayaker? All I need is a kayak.
 Right.
But that's how my mind works.
A quick tour of kayak shops showed me that FRP and carbon fiber boats were
anywhere from $2,000 to $5,000 each. So I decided to make one. As it was,
I got things backwards. I'd had good luck with Glen-L boat designs in the
past, so I checked out their website for kayaks. There it was, Seakayak.
Unfortunately, marine plywood is not a domestic product here in Japan, and
a 4 mm imported sheet costs nearly $100. So I decided to order the
Seakayak kit from Glen-L.
Only after the ordering was done did I get three books of kayak building.
Had I gotten the books in advance, I may have opted for Chesapeake Light
Craft, but that's spilt milk.
With the kit on its way, I went to the System Three website for epoxy,
gloves, stir sticks, fiberglass tape and cloth, and the other miscellany I
needed.
 The ingredients arrived en masse. First the seakayak kit, in two boxes.
Then the epoxy stuff from System Three.
The ingredients arrived en masse. First the seakayak kit, in two boxes.
Then the epoxy stuff from System Three.
I have no covered space at my tiny home, so I coerced a good friend into
letting my build the seakayak in his garage-storeroom. If we built it
cattycornered, the 17-foot kayak would fit.
Tetsu and I used the box the kit came in as a table, setting it up on some
boxes. We laid out all the plywood parts and commenced giving the two
coats of thinned epoxy each. (Why thinned epoxy? Ordinarily, if I had been
living in the U.S., I would have used System Three's Clear Coat epoxy, but
because it is toxic, it cannot be shipped by air to Japan. Talking to
System Three about the problem, they suggested that we thin the regular
epoxy out with 10% lacquer thinner to get a similar penetration to the
thin Clear Coat.)
We started this process as the winter began, so whenever we used epoxy, we
had to leave it for 24 hours to cure. Talk about slow work. Turned out OK,
though, because I would stop by the garage early in the morning before
work and slap on some epoxy (dressing up in a Tyvek suit so I got no epoxy
on my clothes). Next morning when I arrived, the job would be cured.
 After the plywood parts had their epoxy coats, we used butt blocks to join
the side planks and bottom planks. At last, we could start sewing the
kayak together.
After the plywood parts had their epoxy coats, we used butt blocks to join
the side planks and bottom planks. At last, we could start sewing the
kayak together.
Well, almost. First we had to drill a bunch of holes in the planks. Actual
stitching took only a couple of hours.
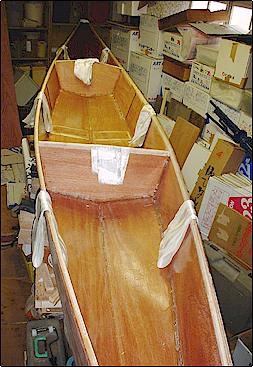
Viola. The seakayak suddenly looked like a boat instead of a pile of
epoxy-coated plywood.
Actually, it reminded me of Frankenstein's monster, all stitched up with
copper wire like it was.
Isn't it funny how you want to get out on the ocean the moment there's a
boat in front of you? So what if it's just stitched together. So Tetsu and
I decided we'd better take kayaking lessons.
The very next Saturday saw us on the beach at Hayama, sun shining in a
cold blue sky with a wind chill that felt like thirteen degrees below
freezing. But we stuck it out, learned how to paddle, strived to keep the
kayaks from tipping over in the cold water, and found out that even
novices can paddle these slim crafts through good-sized waves without
capsizing. We went back to building with renewed fervor.
 Time
to glue the hull together. We thickened the epoxy with cotton fibers and
shoveled it into a plastic bag that we'd clipped a corner out of. Tetsu
squeezed the thick epoxy mix into the joints and I came along with a
tongue depressor and rounded out the fillets. Then, once the fillets had
cured, we could pull out the copper wire and smooth down the fillets,
readying them for taping. Time
to glue the hull together. We thickened the epoxy with cotton fibers and
shoveled it into a plastic bag that we'd clipped a corner out of. Tetsu
squeezed the thick epoxy mix into the joints and I came along with a
tongue depressor and rounded out the fillets. Then, once the fillets had
cured, we could pull out the copper wire and smooth down the fillets,
readying them for taping.
At this point, we installed three-quarter inch carlins along the sheer and
glued some of the same stock across the tops of the bulkheads where the
decks would lay.
I cut a bunch of 4-inch glass tape and laid it over the kayak, ready to
install. With a paper cup of epoxy in hand, I painted a length of seam,
then laid the fiberglass tape over that, and wet it down with more epoxy.
I worked down one side; Tetsu took the other. Between the two of us, the
hull and bulkhead joints were taped and epoxied in just over half a day.
Progress.
Time to get more supplies. This time I went to the Chesapeake Light Craft
website and ordered yellow and red paint, high solid primer, a block of
closed cell foam, a kayak seat, a back pad, and two bronze pad eyes for
bow and stern.
 We
turned the kayak over and taped the outside seams with two layers of
4-inch tape, offset so each layer overlapped the joint by one inch. We
gave those seams three coats of epoxy, building up enough so sanding would
eliminate the tape shoulders. Worked pretty well. We
turned the kayak over and taped the outside seams with two layers of
4-inch tape, offset so each layer overlapped the joint by one inch. We
gave those seams three coats of epoxy, building up enough so sanding would
eliminate the tape shoulders. Worked pretty well.
We moved the hull outside for the sand-down. There was a slight breeze
blowing, so we didn't get too prickly. And we both wore Tyvek suits,
surgical gloves, and face masks.
Back inside, the hull was ready for its covering of 6 oz. fiberglass
cloth. That was a job, but somehow we got it done without many wrinkles.
Actually, instead of trying to drape the whole hull at once, we did half
at a time, lapping the centerline by about three inches with right and
left layers. Seemed easier to control that way.
Once again, three coats of epoxy along with interim sanding to smooth the
hull out.
As this boat is a personal kayak, I put an additional bulkhead of
closed-cell foam at the forward end of the cockpit, measuring my own leg
length to decide where to place the bulkhead. So, Adelante (as the kayak
was later named) now has a watertight space between the forward bulkhead
and the foam bulkhead, a kind of insurance policy, I suppose. Other than
this, there is no watertight space in the entire kayak, as both bow and
stern have access hatches.
 Bulkhead installed, we place the decks--three large pieces of plywood.
Spring arrives. Work speed increases. But still, it takes until late May
to get the finishing touches complete.
Bulkhead installed, we place the decks--three large pieces of plywood.
Spring arrives. Work speed increases. But still, it takes until late May
to get the finishing touches complete.
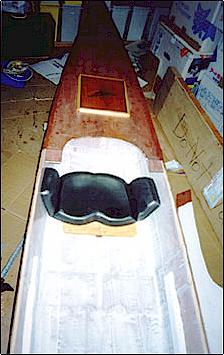
Even after the cockpit coaming is on and epoxied, we still have to install
the seat and the backrest and the hatch cover straps and the . . . it
seems to take forever.
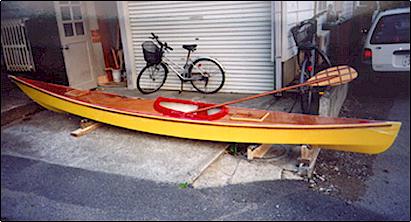
But in the end, Adelante turned out to be an eye catcher. Yellow hull with
red trim and natural wood decks. Lauan rubrails, epoxied and varnished,
with their bronze screws visible, add a bit of character to the craft.
Black webbing to hold down the hatches, deck lines, and shock cord webs.
Black circumference deck line, yellow tow line . . . the list goes on. But
perhaps the crowning feature is the inlaid stern hatch cover, which
features my personal logomark, a singing humpback whale, which my friend
Rick the Mouseherder (www.mouseherder.com)
calls the Wailing Whale. Rick made the Adelante name graphics for the
kayak.

Adelante cruises along the Miura and Boso peninsulas around Tokyo
Bay in Japan, but she has yet to see a dolphin. And I have yet to master
the Eskimo roll.
# # # |

