| I was caught, like a fly in a spider web, in a trap of my own
devising. I was determined to escape. So of course, I decided to build a
boat. Let me explain. At age 48, I had a good job and many
responsibilities. Too many responsibilities and I longed to get away at
times, even if just for a few hours, to claim a life. Somehow, sailing a
boat came to be the focus of that longing, the vehicle for a temporary
escape from the pressures of the rat race, a magic carpet on which to ride
the waters of Puget Sound.
I resisted actually buying a sailboat for a number of reasons. First
there was the expense, a commitment not only to paying for the boat, but
also slip fees and maintenance. It seemed an expensive proposition. There
was also the fact that whenever I visited the local marinas, I noticed
that most boats never left the dock. I just wasn’t sure I wanted to pay
for moorage and have my boat sit there unused. The boat owners I knew had
difficulty getting family and friends to come along on a sail. Whatever
the causes, so many beautiful sailboats were relegated to
on-the-water-condo status. I was cautious and I needed to learn more.
So I joined a sailing club in Seattle. There I learned to sail on
bigger boats, typically 30 to 36 foot Catalinas. But these boats seemed a
bit like seagoing Winnebagos to me. And sailing in Shilshole Bay struck me
as redundant. Over time I became a convert to the small is beautiful
movement. I wanted a small boat that could be trailered around to various
spots and sailed on thin water, away from the hustle and bustle of big
marinas and busy waterways. But I still wasn’t ready to buy a boat.
That’s when I came across the Instant Boat books. I read and re-read
these books. This seemed to be the solution to my problem! I would build a
simple and elegant boat that I could sail around my local waters or take
anywhere to explore new bodies of water. Perfect! Except for one nagging
problem. I had no tools and absolutely no skills as a builder of anything.
Now I know some first time boat builders are humble about their skills.
This was not the case with me. I’m not exaggerating my lack of ability. I
measure once and cut twice every time. No concept is so simple I can’t
complicate it. I cannot cut straight. This is not an exaggeration. I am
spatially challenged. I can’t follow plans. And yet I became determined to
build a boat. I felt I was being directed by some primal force. Building a
boat myself came to symbolize independence and self-sufficiency. Like
thousands of men and women before me, through long history, I would build
my boat and sail away to distant shores!
Who would have guessed that the next step would be so challenging,
namely, selecting a boat to build? I have to admit I spent many hours in
sweet agony trying to decide which instant boat to construct. For whatever
reason, I eliminated the tiny boats. At the time I probably thought they
were not real boats and the building of one would seem more like building
a model or a toy. Looking back, I think I was wrong. Building a Brick
might have been the best choice for a fast learning experience. But at the
time, I wanted to build something more substantial. Finally, it came down
to Zephyr or Surf or Windsprint. I think I ended up choosing Windsprint
because of the pictures and description of it in the New Instant Boats
book. Whatever the reasons, I chose Windsprint and ordered the plans.
When the plans arrived, I got my first shock. All that was included
was a bigger picture of the plans than was in the book and single sheet of
numbered instructions, clearly meant for people who already knew what they
were doing! I needed something more basic. Instead of plans that stated,
for example, “Cut sides out from plywood according to plan,” I needed
advice on how to cut a straight-line for eight feet. This idea of building
a boat on my own was going to be far more challenging than I even
imagined.
First, I went to a local lumberyard and hardware store where I could
buy some marine grade plywood. I had the lumberman slice the sheets into
the long panels, which would become the hull. These were the first cuts to
be made to form my Windsprint.
The next impossible task, as I recall, was to join the various
pieces of plywood with butt blocks. The concept is to join two pieces of
plywood at the edges by overlapping a small piece of plywood over the
joint, gluing the pieces and holding that together until the glue dries. I
believe this is easier if you have a wooden floor into which you can pound
nails or drive screws through the whole joint and leave it until it dries.
Then you can remove the screws and fill in the holes or clinch over the
nails or even grind them off. Somehow I got the panels joined. Still, as
other home boat builders have opined, butt joints are a necessary evil.
Speaking of glue, I used Weldwood as recommended by Payson in
Instant Boats, but I also used epoxy. Unfortunately, it turned out I’m
allergic to epoxy. My face swelled up to the point of almost closing my
eyes. I looked like Quasimoto the boat builder. This discovery has
impacted all my boat building, since I try to avoid epoxy at all costs.
Back to building Windsprint, the next step was to slice two by fours into
gunwales and chines. As was customary in my boat building approach, I did
this all wrong and with much greater difficulty than necessary. First, I
borrowed a table saw. Then I set the blade at the correct angle and
proceeded to push the lumber through, quickly grinding to a halt because
the long pieces kept binding and I had no roller stands (honestly, at the
time I didn’t know from roller stands). Instead, I enlisted the help of
neighbors who acted as roller stands and eventually I got out some useable
pieces. Today I would simply use my circular saw, set to the correct angle
and depth, attach the guide and quickly and easily rip long pieces out of
stock. But this is now and that was then.
Molds, or temporary bulkheads were next. I drew these on plywood,
cut them out as best I could and then added the stock. I don’t know if I
got the bevels right. It remains a mystery to me which side of the bevel
the plywood goes, or whether the plywood edge needs to be beveled. The
funny thing about the molds I made for my Windsprint is I used those
bronze ring nails to fasten the plywood to the stock and I never could get
them apart. They were the sturdiest part of the construction! Next, the
directions say to “stand sides on edge bottom up and tack mid mold in
place.” This step is fraught with problems for the neophyte. I had no idea
what tack meant. Or how to hold the sides upright along with the mold and
attach them. Finally I settled on screwing the sides to the mold using
drywall screws after first drilling pilot holes. It worked. Ditto for the
two other molds.
Windsprint is a double ender and requires both a stem and stern
piece, each piece angled to accommodate the sides of the boat where they
join at each end. There are no directions for how to do this. I think you
just look at the plan and come up with something. Here is what I came up
with: I drew the shape of the stem piece on the edge of a suitable two by
four and then laid that up on my borrowed table saw and adjusted the blade
to copy the angle drawn on the piece. This was a bold step because, if you
look at the plans in “Build the New Instant Boats” you’ll find that both
pieces are supposed to be one and five eighth inches deep. Uh, that would
be one-eighth inches deeper than a two by four. All I can tell you is my
boat floats, apparently I could get by with stem and stern pieces one
eighth of an inch undersized.
For reasons totally unclear to me, I had no problem whatsoever
bringing the ends together then gluing and screwing them fast. The hull
came out straight with no twists that I could tell. Suddenly, my work
looked like a boat!
The chine logs did not go on as easily. For one thing, I discovered
I did not own enough clamps to hold the chines in place. I ended up
screwing the chines to the sides, later removing the screws and filling
the holes. As I tell my friends and neighbors who ask about my boat
building experience, it’s all about clamps. No matter what I go to the
hardware store for, I pick up a clamp.
I used half-inch marine plywood for the bottom of my Windsprint even
though the plans call for quarter inch. I did this on the advice of
another builder, John Bell, and I’m glad I did. It has made for a pretty
sturdy boat. The bottom went on fairly easily. I ground the overhang of
the bottom down with a coarse sandpaper disk on my drill. Turned out real
nice. I believe I had a neighbor come over and paint the edges of the
plywood pieces with epoxy. I know he painted my dagger board and rudder
pieces with epoxy. I hoped this would make the plywood less susceptible to
absorbing water and rotting out.
I turned the boat over and started putting on gunwales. What a
thankless job! I only installed two courses, although the plans called for
three. By the way, how are you supposed to finish the gunwales and chines,
at both ends of the boat? The instructions are rather silent on this. They
say, “Turn boat right side up and put on rails.” I cut the ends off at an
angle and planed them down to almost blend in with the sides. I had some
difficulty getting the ends of the gunwale or chine log to curve in at the
stem and stern. Since then, I have seen examples of gunwales built by
laminating much thinner pieces of wood together. You can do this if you
have enough clamps. This will allow you to secure the pieces snugly to the
curve and then trim them off square at the end before shaping. I know,
most of you are saying, “Why didn’t you do that in the first place?”
It was at this point that I started to modify Windsprint a little. I
decided to deck over the fore and aft ends of the boat. I did this because
I so admire the look of a decked over boat and, I thought to myself, the
result would be a drier, more capsize resistant boat. That turned out to
be not true. I won’t go into what it took to do this, but you may be able
to see from the pictures something of how I did it. Decking over the boat
changed the mast partners configuration and the dagger board case.
I never did understand from the plans how to build the case. As it
was, I simply built a box the correct size and mounted it to the bottom of
the boat and to the side rail. I epoxied this in, which cost me some
allergic reaction, but it had to be done. Cutting a hole in the bottom of
the boat was traumatic for me. Think about it. As a measure once, cut
twice kind of shipwright, I had a better than even chance of ruining the
whole project right there. Of course I measured the thing about fifty
times, drew around the outside of the case and measured off the inside
dimensions then drilled holes at either end and cut out the slot with my
jig saw. It came out perfect! To this day the dagger board case has not
sprung a leak.
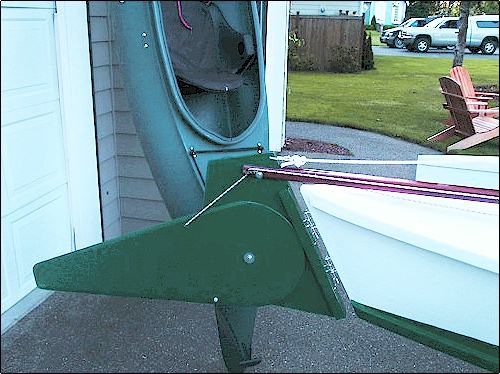
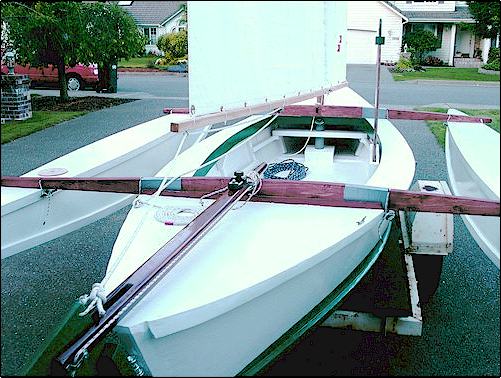
Next came the rudder and dagger board. I’m happy to report these
were fairly easy to do. One thing that helped was the fact I used
half-inch marine plywood left over from the bottom, so I didn’t have to
put two halves together. I again used a course sandpaper disk mounted to
my drill to shape the edges of both the dagger board and the rudder. This
worked well and went pretty quick. I designed in a handle on the dagger
board that works real well and the rudder has some strings on it that I
use to raise it up or keep it down. The tiller is a work of art. Well if
not art, it looks and feels nice. Of course it isn’t curved but it is
stained and varnished. It feels good in my hand.
I never did figure out Payson eyes to attach the rudder to the
sternpost, so I used eye screws and bolts. It seems to work.
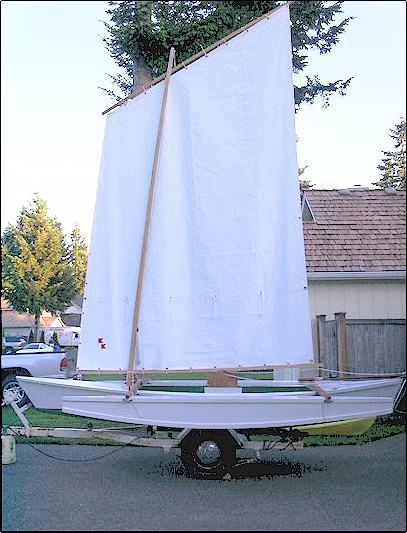
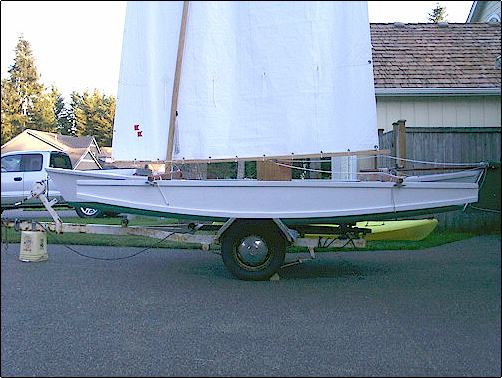
So, all I had left to do was the mast, paint the boat, add a sail,
oarlocks and oars. Ah, the mast. Unfortunately, I have never conquered
this part of boat building. Not to this day and not for lack of trying
mind you. My first attempt was to shape a mast out of a 4x4. I found a
nice piece at the lumberyard and went at it with my plane. Now this was a
laborious process, but it turned out to be a labor of love. The shavings
were to me a thing of beauty. The texture and grain of the wood mast
itself, as it took shape, seemed to come alive. But even as I worked on
it, the mast began to warp. To this day it lies out in my backyard next to
the fence, looking like a giant pool cue gone bad. I think someday I’ll be
able to use one end as a bowsprit.
My next mast came from a dead fir tree harvested out of the
greenbelt behind my house. In truth, I have a dozen masts out there, still
planted in the ground but dead from a terrible ice storm we had a few
years ago which killed off many of the young fir trees around here. They
literally broke off at the top from the weight of the ice. Anyway, I
debarked this tree, planed it down and I’ve actually used it. It works
pretty well, but it has some cracks and worm holes and knots where small
branches once stuck out. I never really finished this mast smooth or
treated it with any preservative. I always planned to build a mast and so
just kept this one handy. My next attempt at mast building came from an
idea that someone promoted on the Bolger e-mail group. This involved using
PVC pipe filled with wood. This actually worked okay, but produced a heavy
mast all of one size from top to bottom. When I later converted my
Windsprint to a lateen sail, I cut this mast down to ten feet and it
worked real well. My next attempt at a mast should have worked. I had some
nice cedar 2x4’s which I cut down to three inches and then glued together
with the grain running in opposite directions to impede warping. I don’t
know what I did wrong, but that glued together mast blank is crooked. I
never even went the next step with it. The funny thing is, I just came
into possession of a mast someone else made for a Bolger boat. It is from
a single piece of wood, it is nicely tapered and light. Along with it I
received a sprit and a Teal type sail. It has inspired me to build yet
another boat. But that is a story for another time. The point is, seeing
that mast close up, I know I could make one myself. But I have a goal in
mind: to build a hollow bird’s mouth mast. What an elegant solution for a
lightweight wooden mast!
I ordered a sail from someone back east. It is a beautiful, crisp
Dacron sail. I’ve got to tell you though, it is huge. Many of you have
seen pictures of Windsprints on the Internet and you see that big balanced
lugsail suspended from the yard and you have to wonder, how does that boat
hold up all that sail in a breeze? Well, forget about that for a moment.
The sail is so big is takes up the whole cockpit when you drop it. Between
the sail, the boom and the yard, it is very challenging to find room to
row the boat.
For the boom and yard I went with fir one and half by one and a
half. I haven’t trimmed them or treated them in any way, which is
something I should get around to doing someday. But I do have a clever way
to attach the sail to the spars. Perhaps I got this idea from someone
else, I honestly don’t remember, but I use wire ties. They work perfectly.
Cinch it up to just the right tension and trim it off. Perfect. I haven’t
had one break yet. They are inexpensive, easy to remove and of course,
individual sail ties have the advantage of being individual. If one does
break the whole sail does not come unattached from the spar.
Finally, I painted the boat. Now I like the term “work boat finish.”
I use this term to excuse the fact that my boat does not have a museum
quality finish. I didn’t enjoy sanding all that much. By the way, does
plywood sand down to a smooth finish, or do you apply ten coats of primer,
sanding between each coat? No matter for my boat. I put latex primer on it
then painted it with latex gloss enamel. One hundred percent acrylic.
Brushed on a couple of coats. I let it dry for a few weeks. This would
have driven me nuts, waiting to launch while the paint dried thoroughly,
but it took me a few weeks to find and buy a trailer. Finally, launch day
came.
How can I describe the mixture of emotions I felt as the boat I
built slid off the trailer and into the water? Excitement, pride, fear,
anxiety, uncertainty. Would it float? Would it tip over? To tell you the
truth, I don’t remember how I rigged the boat for sailing. I must have
gotten the sail up prior to pushing out into the lake. I do remember the
lake was mirror flat. There was literally no wind. My neighbor was with me
and we didn’t have much time and we were using his truck, so the initial
sail of my Windsprint was very limited. But there was one single puff of
wind. Just that one puff lifted my boat and moved it. It sailed for a
moment, easily, picking up momentum from just that little cat’s paw of
wind. It was like a down payment on all my hard work. My boat was a good
design and it responded to the elements! On other days I would learn a lot
more about my boat and how to sail it. But just that one little puff was
memorable.
I left the sail up and my neighbor rowed while I steered the boat
back to shore. We put it back on the trailer and went home. On another
occasion my neighbor videotaped the boat sailing on the lake at sunset. It
is a beautiful tape. It shows the boat tacking back and forth gracefully,
here and there picking up a puff and accelerating. All around the boat are
people whizzing by on jet skis. But the vision of a handmade wooden boat,
powered by sail, is strong enough to block out all the noise and exhaust
fumes and crisscrossing wakes, creating an almost transcendent picture of
wood, wind and water.
I have since taken Windsprint out for many hours of sailing, mostly
on the south Puget Sound. These are protected waters, with lots of room
for a daysailer. There are out of the way places where the water is thin
and motorized boats don’t come around much. My Windsprint doesn’t need
much wind to move her. A modest breeze makes for some very relaxed
sailing. It is a comfortable boat with lots on room on the bottom for
lolling around. One day I was able to lie back in the boat and watch the
sky pass overhead. Some days I would tack the boat back and forth just to
get out of the shade of the sail and catch a few rays of the sun.
Windsprint is a flat-bottomed boat so it pounds against waves and chop,
but heeling to about 15 degrees minimizes the pounding. At that point the
boat slices through the water quite nicely. The boat launches and
retrieves with no problems and it wasn’t too long before I got pretty good
at single-handedly launching the boat from shore, dropping the dagger
board, putting down the rudder and trimming sail in time to steer the boat
away from shore. Of course, this was at the lake or at a put in on the
Sound where there is no dock. From the dock, greater challenges would
arise, like maneuvering around other boats and having the wind blocked by
boats at moorage.
These days of sailing in light breezes were great for getting to
know the boat and really learning how to sail. But not all was perfect. I
learned right away that when there were not enough breezes to sail the
boat, it was almost impossible to lower the sail and row home. There is
just nowhere to put the sail, the boom and the yard. I also suspected that
Windsprint would be very difficult to bail out and re-enter in case of a
capsize. Other Windsprint owners cautioned that it is not if you capsize,
but when you do so. I later learned firsthand just how difficult this boat
is to handle after a dumping.
Because of these concerns, I decided to change Windsprint’s sail
plan to a more conservative one and I tried to beef up its flotation so it
would be easier to recover from a dunking. I chose to make a lateen sail
for my Windsprint based the dimensions of the Sunfish sail plan. I made
the sail out of polytarp. I cut the sides cambered to about three inches,
which built in some some fullness and draft and I got a very weatherly
sail out it. I ran it up on a shortened mast and it worked very well. The
lateen sail was about 75 square feet compared to the original 115 or so
square feet of the balanced lug sail Windsprint was designed for. But this
did not really solve my problem of being able to drop sail and row home or
to shore. Even the lateen sail, though smaller in size, has a boom and a
yard and can’t be cinched up while on the mast.
One thing I should mention right now about Windsprint. It is a great
rowing boat. It is easily driven and moves quickly and is efficiently. I
think pulling boats are measured against a benchmark of how far they will
glide on a single pull in calm water. I believe Windsprint would measure
up pretty well. So it would be desirable to be able to conveniently row
the boat at will, but that requires a solution for stowing the sail and
spars.
I think those of us who like to build these small unballasted boats
should concentrate some of our energy and creativity on inventing a sail
plan that is easily reefed and furled. I would think a good starting place
would be the patented system used on the Escape sailboats. These sail
plans employ a separate mast and boom and allow the sail to be furled
using a single line.
Early this spring I took my boat down to the boat launch and
prepared to go for a little sail. The wind was blowing pretty good, harder
than I had ever sailed in before but I thought it would be okay. In fact,
I never got sailing. I lost control of the boat at the dock and tipped it
over. To my dismay, it filled up completely with water. I had hoped that
the boat, if dumped, would rest on its side, but no way. Perhaps that is
because it is a double ender. The boat actually turned completely turtle.
From the dock I was able to turn the boat right side up and start the
bailing process. If I had been out in the water I don’t think I could have
done it. This unhappy event got me to thinking. To fully enjoy sailing, I
need more stability and peace of mind. I can’t be worrying about dumping
the boat because the mainsheet gets hung up or sudden gust knocks me over.
I DECIDE TO CONVERT WINDSPRINT
INTO A TRIMARAN
Why should I convert my boat to a trimaran? I am now convinced that
a better question is, “Why aren’t all boats trimarans?” I think the debate
about monohull and multihulls is a little like the use of chop sticks
versus a fork at a Chinese restaurant. Clearly, a fork is a more efficient
food delivery device, but chopsticks are traditional. Likewise, a trihull
is a more efficient form for supporting a sailing rig, but monohulls enjoy
the weight of tradition. Big monohulls, boasting large sail plans, are
ballasted to offset the force of the wind on the sails and prevent
knockdown, or worse, capsize. A capsized ballasted boat, which fills up
with water, sinks. Smaller, non-ballasted boats, such as my Windsprint,
depend on human ballast and a fast release of the sheet in a gust to
prevent capsizes. A boat like Windsprint does not sink when capsized, but
it does fill up with water, and becomes very difficult to bail out and
reenter.
Trimarans are faster than monohulls. This is because they can
support more sail area with less weight in the boat, and keep that area up
in stiffer breezes. A trimaran is a more stable platform to fish from, to
swim from and it is easier to reenter the boat from the water. So what are
the downsides to a tri? Well, you have to build three hulls instead of
one. Perhaps you can’t point as well. They are more challenging to trailer
than a monohull.
But I have to tell you this debate seemed pointless to me once I
experienced a small trimaran called the Windrider. These boats are like a
kayak with floats. I rented one out of Port Townsend, Wa. The main hull is
about 16 feet long and the wingspread is eleven feet. The floats are wave
piercing but other than that I don’t know too much about their shape. A
single sail of less than 100 sq. feet powers the boat. You sit in the boat
facing forward and use foot pedals to control the rudder. The mainsheet is
right in front of you rigged through a rotating fair lead and clam cleat.
The sail can be rolled up onto the mast. As soon as I got the boat onto
the water I was amazed at the feeling of stability and lightness afloat.
It was as if the boat was barely touching the water! The acceleration was
exhilarating. I knew right away this was the way to sail for me. Speed. No
worries. One is afforded the opportunity to take pictures or have a cup of
coffee, relax and enjoy the view. No impediments to cruising around in
thin water. You have the ability to beach the boat. The only drawbacks to
this boat are the lack of room for a passenger, the boat is made out of
plastic and it is a little ugly.
I knew right away I had to try and convert my Windsprint to a
trimaran. If it worked, I would have all the benefits of my Windsprint,
that is, a roomy cockpit, nice lines, light weight and wooden construction
plus the benefits of a tri, that is, stability and speed. Additional
advantages would be the ability to easily add a small outboard or electric
motor to the boat by mounting it on a connecting beam and I would be able
to drop sail and stow it and the spars outside of the main hull. I would
also have a small boat that I could stand in. This would allow for all
kinds of things you can’t do or do as easily on Windsprint as originally
designed.
Notice that I am confident that Windsprint as a trimaran will not
capsize. I think that confidence is justified for good reasons. First, I
am not planning on adding sail area nor will I be using a spinnaker. I do
not plan on going out to sea or anywhere that I’m likely to get
significant wave action. The floats will be sealed and fairly voluminous.
It will take a typhoon, I think, to knock this boat over or powerful wind
and wave action combined to “trip it.”
Let me walk you through the design issues. What size and shape
should the floats be? What building process would I use? How would I
attach the floats to the main hull? I’m assuming that the rudder I already
have will be adequate to steer the boat. I am also assuming that the
dagger board is adequate as designed, although it would be easy to make
the board longer if necessary.
Since Windsprint is 16 feet long, I decided to make the amas 12 feet
long. No science here at all. Just seems like enough. I made them a foot
square at the midsection, tapered to a point at both ends. The top is flat
and the bottom is radically rockered. In other words, I am using square
boat principles here. I realize that most catamarans are vee shaped on the
bottom, but the Aqua Cat is, according to its marketing materials, flat
bottomed. So I don’t think the form is problematic. I made the floats
“instant boat” style with exterior chine logs and gunwales.
I used quarter inch luan plywood for top, bottom and sides. To get
all the measurements, I drew the floats on two pieces of plywood laid down
end to end and drew the bottom. That gave me the angles for the stem and
stern pieces. Then I drew out a side by going a foot high then marking off
to six inches at either end. Halfway from each end to the middle I marked
off nine inches. Then I drove in some nails at those points and used a
batten to capture a fair curve. Then I cut out the first pieces and used
them as patterns for all the others. After cutting out all the pieces and
butt blocking them (I did no better this time than last time on this), I
then cut my stem and stern pieces on my table saw and attached them to one
panel. Next, I attached stock to the sides where the molds would be, In
essence, I just attached strips of wood a quarter inch apart where the
mold would go. When I assembled the sides I just slipped in the molds, cut
out from plywood, in the slots and drew the ends of the sides together.
Then I glued and clamped the ends together, but remember I already had the
stem and stern pieces attached on one side. Next I attached the chines and
gunwales to the sides. I used an air powered staple gun to do this ala
Greg Carlson. To get the chine log to take the curve, I kerfed it every 12
inches. This worked real well although it was a slight pain later on to
fill in the cracks with Bondo. Then it was just a matter of tracing the
bottom and tops, cutting them out, and butt blocking and attaching to the
boat. I must say having done all this once before made it much easier this
time around.
With the amas structurally complete, it was time to figure out how
to attach them to the main hull. I cut out a five-inch hole at both ends
of both floats to give me access to put in bolts, which is my first choice
for how to attach the beams to the amas. While I’m testing all this, I’ll
just put duct tape over the openings. Once I’m satisfied with how to
attach the floats to the beams, I’ll figure out some kind of hatch covers.
Speaking of the beams, I’m going to try 2x4’s. The total beam of the
boat is just 8 feet. The distance between the main hull and the float is
about 30” so there is a chance the beam can take the leverage. But it
won’t surprise me if a beam cracks at the point where it is bolted through
to the main hull. If that happens I’m going to look for a way to
permanently mount metal tubing of some kind on the main hull and on the
floats, then go with a connecting tube with a bolt through it at each end.
Because I’m not an engineer or a boat designer, I have some concerns
based on my ignorance of multihull design and construction. For example,
will there be a problem driving the hulls through the water? Will tacking
be problematic? Perhaps I’ll only be able to jibe. How far off the wind
will I have to sail? Because there is so much buoyancy in the floats, I
don’t think they will get driven under, so all the force will either
translate to forward motion or the mast will snap off or the beams will
snap. These questions will have to wait for sea trials to get answered.
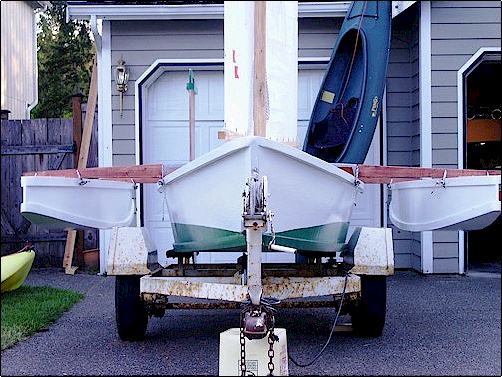
At last, it is Memorial Day weekend, 2002. I have finished the
conversion. Windsprint is now a trimaran! I lashed the akas to the main
hull and bolted them to the amas. The boat still fits on my trailer. I
took it down to nearby Black Lake and dropped her in the water with the
sail up. I readied the daggerboard, made sure the main sheet was not
fouled and pushed off. I picked up a tiny breeze coming in from the port
side and fell off a little, dropped the dagger board, pulled down on the
string that lowers the rudder and pulled in the sail. Basic beach cat
sailing, I think. Everything was going pretty good when I ran out of wind.
Turned out to be the calm before the storm, literally. A storm was coming
in from the west over hills surrounding the lake. The breeze freshened and
my new trimaran took off. Perfectly flat sailing with the whole sail up
and I was just boiling through the water. But I could tell it was
straining the boat. I headed for shore before the full storm arrived. Good
thing I did.
When I got the boat home I noticed that some separation had occurred
at the joint between the deck and gunwale on the port ama. I have no idea
what caused it. But, as I have suspected all along, the attachment of the
amas to the akas and the main hull is the most vulnerable spot on this
boat. Here is how I fixed it. First, I pried open the cracks and poured in
some glue. Next, I screwed down the deck into the gunwale. I covered it
all over with bondo and paint. I now attach the akas to the amas by
lashing, similar to what I’ve done with attaching the akas to the main
hull. This puts all the pressure on the gunwales of the ama instead of on
the deck.
A few more observations about how the boat acted on the water. The
wake from other boats is about the only source of waves on this small
lake. I was concerned that the wave action on the three hulls would be
problematic. In practice the main hull pounds just as if always does, but
the amas, because they are so narrow, seem to fair better. My other big
concern was that the akas would simply snap in two. This does not seem to
be the case, the akas held up just fine. I wasn’t sure how maneuverable
the boat would be, but I found I could tack quite easily in about 100
degrees. The original blades seem to be plenty to steer the boat and keep
her way.
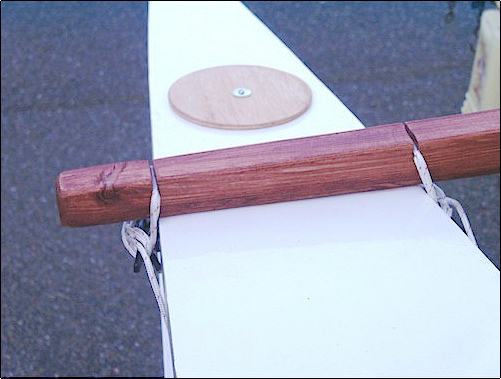
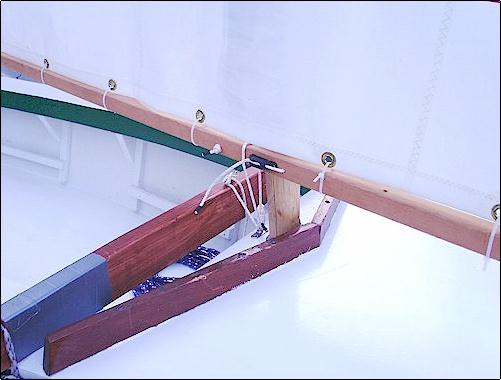
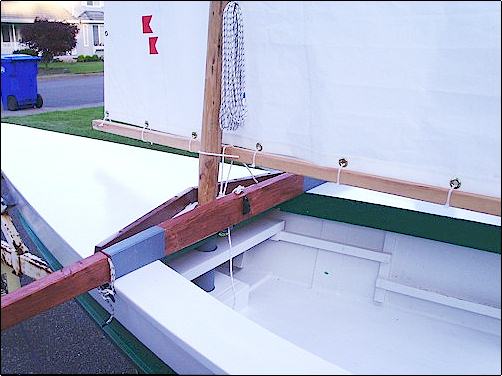
Here a few photos of the rigging details. The boom is held in place
next to the mast with a parrel, or line which I run to jam cleat. This
prevents the boom from pumping back and forth under in a breeze and also
keeps the sail from flying around when you first raise it. You can also
see a vang of sorts, which allows you to tension the luff of the sail
which is critical to achieving correct sail shape. I tie to pad eye
mounted on the deck just behind the mast, then loop over the boom, go back
through the pad eye and finally tie off to a cleat mounted on the aka.
Because the boat is now so stable, I will probably experiment with
different seating arrangements as alternatives to just lounging on the
floor of the boat. I also think an electric trolling motor mounted on the
aka would be the perfect auxiliary.
So I’m ready to do some real sailing in the Puget Sound this summer.
Hope you enjoyed the article. Please feel free to correspond to
Teakdeck@aol.com.
|

