“Start to Finish”
Part I
Regular readers of my column (which is not to
imply that those who don’t read it are irregular) have
doubtless noted my preference for 50’s and ‘60s
OMC products over other brands of outboard motors. This preference
is due to the ready availability of many replacement parts,
the need for few specialized tools, and the quantities of these
outboards that were sold and which still exist.
All of this was covered in my old Duckworks article,
“Primer
on Old Outboards".
Over the past several months, the focus of this
column has been on individual areas of these outboards; i.e.
the magneto, the carburetor, etc. Although there is still much
to these engines that has yet to be covered, I have decided
that we have reached a point where we can look at what it actually
takes to get one of these old engines running. This column will
be the first of (4) columns dealing with this one particular
engine
This series of columns will show exactly what
I do to an engine that I intend to run on my own boats, from
start
to finish..
I made a decision that the engine I chose would
be the subject of this series of columns regardless of the outcome.
i.e. if the engine turned out to have hidden major damage and
was basically “un runnable,” I would not go grab
another engine off the rack and start anew. Instead, you, the
readers, would be informed that the engine is junk
What ever happens will be reported.
First came “Reality TV;”
Now, “Reality Column”
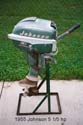
The outboard that I choose to be the subject (victim?)
is a 1955 Johnson Model CD-12, 5 ½ hp. The 5 ½
was manufactured from 1954, I believe, until about 1965, when
it was replaced with a “low profile” 6 hp There
were many thousands of these engines made and the old outboard
hunter is sure to run across a few. It is the smallest old OMC
that features a full forward-neutral-reverse gearshift.
This particular engine was found about 2 years
ago in the back of a boat dealer’s workshop. someone had
brought it into the shop, after it had lain unused for many
years, and wanted an estimate as to how much money would be
needed to “get it running.” I don’t know what
the estimate was, but the owner left his engine at the dealership
and the work was never done.
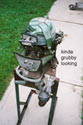
When I ran across this engine, I noted that it
appeared complete; no missing knobs or cowlings or other pieces.
Pulling the starter rope showed the engine to not be “locked-up”
and a nice “thunk thunk” noise seemed to indicate
good compression. I bought the engine from the dealer for $50.00
and took it home where it sat on a rack for about (2) years.
When I decided that I needed a bigger auxiliary engine for my
AF4
than the 3 hp Johnson I had been using, as well as needing a
subject engine for my column, the 5 ½ was moved to the
front of the “projects” waiting list.
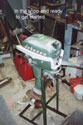
On a Sunday afternoon, I returned from rowing
the Oracle
rowboat at about 4:00 pm, and began to wash the boat as I always
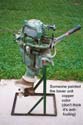
do. After I was finished with the boat, the Johnson 5 ½
was moved outside the shop and mounted on a stand for de-greasing.
I find it rather
unpleasant to work on a greasy, grimy outboard, and often damage
can be hidden by 50 years-accumulation of crud.
There are numerous cleaners/ degreasers on the
market, but here is what I use; If I do not care about the existing
paint and decals on an outboard, I use straight Castrol Superclean,
which is available in the automotive department at Wal-mart
for about 7 bucks per gallon jug. I fill a portable spray bottle
with the cleaner and begin to soak the engine with the stuff
Cowlings are removed as necessary in order to get to the grease.
Once the entire engine is soaked, I will allow if to sit a while,
as I use a toothbrush to scrub corners and hard-to-reach places.
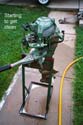
After sitting a while, I will rinse the engine off with the
garden hose, at which point those areas that require further
cleaning will be evident. As most shampoo bottles say, “repeat
as necessary.”
Of course, when one is soaking and rinsing one’s
outboard, it pays to keep the water out of the inside of the
engine. Put the choke in the “on” position, and
put the engine on the highest tilt-pin setting so that anything
that enters the carb. throat will flow back out. Make sure the
sparkplugs have their gaskets, and that the plugs are tight.
Avoid spraying up into the magneto or directly at the carb air
intakes.
Now, if you want to preserve your paint and/ or
decals, be aware that full strength SuperClean will ruin both.
In this case it pays to start with something mild like dish
soap and see if stronger cleaners are needed. I have had to
go as far as to use “easy-off’ oven cleaner in an
attempt to remove years of ‘baked-on” grease on
exhaust components of outboards.
The decals and paint on the cowling of the Johnson
5 ½ were far from “perfect” but I decided
to save them anyway. I simply removed the cowling and set it
aside for later cleaning with mild soap.
For the rest of the engine, a mix of 1/3rd degreaser,
1/3rd dish soap, and 1/3rd hot water seemed to work well.
After repeating as necessary, the engine was put
back in the shop to drip dry.
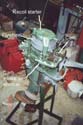
After work, on Monday evening, I began the actual wok on the
little Johnson. I removed the cowling and then the recoil starter
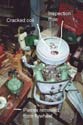
so as to gain access to the inspection port in the flywheel.
I had my suspicions as to what ailed the motor when the owner
had brought it into the shop for an estimate, and I was proven
correct. Through the inspection hole in the flywheel I could
see two cracked magneto coils.
If there is a universal weakness among OMC outboards
of up to 40 hp, built from about 1951 until the late 1960’s,
it is the magneto coils. They always crack and go bad, without
exception. If they have not been replaced, they will need to
be replaced. Without exception.
The silver lining to this dark cloud is that the
coils are readily available new at reasonable prices, and can
even be found used. Replacing them requires removing the flywheel.
A further silver lining is that it is easy to
check the coils, and their condition can be used as bargaining
leverage when making a deal to purchase a motor.
Nearly all OMC outboards of this time period and
under 40 hp, have three threaded holes in the top of the flywheel
for a flywheel puller. These same three holes, in the earlier
engines, are also used to attach a piece of the recoil starter
to the flywheel. While removing this piece I
noted, but thought little about, the fact that one of the three
screws for this part was missing.
The flywheel puller that I use is actually a cheap
harmonic balancer puller, made in China and purchased several
years ago for about 10 dollars. It has three bolts which thread
into the three threaded holes in the flywheel, and a large threaded
center mandrel which bears against the top of the crankshaft
which protrudes above the flywheel once the flywheel nut is
removed. I prefer not to totally remove the nut, but instead
to slack it off but leave it on the crankshaft to help support
the crankshaft. If the crankshaft is damaged in the process
of removing the flywheel, the engine becomes a “parts
engine.”
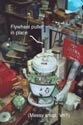
I installed the puller and began to tighten the
center mandrel screw, taking care not to allow the flywheel
to turn - if the three bolts threaded into the flywheel were
threaded in so far as to extend below the flywheel, allowing
the flywheel to turn might damage something inside the magneto.
As I tightened the puller, I noticed something
I did not want to see: one of the three bolts was pulling up
out of it’s hole; the threads in one of the three flywheel
holes was stripped. Remember the missing screw for the recoil
starter piece?
In over 10 years of working on old outboards,
this was only the second time I had found one of these holes
stripped.
With only two holes useable, the puller was not
going to remove that flywheel
On to Part II
Later