|
|
Back from the Dead
by David "Shorty" Routh
I was a used sailboat dealer, and one of the things I would do to find boats to resell is I would walk around boat storage lots and write down the hull numbers of boats that had a green coating of slime on them. Anything with plant life growing from the cockpit was expecially obvious, and needing a new owner. With my boat dealer license, I could call the state and they would give me the owners information, which I would call and ask if they were interested in selling their boat. One boat I was looking at happened to be owned by the Boyscouts, and when I called on it, I got to know the head of the scout's boat program. He and I would BS on the phone for long periods talking about all sorts of stuff, very friendly guy to talk with. So back to the matter at hand, I was trying to buy a sailboat from him when he mentioned a bone yard of boats he had at a camp only a few minutes up the road from me.
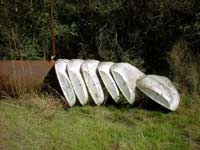
| I headed up there and found a good stockpile of a variety of boats, and off in a corner was this stack of Holder 12's. Each hull had been completely stripped, and each had either holes in them, or various states of repairs. Called my new friend the next day and talked about buying a couple of the other boats for resale, and then mentioned the pile of Holder 12's. |
|

He said don't worry about them, a couple of volunteers were going to take them to the dump soon, so if they are in the way, just do whatever to get them moved. Do whatever? Hey, how about if I take them home? What on earth would you want with those? I explained that while there was no way I could fix them up for a profit, they would be fun to fix and use as personal boats, and I had a couple of friends that might be interested in them. So with great joy, he said I was welcome to haul out the trash for him.
|
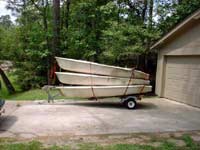
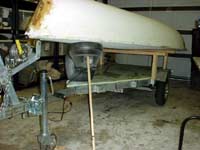
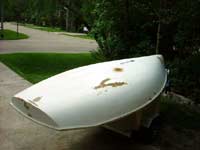
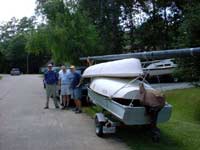
| I looked over the set of 6 hulls and determined that 1 was in excellent shape, 2 were in fair shape and only needed minor cosmetic repairs, 2 were pretty bad, and 1 was a total junker. So I grabbed the 3 good ones and headed back home. Kinda funny how they stacked so well, even so I stuck to the back roads and never went over 45 mph. |
|
 I power washed the 3 hulls, took some pics and emailed my friends. I was making a swap with a friend of mine, he was giving me another boat, and I was giving him a couple of masts. I also gave him 2 of the good hulls, one of which he took home and immediately sold for $50 like it was! He fixed up the other hull and sailed it around a little, then sold it too. So I had my pick of the litter still, and was fixing it up when a land-lubber friend asked me if I knew where to get a cheap or free boat. Part of me wanted to plead ignorance, but the other part knew that if I didn't get her a boat, then she wouldn't have one, so I gave her the pick of the litter. That is OK... there are still 3 hulls left, and with a little work, they will all come back to life - because fiberglass hulls really do last forever. The only ones that don't come back to life have been thru a blender, and even those have hope.
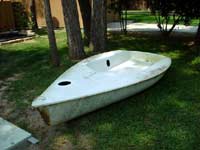
So back to the bone yard for the others, and another slow trip home. Immediately after getting back, another friend wanted a free hull hearing about the others, so now I was down to 2 hulls left, the junker, and the complete junker. And can you guess what happened next? Another friend said "that sure is a nice looking hull....", and now I was down to one, the complete junker.
|
I already had an idea for some of the stuff I was going to do with her, so I cut open a couple of places to install deckplates.
|
|
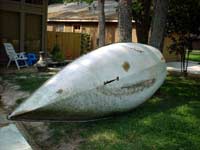 |
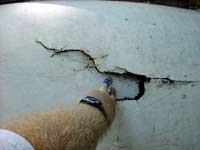
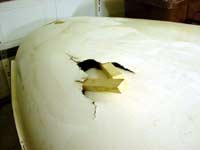
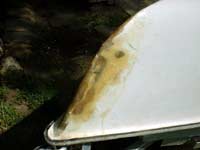
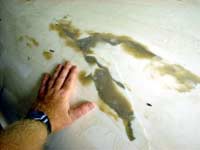
Looks like someone had done a couple of repairs on her previously, but that large hole looks like the cause of her ending up in the bone pile. |
| Whew that is a big hole, I could get my entire arm in there. Lucky for me that all the pieces are there, I just have to patch back up the cracks. |
|
|
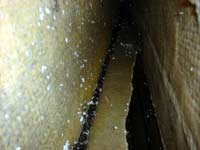
Before I could start repairs, I cleaned the hull and started drying out the interior. |
| The sticks are to help the airflow come out the hole, and hopefully dry out the area so the epoxy will stick to it. |
|
| |
Inside the hull I found that the supports between the cockpit and the bottom of the hull had been crushed. Probably from lots of kids jumping into the cockpit. |
The daggerboard trunk was cracked on both ends, so I sanded it down pretty good and glassed in both ends again. I used several laters of glass with filler over top.
|
|
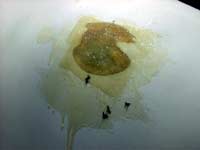
Next was that big hole. I had a couple of options -- first idea was to make a backup plate (from fiberglass) and put it inside, then pull on it with strings while sandwiching thickened epoxy so it would adhere to the inside of the hull. This is the more common method for fixing this type of problem, but this hole was on the bottom where nobody would be looking, and I didn't want to take all that time, so I went with an external repair instead.
First sanded down the edges, and pulled them together so they held the basic shape of the outside of the hull. I then put a few small dabs of thickened epoxy to sort of "tack" them into place, like welders do. After that cured, I could really goop on the thickened epoxy to fill the entire area. (this pic is of the big gooping of epoxy, before sanding).
|
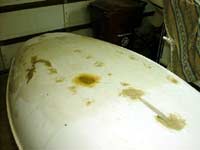
I also filled in other parts of the hull that needed it, then sanded everything down.
|
|
| |
The bow has had a number of previous repairs, I added to it by sanding and then adding a couple layers of fiberglass. Looks horrible here because you can see all the other repairs below, but after I sanded it and painted, it really looked (and was) solid. Much stronger than the original bow. |
Here is a repair done in a hurry, I should have cleaned up the drips but had to leave it right after application. Several love bugs are trying to imoralize themselves by swimming in the epoxy, obviously they watched Jurrasic Park too many times. Came right off on the next sanding pass...
|
|
I did a few things and forgot to take pictures. The interior support was bugging me, there was a ton of flex when I sat in the cockpit. I wanted to do something to support it so I wouldn't be damaging the hull more every time I bounced up and down in her, so I decided to foam between the cockpit and the hull.
You can see a series of holes, there are 3 rows of them. I drilled these in the hull and then poured in self expanding foam. This foam then expanded and made a perfect support, it was very solid to sit on. Another round of filling in holes and sanding.
Finally I put a layer of fiberglass on the entire bottom which starts just aft of the trunk and goes to 6" from the stern.
|
Extra layers of glass over the big hole.
|
|
| |
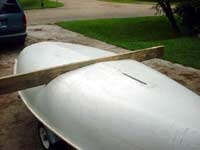
Many boats see their roughest time on the trailer. As they bounce down the road, if their trailer bunks aren't supporting the boat correctly, it can damage the hull pretty bad. |
For this hull, I am making a curved bunk board that goes cross wise and will support the hull all the way across. I first setup the trailer so I knew exactly where the board would be crossing the hull.
|
|
| |
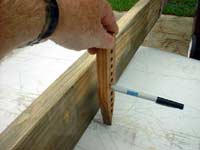
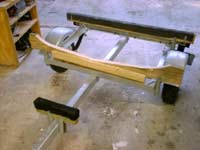
This tool has a real name, can't remember what it is, I call it an "offset tool". I mark the curve onto the bunk board by pulling the stick and pen from side to side, as the point of the stick makes contact with the hull, the pen makes contact with the board, only offset by a couple of inches. |
Would you look at how well that cut matches the hull ? I once cut a perfect curve in a piece of plywood to fit around my toilet. That was a much tougher curve to match, and tighter spacing.
|
|
| |
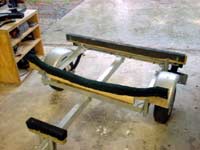
The bottom of the bunk board was a little on the thin side, so I laminated another board to the bottom of it, and on both sides.
|
Cover it with some indoor / outdoor carpet, and we are ready for a cushy ride to the next boat ramp.
|
|
The first trip out was as a row boat. I installed a set of oarlocks, put an umbrella in the mast step hole, and we went rowing. The girls really loved it, and we went rowing often.
I saw in the old advertisements that this boat was sold as a "family daysailor", said something about "take the wife and kids...". So hey, I saw it in print, so it must be true right? I took my wife and both kids a number of times, and while we were all cozy together, we realy could all fit in there, it was fun! Sure was a lot more space than when I took us all on my Splash II kayak, and we all fit in there fine too.
|
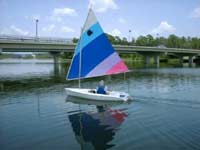
The first sail rig was a sunfish lateen. The original holder was specified to have 60 sqft, and the sunfish sail is more like 80. It worked great.
|
|
| |
Took lots of trips in her, this is a wrecked shriper I sailed past at Palacios.
|
Ahhh.... doesn't get any better than this. (look up at sky, hope for swedish bikini team to parachute in with some beer...)
|
|
|
|
|