Of Mice and Boys
by Kellan Hatch
Part 1
Assembling the Fleet
(click images for larger views)
|
 |
|
Inspiration
I guess it was the realization that kids like to actually be DOING something when they’re in a boat. And the fact that you can only pack so many people comfortably into a cartoppable craft. Anyway, it was like a bolt out of the blue; the boys could build their OWN boats! We’d have our own little armada, a boat for Mom and Dad on the roof rack and a micro-micro-yacht for each of The Guys stuffed into the Tundra’s camper shell.
And that became the number-one criterion for selecting a design: it had to be small. Not a toy, but small. But also as stable, buoyant and safe as you could make a pint-sized craft.
This would be our big winter project. Evan (age 11) and Elliot (age 9) were to do as much of the work as possible, but all under Dad’s careful supervision. Mom would sew the sails. A real family project.
I scoured the web and did a lot of corresponding before I narrowed the field to a few boats that I thought a couple of (heavily supervised) kids could build – designs that would sail well enough for the family fleet to have some really ripping pirate adventures. I huddled the boys around the computer and presented my accumulated photos and plans. The overwhelming consensus was “Mouseboat!”
The Mouseboat is the brainchild of Gavin Atkin, who generously provides the plans free of charge. It’s a very simple design that continues to surprise builders with how well it exceeds its humble purpose.
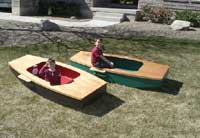
There are many varieties of Mice. There’s your basic Mouse – a small but stable pram for paddling, which seems to have caught on as much as an entry level grown-up’s boat as a kid’s boat. Then there’s its sailing cousin, the Flying Mouse. There are also Oarmice, Cruising Mice, Peddle Mice… it never ends. Now Gavin’s even designed a capsule-boat microcruiser named the Pocket Mouse. The Hot Rat, a larger sailing mouse was very attractive, but in favor of simplicity and size we settled on the 8-foot Flying Mouse. Or at least, our version of it. We call it the Mighty Mouse after the cartoon character, who is, of course a flying mouse, but more pumped than your average flying mouse.
Designers hate it; amateur boatbuilders can’t leave good enough alone. The original Flying Mouse is mostly decked-over with just a small foot well. I wanted a boat with a cockpit, where the boys could hunker down and stay a little drier, keep their ballast low and have a place to sit for rowing, but I decided to keep the side decks so they could hike out when necessary. To accomplish this, I would remove the daggerboard and one bulkhead to create a cockpit. The daggerboard would be replaced by a Michalak-style kick-up leeboard. And while I was at it, I decided to adopt a balanced lug rig. Just because. I was excited to discover Scott Widmier’s Pack Rat article in Duckworks because he had modified the hull in a way similar to what I was scheming, which included the addition of quite a bit of extra freeboard.
Model and Mods
I drew my plan and built a 16” scale model. I liked the way it looked, but decided to add even more freeboard to the real thing. I decided to see if the model would sail, but I didn’t expect much, since dynamic human ballast is a major component of trimming such a tiny boat. We put a flat rock in the cockpit as a stand-in for one of the boys and plopped the model in the pond at the park. It took off like a rocket. I was amazed. And it tracked well – stayed right on course until the wind shifted, then it bobbed around to a new tack and off it went again.
|
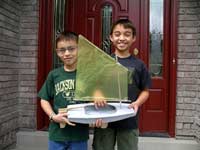
Elliot (left), Evan (right), and the Model (center) |
 |
|
Gavin designed the Mouseboat for extreme simplicity, quick building time and economy. A minimal stitch-and-glue boat, it is very easy to lay out and assemble the panels. As a result, making simple changes, like adding extra freeboard was also very easy. My model has 2” of added height but I decided to add 2 more. All I had to do was add 4 inches to the side panels and bulkheads. One of the Mouse’s great features is its fore and aft floatation chambers. By adding 4 inches of height, I more than doubled the little boat’s buoyancy.
I adhere to the eating-an-elephant philosophy of boatbuilding: one bite at a time. Between my crazy work schedule and Evan and Elliot’s homework, piano practice, karate lessons, Cub Scouts, what have you, boatbuilding time together has proven to be a rare and precious commodity. But once they started cutting wood, the sense of accomplishment was evident.
Sometimes patience was the key ingredient. A task that I could do in an evening might take a week of spare time when a 9-year old is behind the wheel. But that’s OK. That’s what it’s all about. Most jobs were broken down into 15-30 minute tasks. Pretty doable chunks for the attention span of the builders (and I’m including myself).
Time and Money
I have to confess that I heinously violated Gavin’s goal for an ultra-cheap boat as much as I did his ideal of an ultra-fast build. You could build a Mouseboat in a weekend for $50. Ours cost five times that and took… uh… considerably longer. If you work slowly enough, see, you spread the expense out over enough time that you don’t notice the difference. Of course, the truly precious commodity is the time spent actually building your own boat. Boatbuilding time is always time well invested, as is time spent with your kids, which is why this project was so rewarding. Time with my boys AND time building boats is time doubly well spent!
I ended up using Aquatek marine ply at about $25/sheet, double the price of the suggested Lauan. Things that I might have scrounged or even done without, like real pintles and gudgeons, inspection ports, etc. I bought from the Duckworks store - good stuff at a much better price than I could find locally.
One big decision was how much to invest in sails. We could go the polytarp route or really blow the budget and get Dacron sails. I’ve been thinking about a small sail for my CLC Mill Creek for quick trips when I don’t want to bother with the outriggers, so I enlisted my wife to sew three identical sails; one for the Mill Creek and two for the Mice. I ordered a sew-your-own kit and Lily made patterns to sew two identical copies. Then we came to the realization that Duckworks sells custom sails for about the same price as you’d pay for a kit elsewhere. I knew they had great prices on sails for Michalak and Welsford designs but somehow it hadn’t occurred to me that you could get a custom sail for the same kind of investment. So we ordered one in Egyptian cream and one in tanbark. That gave the boys three colors to choose from. The unchosen 3rd sail would end up on my Mill Creek.
|
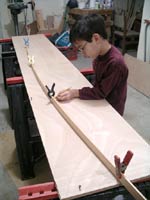
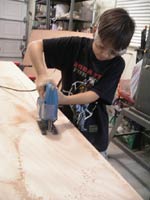
Evan masters the Makita |
 |
|
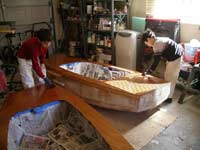
Putting It Together
Boys and saber saws are a good mix. Just noisy enough but not too dangerous. We stacked the ply two deep two cut two panels at a time. We stitched them together with plastic cable ties. This was one of The Guys’ favorite parts. Watching their boats become 3D almost instantly was thrilling. They also really liked cutting the ties off after we had glued the inner seams. Now that I’ve tried both methods, I still prefer wire over plastic ties for a number of reasons.
Making the fillets and taping the seams was quite an interesting process. Two kids flinging epoxy can be pretty messy! Each boy had a set of clothes known as their “epoxy clothes” and they wore nitrile gloves, which go almost to their elbows, and plastic bags over their shoes.
|
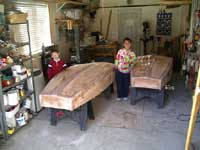
Finished hulls - a major milestone |
|
When we got down to more detailed work like rudders, leeboards and sail rigs, I did most of the fabricating and they helped put them on the boats.
The Guys took to nailing down the decks with earnest. All of the other construction had been glass/epoxy stitch-and-glue, but we put the decks on with PL Premium and bronze ring nails.
|
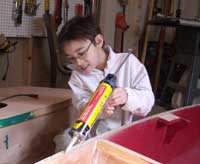
Elliot applies glue for the deck (with brutal force) |
 |
|
Boys will take hammering over gluing any day. If I had it all to do over again, I might just dump the stitch-and-glue and use chine logs and ring nail construction, just for the sheer joy of the manly art of wielding a hammer.
Another thing kids seem to like is checking things off a list. School probably does that to them. They like to know how they’re doing. Hardly a day passed that I wasn’t asked for a percentage-of-completion figure, so they could assess their progress. Before we started the actual shop work, I broke the whole project down into a very detailed 3-page task list. Every time the boys finished a task, they got to check it off the list. That way they saw their progress both in wood and on paper.
|
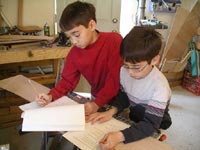
Making a list and checking it twice |
 |
|
Painting was also interesting. The Guys started out with some pretty elaborate color schemes in mind, but I admit to intervening in the interest of simplifying them. I limited them to two colors. I just couldn’t picture a black, red and silver boat with green sails and yellow rudder. Both boats ended up with painted hulls and cockpits. The decks got a natural urethane finish.
|
Elliot aligns the deck panel |
|
In an effort to simplify painting, and to keep the mess to a minimum, we painted the cockpits before attaching the decks. Painting is another very rewarding task for kids. It gives them the highest effort-to-accomplishment ratio of just about anything they can do. And when it’s painted you know you’re not far from water. Evan chose forest green to compliment his mahogany deck. That inspired him to name his boat “Luck O’ the Irish,” which he then changed to “Blarney” and eventually to “Blarney Stone.” I was certain that Elliot would name his “Black Widow,” just like his pinewood derby car, which also has a black and red color scheme. But, unable to settle on anything he liked better, he named it Fledermause, which is German for bat, but translates literally as “flying mouse.” Or so I’m told.
|
Applying the third coat of spar urethane |
 |
|
Fitting Out
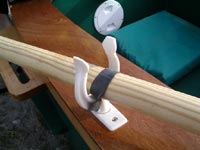
The fit-out for these boats is pretty posh for such minimalist minimal: stainless hardware, Inspection hatches, cam cleats. I doubt there’s a more elaborate Mouseboat out there. Not that that’s necessarily anything to brag about. We decided to make these boats rowable, but I didn’t want to pay an arm and a leg for 5-foot oars so I made two pair from closet dowels with ¼” ply blades slotted into them. A couple of bucks each.
We used nylon oar locks from the Duckworks store, and I found that a slice of bicycle inner tube makes a great oar keeper, to reduce the frustration of oars jumping their locks.
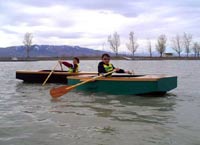
The boats were ready for rowing a couple of weeks ahead of the sail rigs, so we hauled them to the marina at a local lake and took them for a row. I was pleasantly surprised at how handy they were under oar.
|
Ready to row – another milestone |
 |
|
Elliot had no problem getting his boat to go exactly where he wanted to, even after a stiff wind kicked up. Evan was a little less adept at the oars and the added windage of the modified hulls reared its head and kept him drifting downwind whenever his mind wandered from the task at hand. But by the time we went on our second outing Evan had somehow magically achieved the ability to row very well. “I leveled-up,” was his explanation.
I was also impressed at how stable these little craft are. I had to reprimand Elliot for walking around on the deck of his brother’s boat.
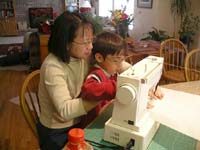
Now it was time to turn out attention to sailing. We found a small, shallow reservoir 2 hours out of town that sounded like the ideal spot for the boys to learn to sail their microyachts. No powerboats allowed. The sails were on order from Duckworks, but Lily set to work sewing the kit sail, just in case. And I got busy carving spars.
|
Elliot helps Mom sew his sail |
 |
|
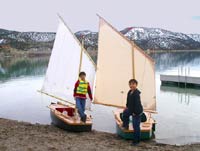
Cast Off!
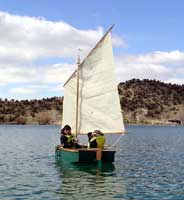
The sails arrived in the nick of time (I was pretty surprised that Duckworks could turn them around so quickly) and we laced them onto the spars. Well, cable-tied them on, anyway. Evan chose the Egyptian Cream sail and Elliot opted for the white one that he had helped his mom sew. That left tanbark for me.
I loaded the boats into the pickup. They fit.
We were lucky to catch a window of two clear days between blizzards. The first day we put the Mice on the water it was only 39 degrees out so we bundled the boys up and sent them out together on Evan's boat while I rowed alongside in Elliot's. Not much wind, just enough to cruise along at about 2 knots. Pretty ideal for a first time out, really. The next day was a balmy 50-plus degrees and The Guys each skippered their own boats. The wind came and went, never more than a zephyr, but no one seemed to mind.
I can't tell how happy I am with these tiny boats. They row well and they sail well. I think the balanced lug was a good choice. They seem to tack very easily. Gavin was concerned that the boats would be undercanvassed with all the extra freeboard I piled on them, but they seemed to move along well with just a whisper of air. I can't say yet what they'll do in a fresh breeze, but I look forward to finding out - once it warms up a little. The booms are set pretty low, so when we take them out in heavier air I'll probably make the boys wear their bicycle helmets.
|
Proud Skippers |
 |
|
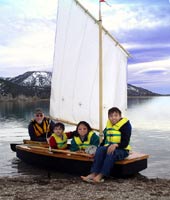
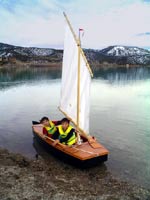
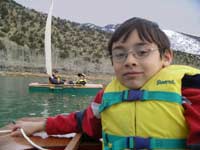
Also, with the additional buoyancy, these little boats can handle quite a load. Lily and I crewed with the boys and not only was there adequate sitting room, but they still rode very high in the water, even with my additional 220 pounds of lardage. Evan and I lost the race back to shore. He claimed he was owed a "fat guy handicap," considering his cargo.
If you’re looking for a great father-and-son project I think I have just the thing.
Awesome, amazing, fun little boats, these Mice.
|
Relaxed downwind run (or is it walk?) |
 |
|
* * * * *
End of Part One
Stay tuned for Part Two, where we discuss details of the sail rigs, transportation, and our Summer adventures.