Stupid Outboard Tricks
by David "Shorty" Routh
https://www.shortypen.com/
Most small production fiberglass sailboats have a fairly weak transom and you are not supposed to trailer with an outboard attached. You can get away with a dinky 12 lb cruise and carry, but beyond that, the weight of most motors will flex and possibly damage your transom as the trailer bumps over pot holes going down the highway. Some sailboats are built to take it, and some others have been owner modified to take it, but most sailboats should have the motor removed while trailering.
So what are some of the ways to carry an outboard? They usually are dripping oil, are covered in slime, and for the water cooled models, they leak water for a while after use. If you have a pickup truck, just toss them in the back and who cares what mess they make because that is what the bed of a pickup truck is for. For the rest of us that drive automobiles with carpet storage areas, we need to find some kind of solution to keep the mess from getting all over our interiors. Also there is the issue of whether you can lay your motor down or not. A motor expert friend of mine told me that it was OK to transport and keep 2 stroke motors in a horizontal position for long amounts of time. Thru personal experience, I have found that some motors don't seem to mind, some of my motors have laid down for several years before being used again, but one motor that I had did not like to be laid down. It was a game fisher 3.0 hp sold by Sears, not sure who originally manufactured it. If I laid that motor on it's side, it wouldn't start for atleast a half hour after being place upright again.
"The Trash Bag"
I started carrying around motors with a common method, I took a heavy duty trash back and stuck the motor in foot first. It worked pretty good and the bag would last for a trip or two before needing replacement. Several times I damaged the bag either with rough handling or other gear rolling around in the back, and the trunk area of my minivan was getting a few extra stains which was annoying me. Also it would take a couple of days to get the smell out if I had a really bad spill.
"The Tray"
Next I tried making a motor tray. It is just a piece of plywood with a lip around the edge. I heavily coated the inside with polyester resin to seal it. There is a pair of pad eyes on each side of the motor just below the head, a line is run across the motor and tied with a truckers hitch to keep the motor in the tray.
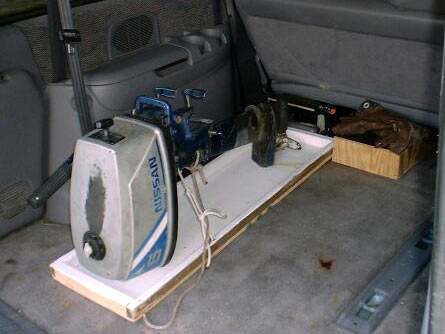
This arrangement really works good and the tie down line has a very unexpected result. In addition to holding the motor on the tray, it also holds the tray on the motor. When I want to move the motor around, I just pick up the motor by it's handle and the tray comes with it. Also since the tray is just a couple inches larger than the motor, I discovered that it will fit in the foot well inside my cabin, so I can transport it in there, out of view.
I have only had a couple of problems with the tray. First is that I left the motor in the cabin too long and it made the cabin really stink like 2 stroke oil. Next is that I moved to Arizona, and the extreme heat and dryness pulled open cracks in plywood, so I should have coated the inside of the tray with a layer of fiberglass.
"The Winch Post Mount"
My motor had been sitting for a long time and I wanted to test run it to make sure the carb wasn't all gummed up. Scratching my head, looking for some place to hold the motor upright and put a bucket of water underneath. The first thought was to prop something under my existing transom motor mount, but I had seen others with mounts on their winch posts, so I decided to give it a try.
I opened up the motor clamps as wide as they would go, and then laminate some plywood to make the biggest mount that the motor would fit on. A couple of U-bolts to attach it to the winch post and presto I had a new place to carry my outboard. To keep dim-witted thieves from walking off with my motor, I put a padlock between the handles of the screw clamps so it can't be un-clamped without removing the lock first. When sailing, I don't have a lock on the handles so I needed a place to put the padlock. You can see a pad eye in the photo below, that is where the lock goes while I am on the water.
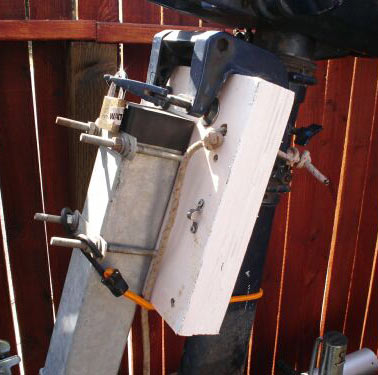
When boating on the water, I have a leash line tied around the motor shaft, so just to be paranoid, I drilled a hole in the mount and run the leash thru it. With a quick stopper knot, the leash will now keep the motor on the mount incase the clamps let go.
Finally a bungee around the water jacket keeps the foot from swinging up and striking my car if I slam on the brakes for some reason.
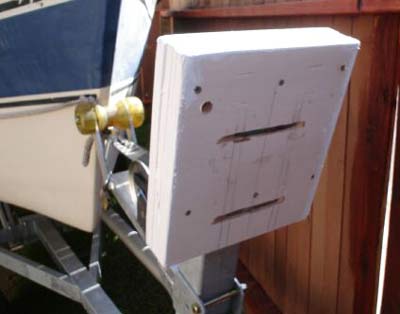
In the photo above, you can see that the U-bolts are counter-sunk into the plywood so the outboard clamp slides onto the mount easily and is held against the plywood, not the bolts.
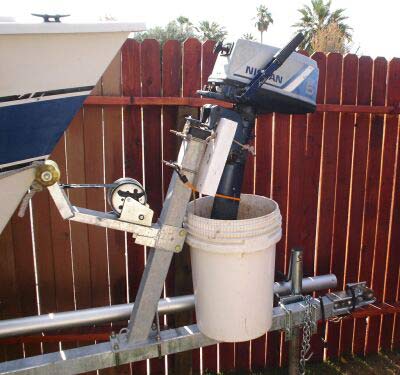
And the main reason for doing this in the first place, I can test run the motor by simply putting a bucket of water on the tongue. Also it is easy to change the lower unit oil.
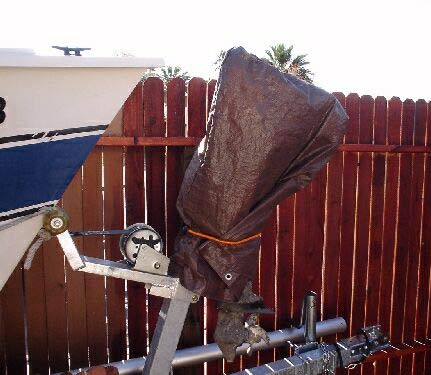
Finally I made a cover that fits over the entire motor to protect it from UV. I am not worried about the body of the motor, but the engine cover is made from plastic and those take a beating from the sun. Hopefully it will also keep the wasps from crawling in the motor housing drain and making a nest in the engine area.
|