Kill or be Killed
Perhaps you have seen the tapes on "Funny Home Video"
television shows; the riderless powerboat circling at
high speed until it rams another boat or a rocky shore, as
it's operator, who was thrown from the boat (usually while
doing something stupid) watches helplessly.
Sometimes it's not so funny, as the "authorities" remove the
body of the operator from the water after the circling boat
ran him down, or even more tragically, remove the body of
an innocent bystander who was run-down by the uncontrolled
speeding boat.
Nearly all modern outboard motors are fitted with a safety "kill-
switch." which has a lanyard that the operator attaches to his
person. Then, if the operator parts company with the boat, the
lanyard is pulled and the engine shuts-down. This is a safety feature
well worth having, and it can be easily installed on the older OMC-built outboard motors that I recommend so highly as a source of
cheap power. This would be OMC-built engines manufactured
from about 1955 until about 1972, and of 40 hp and less. All of
these engines, most of which are two-cylinder, are fitted with
simple "points and condenser" ignition that is vary adaptable
to lanyard safety switches.
It will allow you to "kill" the engine before the engine can kill you.
Or someone else.
 click images to enlarge
 |
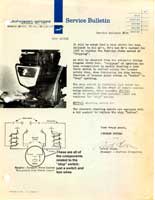
The addition of such a "kill switch" is dirt-easy if your old OMC engine
was originally fitted with a push-button shut-down switch. Have a look
at the posted Johnson Service Bulletin, which explains how the
standard push-button stop-switch worked. Basically, it is just a spring-loaded
switch, "normally open" (normally in the "off" position) that is connected
by two wires to the ignition points. The magneto ignition system on
these two-cylinder OMC engines is always "on:" in order to turn the
ignition "off," an electrical connection is made between the ignition
points of both cylinders. This disables both cylinders and the engine
stops running. One pushes the stop switch, the stop switch electrically
joins the two cylinder's ignition points, and the engine stops.
 If your engine was not originally fitted with the "push to stop" switch,
the lanyard kill switch can still be added; it is just a little more
work.
If your engine was not originally fitted with the "push to stop" switch,
the lanyard kill switch can still be added; it is just a little more
work.
The main item one needs in order to install the safety kill switch is, of
course, a kill switch. These are available through boat dealers and also through
many mail-order and on-line marine suppliers. The important thing to
remember is that you need a switch that is "normally open;" usually this
type of switch is specified as a switch for magneto ignition systems,
but ask questions if you are not sure.
 Once you have your switch, you need to decide if you want to mount it
to the engine, or mount it to the boat. Mounting the switch to the engine
keeps one from having to run wires on the boat, and makes it very easy
to transfer the engine to another boat. However, chances are you will have
to fabricate some sort of bracket to mount the switch on the outboard motor,
which might be more work than wiring the switch, plus the bracket may
not look "nice," if you are concerned about aesthetics. Finally, you really ought
to purchase a spare lanyard so that, if you are pitched from the boat,
someone remaining in the boat can attach the spare lanyard to the motor,
allowing it to be restarted so the boat can circle back to pick you up.
Once you have your switch, you need to decide if you want to mount it
to the engine, or mount it to the boat. Mounting the switch to the engine
keeps one from having to run wires on the boat, and makes it very easy
to transfer the engine to another boat. However, chances are you will have
to fabricate some sort of bracket to mount the switch on the outboard motor,
which might be more work than wiring the switch, plus the bracket may
not look "nice," if you are concerned about aesthetics. Finally, you really ought
to purchase a spare lanyard so that, if you are pitched from the boat,
someone remaining in the boat can attach the spare lanyard to the motor,
allowing it to be restarted so the boat can circle back to pick you up.
 Mounting the switch to the boat means than one switch can serve several
engines when used on that boat, each engine being fitted with a disconnect
plug on the wiring. Also, in the event of "man overboard," the disconnect
plug can be disconnected, rendering the switch inoperative and allowing
the engine to be restarted to go back and pick up the jetsam. However,
if the connecting plug should vibrate loose or should you simply forget to
plug it in, the safety switch is rendered equally inoperative.
Mounting the switch to the boat means than one switch can serve several
engines when used on that boat, each engine being fitted with a disconnect
plug on the wiring. Also, in the event of "man overboard," the disconnect
plug can be disconnected, rendering the switch inoperative and allowing
the engine to be restarted to go back and pick up the jetsam. However,
if the connecting plug should vibrate loose or should you simply forget to
plug it in, the safety switch is rendered equally inoperative.
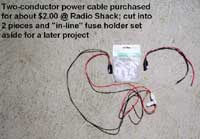
 The example installation shown here has the switch mounted in the "dashboard"
of the boat. A trip to the Radio Shack store resulted in the purchase of
a low-voltage "power cord" measuring about 3 1/2 feet in length, and featuring
matching two-prong plugs at either end and also an "in-line' fuse holder.
Cost was about $2.00 plus sales tax. One could certainly use fancier plugs, but
I preferred to go "cheap." The wire was cut in two, and the fuse holder
thrown in the "junk' box for use on a later project, and I now had my disconnect
plugs. As the example engine (the 1953 Evinrude "Big Twin" featured in the
latest "Start to Finish" column series) did not have the existing stop switch, I had
to add the necessary wiring. The magneto was removed from the engine
(see Magnetos column) and two small holes (about 1/8 inch) were drilled through
the bottom of the magneto plate near the ignition points. Be careful not to
drill through anything besides the plate. Also be aware that the wires you add
must not be in the way of moving parts underneath the plate; remember that the
plate rotates to provide "spark advance."
The example installation shown here has the switch mounted in the "dashboard"
of the boat. A trip to the Radio Shack store resulted in the purchase of
a low-voltage "power cord" measuring about 3 1/2 feet in length, and featuring
matching two-prong plugs at either end and also an "in-line' fuse holder.
Cost was about $2.00 plus sales tax. One could certainly use fancier plugs, but
I preferred to go "cheap." The wire was cut in two, and the fuse holder
thrown in the "junk' box for use on a later project, and I now had my disconnect
plugs. As the example engine (the 1953 Evinrude "Big Twin" featured in the
latest "Start to Finish" column series) did not have the existing stop switch, I had
to add the necessary wiring. The magneto was removed from the engine
(see Magnetos column) and two small holes (about 1/8 inch) were drilled through
the bottom of the magneto plate near the ignition points. Be careful not to
drill through anything besides the plate. Also be aware that the wires you add
must not be in the way of moving parts underneath the plate; remember that the
plate rotates to provide "spark advance."
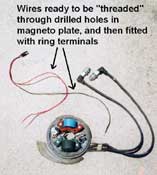
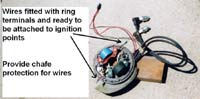
 The wires were then feed up through the holes and the ends of the wires were fitted
with crimp-on ring terminals. Then the wires were attached under the screws on
each set of points, the small screws which also hold the wires from the coils and
also the wires from the condensers. After this 10 minutes of work, the magneto was
ready to be reinstalled on the engine.
The wires were then feed up through the holes and the ends of the wires were fitted
with crimp-on ring terminals. Then the wires were attached under the screws on
each set of points, the small screws which also hold the wires from the coils and
also the wires from the condensers. After this 10 minutes of work, the magneto was
ready to be reinstalled on the engine.
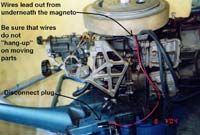
Be sure to rotate the magneto through the full range of it's rotation to be sure that
the wires will not interfere with it's movement. Then route the wires out of the cowling
at some convenient place and the engine is done.
 If your engine is already fitted with a push-button stop switch, all you have to do is
disconnect the wires from the push-button stop switch and attach the wires to
a quick connect plug, or in the case of a motor-mounted safety kill switch,
connect the wires directly to the kill switch. This will render the "push to stop"
switch inoperative, but you can always pull the lanyard to stop the engine.
If your engine is already fitted with a push-button stop switch, all you have to do is
disconnect the wires from the push-button stop switch and attach the wires to
a quick connect plug, or in the case of a motor-mounted safety kill switch,
connect the wires directly to the kill switch. This will render the "push to stop"
switch inoperative, but you can always pull the lanyard to stop the engine.
There is no need to remove the flywheel and magneto if the "push to stop"
switch and wiring is already present.
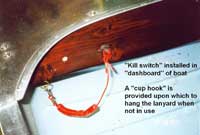 The example switch was installed in a round hole drilled in the dashboard of the example
boat, and then two wires lead from the switch back to the transom, said wires being
soldered to the wires on the "other half" of the Radio Shack power cord to provide
the "boat end" connector plug to attach to the connector plug on the motor.
The example switch was installed in a round hole drilled in the dashboard of the example
boat, and then two wires lead from the switch back to the transom, said wires being
soldered to the wires on the "other half" of the Radio Shack power cord to provide
the "boat end" connector plug to attach to the connector plug on the motor.
 And that is all there is to it; be sure to thoroughly test your new safety kill switch, and
as mentioned before, give some thought as to how the engine can be restarted
without the lanyard being present, and in the case of the boat-mounted switch, give
some thought to the possibility of the switch being accidentally disconnected.
And that is all there is to it; be sure to thoroughly test your new safety kill switch, and
as mentioned before, give some thought as to how the engine can be restarted
without the lanyard being present, and in the case of the boat-mounted switch, give
some thought to the possibility of the switch being accidentally disconnected.
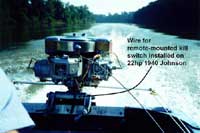
By the way, if you are running a single-cylinder engine, you connect one wire to
the single set of ignition points, and the other wire to a "ground" on the engine.
That is how I how I made the connection to my 1940 22hp Johnson, which does
have two cylinders, but both cylinders "fire" simultaneously from a single set of
points.
Wishing you safe motor'n!
Max