Take Apart Fishing Pram
by Tom and George Fulk
excerpted from "Messing
About In Boats"
My brother George had a nice new truck
with a 6' bed, but the 6' pram he had seemed too unstable for
serious fly fishing. There is always a temptation to stand to
cast when fly fishing since it's easier to get more distance,
and you can also cast more readily in all directions. In a way
it's a self defeating situation though since, if you remain
seated to cast, you don't need to cast far. Standing just makes
you more visible to the fish and, if standing, you MUST cast
farther. The 6' pram seemed too small on some of the cold water
and large lakes along the Alaskan highway. We mulled over how
lo get a one quart boat into a one pint truck.
The answer was obvious and I drew up
a plan for a 9' boat made of two parts, a 3' bow section and
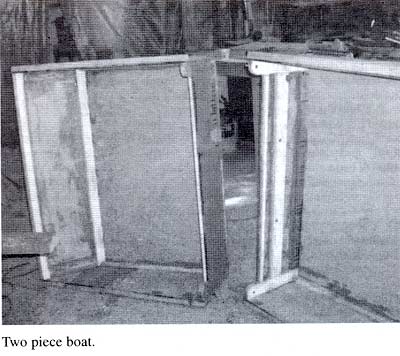
a 6' stem section. The two part boat turned out to have an unanticipated
advantage. The two sections are each light enough lo handle
easily, but a one piece 9' boat would have been too heavy for
easy handling, especially if car topping.
George has had plenty of experience
in boatbuilding and made a few changes from the plan to ease
construction. He will tell you about this.
Construction: Tom
supplied helpful construction tips. This boat is very easy to
build. I began by ripping a 4'x8' sheet of 1/4" ocoume
plywood lo make two 2' wide sheets. I scarfed a 2'x2' piece
to the end of each, using the Payson method, to make material
2'x10' for two sides.
Next I laid out the sides following
offsets from Tom's plans, and used a batten to get a nice curve
to the bottom close to the layout lines. Having cut out one
side, I clamped it to the other and used it as a pattern for
the second side.
I built the bulkheads and transoms about 2"
too tall, laid them on the sides at the places indicated in
the plans, then marked off the bevels for the bottom and top.
I cut the bevels on a table saw. Next I notched out places in
the cross members for the chine logs, screwed and glued chine
logs to the inner faces of the sides, then attached sides to
transoms and bulkheads. The two bulkheads are installed about
3' aft from the bow and only 1/4" apart from each other.
Temporary spacers were used to maintain the 1/4" spacing
between bulkheads and the two bulkheads were installed as one
assembly. I added gunwales, laminating two pieces to make finished
wales 1-1/2" x 2".
I placed a full sheet of plywood on the lower
edge of the sides, clamped it "in place, marked off the
size, and cut it out for the bottom. I scarfed a second piece
to the first to form the completed bottom, which can just barely
be taken from one sheet of plywood. Next I added the deck to
the bow and knees to the stem. The knees reinforce the side
and transom connection and need to be fitted and fastened well.
I taped the chines with fiberglass set in epoxy. At this point
the boat looked almost finished, but the fun part was about
to begin.
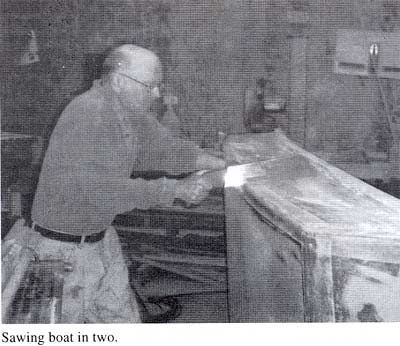
I turned the boat over and drilled four holes
through both bulkheads for the bolts. Then I took a hand saw
and cut the boat in two, sliding the saw between the two bulkheads.
That was the first time I cut a boat in half. Suddenly it took
up a lot less space in the workshop.
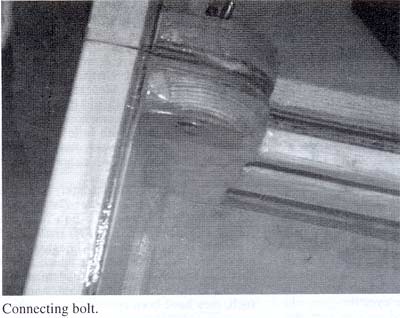
Next I added the seat and oarlocks. To strengthen
the holes for the bolts which hold the two parts of the boat
together, I added small stainless steel plates around the holes
to both sides of the aft section and lo the forward side of
the forward section. The 1/4" carriage bolts are permanently
glued into the forward section. I used small brass wood screws,
countersunk into the plate, and glue to hold those plates in
place. They prevent the bolts from enlarging the holes when
taking the boat apart repeatedly. Tom suggested reinforcing
the holes by gluing copper tubes into the holes. That would
have worked, too, I am sure. I buttered up the inside of the
holes with epoxy to prevent water from soaking into the end
grain. The holes need to be 1/16" larger than the bolts.
The bolts are above the water line so there is no worry about
leaks.
I placed three 3/4" x 1" cedar
runners along the bottom and covered each with a flat aluminum
strip. They do a lot to strengthen and protect the bottom from
wear. It would be best to laminate the runners for the forward
section from 3/8" thick stock so they would bend more easily
and conform to the curvature of the bottom. I painted the boat
with a one part epoxy paint, Brightside by Interlux. It took
three quarts, including undercoat.
Following Tom's advice, I built 7-1/2' oars
for this boat. They were easy to build, inexpensive, and work
well. The blades are 1/4" ocoume plywood covered with fiberglass,
set in a slot in the looms. The looms are
laminated from a clear 2"x6" ripped lengthwise. They
are finished round about 2" in diameter at their inboard
ends, tapering down to almost nothing at the blade end.
Sea Trials:
I took this boat on a two week camping trip around Lake Superior,
using it almost every day. I think the boat offers a practical
solution to the person who wants to carry a 9' boat inside a
6' pickup bed. That said, it would be better to have a 8' single
piece boat in a 8' pickup bed. It takes five minutes to put
the boat together and another five to take it apart again, so
I lose 10 minutes of fishing.

I was a bit skeptical
about how easy it would be for one person to load this boat
into a pickup. Once I got a system, I found it was really quite
easy. To load the boat, I take it apart and set the forward
end of the larger section on the tailgate. The larger piece
weighs a little less than 60 lbs., but I am lifting only one
end at a time. With one end on the tailgate and the other on
the ground, I place the smaller section of the boat into the
larger. The smaller weighs 27 lbs. Now I lift the whole thing
up and slide it in.
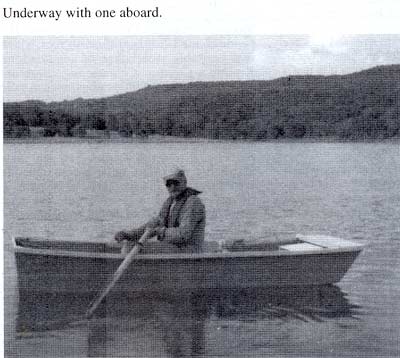
Once the boat is together
and on the lake, it is a wonderful fishing platform. It moves
along nicely with the big 7.5' oars. These oars have long, narrow
blades (36"x4"J, and once I get the boat moving I
can keep it moving with little effort. To give the oars a little
more clearance over my knees, I added 3/4" thick oak pads
to the gunwales and mounted the oar locks on them. The boat
is stable. I can stand up to cast, move to the side to net my
fish and to either end to lift the anchors. It is a safe boat.
I have a styrofoam block under the seat and 1-1/2" thick
foam panels along the sides. The flotation is covered with fiberglass
cloth and tied firmly in place. The styrofoam has the volume
to displace 85 lbs. of water.
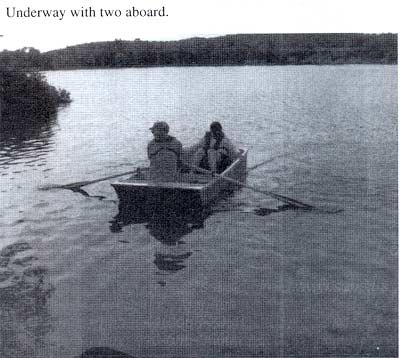
This boat is designed
to be for one person but I found that, with a few modifications,
I can take a passenger. I built a small box seat that conforms
to the bottom of the forward section with a notch to fit over
the lower frame of the bow transom. I added 1-1/2" thick
pads to the gunwales of the smaller section where the sides
meet the bulkhead. The pads strengthen that joint and provide
an elevated mounting for a second set of oar locks. The boat
is nicely balanced with the passenger setting in the stem and
me rowing in the bow. My wife and I made a circuit of four lakes
in Canada, pulling the boat on a two-wheeled dolly over the
portages.
I suppose I could
put a small 2hp motor on this boat, but I am content to row
it. The gently slap, slap of the waves hitting the bottom as
I row upwind would become a terrific pounding if under power.
A Final Note:
Flotation in smalt boats used mostly in cold water is essential.
It should be securely and well placed. Hypothermia is always
an issue in trout fishing since water temperatures are seldom
over 55" and frequently in the 40s. It's best, I think,
to have a boat which will float level, into which you can slither
if the worst happens. Boats like this will seldom overturn even
though they may fill. The most common accident is falling overboard.
Getting your body out of the water even a little enhances your
Survival chances. Having offered this bit of sermonizing, let
me add that my favorite trout fishing boat has no flotation.