Twisted Lassie
by Steven Fisher
What I haven’t needed is another boat but all who build boats know that there’s always a boat that’s crying out for your efforts. I built my first boat, a Goldeneye from Pygmy, about nine years ago but wasn’t until a few years ago when I retired that the disease really hit. Over the past 3 and 1/2 years I have built 16 boats 11 of which have been given to friends or donated as fund raisers for various non-profit organizations. Only 1 boat was kept as a personal craft but that too was given away this past winter in Florida. All the boats were practical and some of them even looked pretty good but I always wanted a boat that I could say, with pride, I built this boat. I always admired stripper canoes but was unsure I had the skills to build one.
The process of hanging the strips was fairly easy. I opted to nail strips to the forms and staple between forms.
(click images to enlarge)
|
 |
|
I spent hours on the net looking over various plans and kits and finally settled on the Arkansas Traveler from Clark Craft. At 13-1/2 feet it would be easy to single hand and it had a seat I could sit up on. As much as I loved my little sit on the bottom boats my legs were giving me problems even with the wonderful foot braces from Duckworks. The numbers were so appealing that I just ordered the complete kit. Various family commitments kept making me put off the delivery date until early November.
|
Things became more difficult as the curves became tighter. Renee helped with a few and then I found that I could relieve pressure in the curves by putting in relief cuts with my Japanese saw. |
|
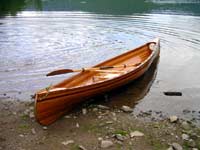
The kit arrived and immediately went into my downstairs playroom, a place I had promised would not be a boat yard after I had finally cleaned the room after last winters project. I convinced Renee that no epoxy would be used and that in the spring I would fix the place up for my granddaughter. The packing was impressive as was the number of 16’ strips all nicely done in bead and cove. There were no plans or instructions other than a copy of “Mac” McCarthy’s featherweight Boatbuilding. In fact the boat was the Wee Lassie II determined by the beam that was 29”. Ultimately this would necessitate serious testing as to how high I could place the seat without affecting stability.
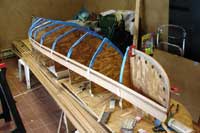
The strips add up to a sleek body. But then the real work begins: sanding and preparing the surfaces, in and out, for glassing.
|
 |
|
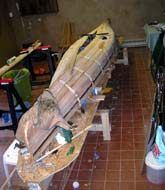
The first step was building a strongback, which proved easier than expected because the box that contained the strips was perfect with a few adjustments. It took a bit of time to set the correct positions for the forms. Laminating the inner stems was fairly straightforward. I used 3mm okume left over from a previous project and 3 layers worked out perfectly and easily followed the curve.
|
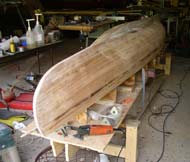
The exterior worked out quite well and after 4 coats of epoxy it was time to remove from the strongback and deal with the interior. |
|
The first try hanging a strip was a mess as I quickly learned that my spacing between forms was incorrect. Measuring again and repositioning solved the problem. The process of hanging the strips was fairly easy. I opted to nail strips to the forms and staple between forms and the first 10-12 strips per side presented no problem but things became more difficult as the curves became tighter. Renee helped with a few and then I found that I could relieve pressure in the curves by putting in relief cuts with my Japanese saw. I used the new Titebond III and was careful to use a wet rag to wipe excess glue off each strip. This new glue is waterproof (not an issue here since it would be epoxy/glassed in and out) and sets very quickly. It’s very satisfying as the strips add up to a sleek body. But then the real work begins: sanding and preparing the surfaces, in and out, for glassing.
The plan had come together and then I looked carefully and noticed a twist to the right (about 1/2”) in bow and stern this despite my left leaning politics.
|
 |
|
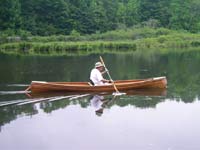
Previous boats were also glassed but I usually just taped interior seams rather than deal with glassing a concave surface. The exterior worked out quite well and after 4 coats of epoxy it was time to remove from the strongback and deal with the interior. First I built a sling and them proceeded to sand, fill, and sand until I felt my interior surface was smooth enough to lay out the glass. I followed McCarthy’s instructions and was pleased with the interior. Slow and steady with the squeegee followed by a foam roller did a good job of eliminating bubbles, drips and puddles. I now had something I felt proud of and continued slowly to install bow and stern waterproof bulkheads, inwales, outwales, thwart, seat (purchased) and bow and stern decks. The plan had come together and then I looked carefully and noticed a twist to the right (about 1/2”) in bow and stern this despite my left leaning politics. The boat looked great and now it was time to put it in the water for the real test. The seat raised 5” was comfortable and the right twist was easily adjusted for primarily because I’m so dominantly right handed I tend to paddle to the left.
|
As soon as I completed this boat I started building a hull for a 1-meter RC sailing yacht using the same techniques but using balsa and basswood. |
|
As soon as I completed this boat I started building a hull for a 1-meter RC sailing yacht using the same techniques but using balsa and basswood. As I worked this smaller model I realized that I could avoid the relief cuts by mounting the center strip and working out 3 or 4 strips thus reducing the stress. I also realized that by installing this center strip as the first strip I would have noticed the twist.
Building RC boats is fun but not nearly as satisfying as the full size boats so while I complete a stitch and glue 11-1/2 canoe I started 2 years ago I’m contemplating my next project.