|
Boater's Gear Review |

|
|
by Chris Ostlind - Salt Lake City, Utah - USA
Nikon Binoculars for Boating |
|
Including binoculars in my gear bag when boating was a tough sell for me. In my principal professional career, I shoot photos all day, specializing in architectural subjects and I’m pretty used to carting around a bag full of relatively heavy stuff to create images. The last thing I wanted was to hoist another bag of stuff such as a pair of binoculars.
What turned it around for me was a long sailing session on a friends boat in which we had to pick out our destination across a rather large bay. As it turned-out, our charts were… well, let’s just say they weren’t as good as one would have hoped and the small cove we had in mind was not clearly recognizable from the distance we were out at sea.
My sailing partner then surprised me and produced a pair of Nikon binoculars that had a built-in compass that could be read while he was glassing the distant coastline. He easily sighted the cove and could then give a precise compass heading all from the binocular session.
Whammo! That saved us a couple of hours of screwing around time where we would have cruised up and down the shore looking for landmarks to tell us where to anchor.
Later, we used the binoculars to pick out reefs and shallows as we approached the shoreline.
Ever since then, I’ve included a pair of binoculars in my bag so that I could have the same flexibility while out on an adventure cruise.
Binocular basics
Just a few comments on the basics of binoculars. When you shop for a new pair, you’ll see a set of numbers that describe the binocular so you can compare them to each other and have some idea as to what you are comparing. The first number represents the power of magnification of the optics when compared to normal vision. Magnification is a tricky issue that only you can resolve for your needs. The higher that this number is, the closer the binocular will draw you to your subject.
This is done by narrowing the field of view, as well as magnifying, so that all you can see is the limited area on which you have focused. Narrow field angles are good if you have to pick-out subjects clearly or if they are very distant. Wider fields of view allow you to scan a greater area while at the same time having narrowed the viewing angle from what your eye sees normally.
The second number represents the diameter of the front glass of the unit. This number gives you an idea as to the light gathering capability of the binocular.
You can easily get an idea as to how bright the relative field of view will be by comparing two binocular pairs from the same manufacturer. The lower the second number, the darker the image will be as you look through the unit. This isn’t always an issue, especially if you are only using the binoculars in full sunlight. It really comes into play in the very early morning and the late afternoon. Since I’m 57, I find the larger optics to be very useful in helping my tired old eyes to pick out subjects that would be difficult or impossible with a smaller front optic.
In this review I’m going to take a look at three distinctly different pairs of binoculars from Nikon that each have their own pluses and minuses for boating. The units I will review for you are the ProStaff 10x25, The OceanPro 7x50 with compass and the StabilEyes VR 14x40.
ProStaff 10x25
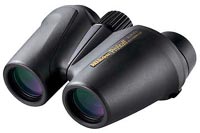 These binoculars are really compact, easy to make sense of and very straight forward in use. Most of us have had a shot at lifting a set of binoculars to our faces and the ProStaff’s are very much like any other set of binoculars you may have used in the past. They’re about palm sized when folded for storage, flip-out to operational width and are encased in a waterproof rubberized jacket to keep them dry and fog free in use. These binoculars are really compact, easy to make sense of and very straight forward in use. Most of us have had a shot at lifting a set of binoculars to our faces and the ProStaff’s are very much like any other set of binoculars you may have used in the past. They’re about palm sized when folded for storage, flip-out to operational width and are encased in a waterproof rubberized jacket to keep them dry and fog free in use.
These units are the essence of simplicity for field use. Spread the halves of the binocular until you can comfortably see through both eyepieces at the same time while holding the unit still. You simply sight through the left eyepiece and focus on the subject by rolling the central adjustment knob between the barrels. Once you have the image focused, you close your left eye, open the right eye and then turn the right eyepiece until the right eye field is also focused.
That’s it and you’re in business.
I like this size of binocular for kayaking, canoeing and for easy stashing in a fanny pack for day hikes ashore. They’re light and very rugged and they come with a nice carrying case that is easy to slide onto a belt for convenience. The ProStaff 10x25’s run right around $135 on the street.
OceanPro 7x50 with Compass
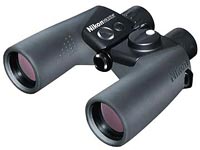 The OceanPro 7x50 is a full sized binocular and it has the punch that you’d expect from a set of glass that you’d take on a larger boat. The front glass is a full 50mm across and that means they can be used in very dim light situations. The magnifying power of 7x is about average for field binoculars that are good for all-around use. These units are solid and they’re also encased in a waterproof, rubberized jacket for durability in a marine environment. The OceanPro 7x50 is a full sized binocular and it has the punch that you’d expect from a set of glass that you’d take on a larger boat. The front glass is a full 50mm across and that means they can be used in very dim light situations. The magnifying power of 7x is about average for field binoculars that are good for all-around use. These units are solid and they’re also encased in a waterproof, rubberized jacket for durability in a marine environment.
Perhaps the biggest advantage that these binoculars have over units from other manufacturers is the built-in compass that allows you to take an accurate heading without removing the glass from your eyes. Without this feature, you would have to take your sighting, lower the glass and then pick-up the compass to aim it at the same place; assuming you do, in fact, aim it at the same place. No, the compass feature is not absolutely necessary, but it is convenient and it is simple to make use of, so why not?
I find the OceanPro to be the most durable, dependable binocular system I have ever used. I’ve had mine for several years now and they’ve survived dunkings, being tossed to the deck when I wasn’t paying attention and general bad behavior on my part when things got dicey on board a pitching boat. I’d replace them in a minute if they were lost or stolen. Current retail pricing of the OceanPro binocular is in the neighborhood of $250.
StabilEyes VR 14x40
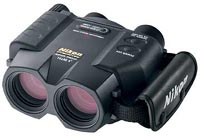 The VR in the name stands for Vibration Reduction. This used to be fairly exotic technology for telephoto lenses, but more recently it is becoming the de facto standard for long lens applications in photography. In the past there have been VR type binoculars available, but they’ve been rather spendy to obtain. While no VR technology is truly cheap, it has come down in price lately and these binoculars are an indication of that trend. The VR in the name stands for Vibration Reduction. This used to be fairly exotic technology for telephoto lenses, but more recently it is becoming the de facto standard for long lens applications in photography. In the past there have been VR type binoculars available, but they’ve been rather spendy to obtain. While no VR technology is truly cheap, it has come down in price lately and these binoculars are an indication of that trend.
So, what’s the big deal with Vibration Reduction, you ask? Perhaps you’ve been on the deck of your boat in a serious chop and you tried to use some standard binoculars to sight the dock as you approach to see if you should come in right away or stay outside the hustle of traffic. If that’s so, then you know how hard it is to get a steady image. With these VR binoculars, those days are over and only the most serious, choppy, wind driven, tossing and rolling will affect the picture you get when you use them. No really, they’re that steady in use.
I’m not going to go into the actual technology for VR in this article. Here’s a good URL link for you to follow, though, and it will tell you everything you need to know if you are curious.
The really cool technology of VR in binoculars does come at a price, though. They’re hefty. Not necessarily hefty in the sense that they weigh a bunch more than standard glass, as they’re only 6 ounces more, but hefty in the way they sit in your hands as you hold them. It’s a different feel from the more traditional binoculars.
These bad dudes will set you back about $1000 and that’s a lot of money for the technology advantages of vibration reduction.
|