|
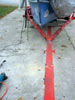
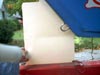
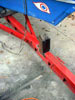
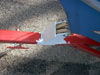
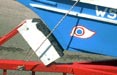
All in all, the trailer I designed and built for the light schooner has been providing reliable service. But as I mentioned in the original article, one thing has been annoying me greatly. When retrieving the boat from the water, the bow meets the trailer’s post like this:

If I tie it down here then pull forward, it looks like this:
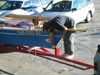
This is because the angle of the boat to the trailer made the bow meet the tower too high up on the bow. If the bow were dead vertical, this would hardly matter. It’s not. So I back up until the stern just floats. Then I can lift the bow and pull it forward, then cleat it like this:
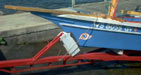
What a pain in the butt! Obviously I could buy a winch and force it. But this causes stresses, costs money, and it just seems I should be able to do it by hand with a hull that’s only like 700 lbs with all the junk in it.
To fix this, two things had to happen.
First, the attachment point at the bow had to be lower down, as close to the keel as was practical. This was easily accomplished by adding a stainless steel bow eye, well bedded in PL400 and fastened with big washers on the inside of the stem.
Second, trailer post had to get shorter, so it wasn’t trying to prop up the bow. I wanted it to be two short and stout plates. The eye would come to rest between these, and a bolt running through all three members would secure the bow to the trailer in such a way that it cannot possibly be in the wrong place.
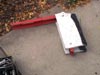
Here it is with the old post cut away. Five minutes with a grinder.
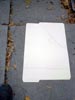
Here is a cardboard pattern for the new pieces taped in place. Another 10 minutes.
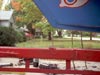
Here are the new pieces cut from 3/16” plate and bored. This took about 45 minutes with the grinder and drill press, and used up 3 cutoff wheels. It would’ve been quicker with a cutting torch, but I was out of oxygen! You see them tack welded in place for test-fitting. Never neglect this. It’s easy to cut through a tack weld to reposition something, but once you have a complete weld it’s one big ol’ piece of metal.
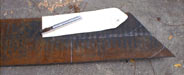
Here are the new plates welded in place. Maybe another hour to get it welded. It would have been quicker if I’d had the right welding rods on hand. With 6013 the weld puddle likes to run downhill, which is not great for this application. 6011 would have been much better, but I forgot to get some. This meant more “weld a bit…cool a while…weld a bit” to keep the weld from getting too hot and running uncontrollably downhill. These were not pretty welds, and had some slag inclusions. I hope that our friend Rustoleum prevents them from rusting. Next time I’ll just wait until I have the right welding rods.
Anyway, after a quick sandblasting and washing with Spic-N-Span, it got some Rustoleum Bare Metal Primer. This is not the fanciest way to coat metal, but it’s cheap and easy to touch up. Note the space heater to help the paint dry on this 55 degree October day.
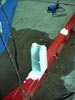
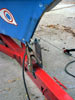
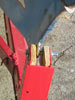
We can’t let the bow ram into the edge of plate steel. So it needs some padding. Pads were easily made from some scrap ¾” ply. I set them so they protrude beyond the steel a little bit, so the bow doesn’t ever touch the metal. I soaked the pads thoroughly in linseed oil thinned 50/50 with turpentine.
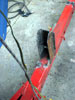
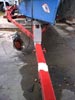
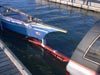
Now when retrieving the boat, there’s no giant tower in the way on the trailer tongue. It is easy to walk down the tongue and pull the bow up the trailer. The final lift into place for bolting requires leaning over the bowsprit while lifting it. It’s not too bad as long as you put the bolt through on the side where your hand is.
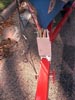
A finishing touch is a short section of rubber garden hose to provide a pad between the bolt and bow eye. But don’t try to insert it while lifting the bow. Pull the boat out of the water with just the bolt, then add the hose. It took me only one section of hose lost in the water to figure that one out. I must be getting smarter.
Do note the nylon insert nut. Anything else will eventually vibrate loose, and probably at a very inconvenient time.
Best of all, the boat now loads quickly and easily with no winch power, and only a little acrobatic skill.
One caveat
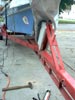
Before closing, I should mention one other point that I think is less than ideal in this trailer design. The aftmost transverse steel frame piece is not ideally located. It’s in the way of lowering the outboard motor when the boat is on the trailer. I didn’t think I’d care about this when designing the trailer, since I assumed I’d mostly sail with the motor as a distant backup. Not so. It turns out it’s very much an auxiliary, so this frame piece is annoying.
This decision was governed by the scrap steel I had on hand. It would have been better to put that aft steel crosspiece under the transom. But my metal wasn’t long enough. So I used the full length of what I had and figured I’d deal with the inconvenience. Now that I’m using the trailer, it seems plenty strong. When it gets to annoying me enough, I’ll cut it off and weld it a bit shorter. I recommend you start out that way if you build from this design.
Plans
Click the image below for a large scale drawing of the trailer that I built. It is suitable for printing and may help you build your trailer.
To save the full sized drawing, right-click the image above and select "Save Target As....".
Rob Rohde-Szudy
Madison, WI
robrohdeszudy@netzero.net
|