The 9.5 Laura Bay - Part 2
|
|
|
design by Warren D. Messer - Seattle, Washington - USA |
Part
1 - Part
2 - Part
3 - Part 4
- Part 5
- Part
6
When we last left Laura, she was drilled, wired, bolted, and tied down on the building platform. Kind of like the damsel in distress in one of the old serial dramas at the Saturday morning movies. I guess I'll have to start twisting my mustache and develop a deep laugh.
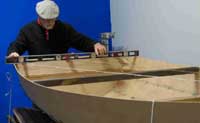
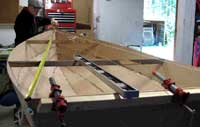
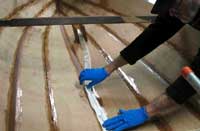
The next phase of construction is to epoxy all the hull panels together on the inside. The main thing to remember and to do, is to make sure the hull is level and square. You don't want to ruin all the good work you've put into the boat already. One of the things I did to my work platform, was to drive some wire fencing staples into the ends of the 2x6 cross pieces. The rounded ends keep from snagging on anything and makes it easy to pass a cord through. I use the upper wires in the hull as the other tie point and tighten the cords down with the use of the four foot level to be sure everything is. I then take my tape and measure from each stern corner to the bow to make sure the boat is square, and tighten the cord that needs it. This hull was off only ¼" and just needed a slight tug on the Port cord. When ever you make an adjustment to one cord, check all of the leveling spots again to be sure you haven't unleveled or knocked out of square something else. Once you are happy, its time to start with the epoxy.
One last thing to do is to cover the heads of the bolts or screws with a bit of masking tape. If you don't, several will be filled with epoxy or fillet material and become scrap. Now is the time to erase any pencil marks that are not needed for later reference. The only place they will be covered is under the fillet material. They will show through the glass tape. The big "pink" ones work great. Good time to check for level and square again.
The "Jump Stitch" is used to hold all the panels together so the wires and bolts can be removed later for the finial fillets and glass taping. I always make sure that I "presoak the edges" of the hull panels before I apply the epoxy jump stitches. I use the handy man's favorite tool for doing this; the used toothbrush. I haven't found anything better for doing epoxy work. The toothbrush is soft and holds the epoxy with very little drip out, and the handle makes it easy to reach places and see what you are doing. Plus it has a handy squeegee on the reverse side. Have your friends and family save them for you. Soak them in a little bleach and water if you need to.
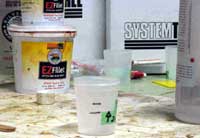
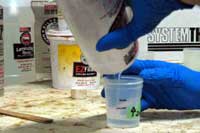
It doesn't take that much epoxy to soak the seam edges, and you want to be careful as you go; so make small batches. I only make up 1 ½ oz batches doing this; 1 oz part A and ½ oz part B. I never use anything bigger that the 4oz plastic cup for any epoxy mix. I put a piece to tape on the cup's graduated marks to better see what I am doing, and this has proved easy to follow. I have never had a bad mix batch yet, and I always do the pouring in order. Part A first, Part B second, followed by a good stir, scraping the sides of the cup and the sides of the popsicle stick. Back up any gaps in the hull seams with masking tape to keep the epoxy from dripping onto your shop floor or work bench.
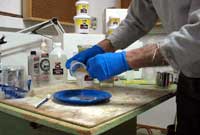
If I am doing epoxy work that may take some time, I pour the mix into a plastic picnic plate to spread the epoxy out and to reduce the amount of surface area that the epoxy has to work with. Trapped in a small container, the epoxy will "kick off" much quicker that what you want. It the cup starts to feel warm in your hand, get it out of the cup quickly; if it's hot, its too late. You may as well throw it away, as it will be trying to set up as fast as you are trying to spread it out, and it won't.
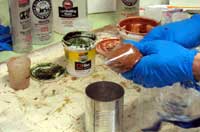
With the seam edges for the jump stitches coated, its time to mix up some fillet material. I use System Three's EZ Fillet for all my wood filled epoxy needs. I tried the mix it yourself approach, and got tired of the varied results I had from batch to batch. Plus dealing with all the itchy additives that seem to float around the shop forever. Follow the directions for 2 parts A and 1 part B, and every mix is the same; always. No bad batches, less slumps after application, and less dust and mess.
I follow my own advise and never mix up more than 3oz at a time. I have a couple larger containers that act as paper weights now, because I was overly optimistic about the speed of application. I use the 4oz cup and mark it off with the two tapes method. One of the things I learned in a Soils Engineering class, was that anything with moisture in it can be made to "go quick" or slump. It's called Pore Water Pressure, and when a material with enough moisture is shaken or thumped enough, it liquefies. The part B(green) is liquid, but the part A is on the stiff side, but contains enough liquid to "go quick". To make measuring the part A accurate, I (can't think of any other word than plop) "plop" in a bit of A into the cup. I then tap the cup on my epoxy bench until it slumps; then I add some more until I get it "slumped" to the 2oz mark. It shouldn't take more than about a dozen good firm taps to "make it so". Then add the part B on top of, and to the upper 3oz tape mark. Try to drip the part B off the popsicle stick around the surface of the part A so it is an even layer and doesn't weight the center down and cause the part A to creep up the sides and affect the measuring. Follow this with a good stir. Scrap the sides, bottom, and the stick; also rotate the cup in your hand as you stir to get an even mix. You will see the color change, but keep stirring and the mix will get smoother and easier to stir. For this size mix, 1 minute is enough.
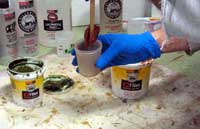
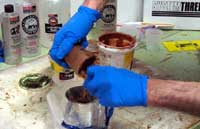
Before I mix up my fillet material, I get out my old tin can and put a used plastic bag inside. Use the ones with no pleats in the corners. You only want one of the corners in the can, so I put my finger in the corner to hold it in place as I fold the excess bag around the outside of the can. Now I pour in the fillet material by scraping the side of the cup as I rotate it in my hand; like a cement truck pours out it's load. Have and old rag handy to wipe off the popsicle stick and the inside of the cup. Both can be reused several times. Pull up the sides of the plastic bag and twist it tight up to the fillet material. Slide down a knot next to the fillet material and cut off the excess bag with some old scissors. I go to the dollar store and buy a new pair for every boat I build and throw them away when I'm finished. The scissors are usually finished too. Take the scissors and cut a "SMALL" hole in the end of the bag. You are now ready to jump stitch.
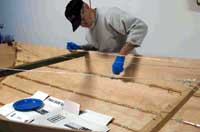
The jump stitch works like it sounds, you place a 3-4 inch "stitch" and "jump" to the next stitch and repeat along all the seams. Just squeeze out a little bit at the start of the stitch. You use a popsicle stick to drag out the fillet material and push it into the seam. If you apply too much, then you have to scoop it up and move it someplace else. This is why you taped over the bolts. You will get some in the wires, but don't worry about them as they will be trash or scrap soon enough. Make sure you have a scrap piece of cardboard box in the hull to set the fillet bag on as you work in the fillet material with the popsicle stick. Keep an eye out for drips and plops where you don't want them, because there always are. If you are after the perfect wood interior, I would advise you to tape off everything that doesn't get epoxy coated or taped. There are always plops, drips, and runs to deal with. Always! One 3oz mix of bagged fillet material should be enough for this task. Try to get all the fillet material out of the bag and into the seams and then go back and work it in with the popsicle stick. You will have more time to work with the fillet material and it won't kick on you.
Check your work and make sure that everything is filled (all seams, stern and bow corners) and all the fillets are smoothed into the seam gaps (easy to forget) and that all of the plops and such are cleaned up. Now let the hull set for a day or so depending on the temperature in your work area. If its cool out, I would advise at least a two day way. If its warm to hot, the next day may be ok to start removing wires and bolts. In either case, use your thumbnail or small screwdriver to check for hardness, and it should be hard before you remove the wires. On my next hull I will try a tube of the mix in the nozzle, 30 minute "Quick Cure" and see how that works for the jump stitch process. But still pre-coat the seam edges and let cure. Check the hull for level and square again, as you may have knocked it out by leaning over the edges. Do this before the epoxy sets.
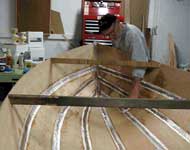
Now that the jump stitches have cured, its time to remove the bolts, then the wires. This always seems like a moment of truth for me, as I always expect the distorted plywood to "POP". It never does if you do it right and presoak the seam edges and get the jump stitches pressed into the seam groves and have enough of them. I remove the bolts first to see if anything wants to shift, and then start clipping wires in less stressed areas of the hull. On my first boats, I would remove the wires and fillet and tape one seam at a time just to be sure. I still leave the top wires on all the panel corners in place until I fillet and tape those spots.
After all the wires and bolts are removed, I use a hand rasp and a rasp plane on the seams to knock down any fillet material that stands proud around any of the wire holes, and at the jump stitch start and stop points. This also makes me check all the seams for problems as I work. Make sure to vacuum up all the bits and pieces before you start the next project.
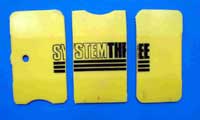
Now its time to fill and shape the seams with fillet material to add strength to the seams. On most hulls, there is a large angle between the side and bottom panels and its easy to get a good depth to the fillet material. This hull has some places where this happens, but has areas where the panels are almost flat to each other. To get around this problem and to have enough thickness at the seam, I took one of my squeegees and cut it into thirds. The one with square ends was sized for the regular seam fillets, and the other two were cut to form a half round shape to give the fillet some depth in the flat panel areas. I later had to trim off the outside corners of the half round squeegees to fit the hull better.
Before you mix up the first bag of fillet material, you need to lightly coat the seam area with mixed straight epoxy, the width of the fillet and a bit beyond. This will make sure the plywood doesn't suck out the juices from the fillet material and create an epoxy starved joint. This coating doe not have to cure first, but let it set for a few minutes to soak in. Now mix up a batch of bagged fillet material and cut a bigger hole in the bottom than you did for the jump stitches, but not too big. Start on the keel seam at the stern and work that seam all the way up the bow. Squeeze and Squeegee as you go, and use a small putty knife to clean up the sides as you move along the seam. You may want to figure out where you need to change squeegee's as the hull changes shape, and put a piece of masking tape there as a reminder. When you change from a flat seam to a humped seam, your technique will need to change as well. Try to keep the fillet small and watch that it doesn't slump on you. With these "humped fillets" you may want to do it twice. Let the first coat firm up a bit and then give it a finial coat.
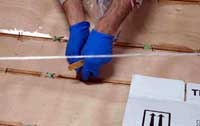
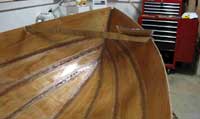
Now that you have all the hull and stern panel seams filleted, its time to lay down the first layer of cloth. I use a combination of 2" and 3", 6oz cloth tape. Using 3" and 4", 4oz tape is ok too. I roll out the tape and center it on the hardening fillet material. The fillet material still being sticky, holds the tape in place as I work and wets out the tape somewhat. Once the 2" tape is laid down I start mixing up straight epoxy and proceed with the "wetting out" of that first tape layer and a little bit beyond for the 3" tape later. I run the keel seam tape from the stern to the top of the bow as the first tape down. Then the next seams on either side. I trim the later runs to be flush with the edge of the keel seam tape to keep from creating a pile. Now I do the stern seam and cover the 2" tape and wet out. Next comes the 3" tape and it's wet out. I run the side seams first and trim them to the bow centerline and run the keel seam last to cover everything up. Then the 3" stern seam tape goes over everything there, and is wetted out. Leave a ½" length of tape exposed above the corners to give you something to trim off. Now go around the hull and check for lifting tape and runs. I had to put "darts" (small cuts) to the bottom sides of the 3" tape to get it to lay flat along the forward part of the hull. The "darts" were placed were the middle and bow seat bulkheads will be mounted and thus be covered later.
As a side note, I had gotten to the wet out of the 2" tape when I called it quits (7pm) for the day. I wanted to eat and "Lost" would be coming on soon. That forced me to wet the seams again the next day before applying the 3" tape. I used more epoxy than I would have normally if I had placed the 3" tape on the wet 2" tape and did a finial wetting out of everything. If I had thought about how long it would actually take to fillet and tape the hull, I would have pulled the wires and bolts and only wetted out the seam areas for the fillet material and call it a day. Then do the fillets and taping the next day. With System Three Silvertip Epoxy, you can wait up to 72 hours between applications without having to sand, and still have a good chemical bond. Also in my haste to see what the "others" were up to, I didn't check the seam areas for runs, and had a couple of small ones. A "cabinet scraper" took care of them and I then proceeded to give the inside of the hull a first coat of epoxy between the seams to seal off the grain. Much easier now before all the interior parts go in. I'm using a "rubber edged" squeegee to do this with. I used a brush on my first boats and couldn't keep the runs from ruining my finish. Then I went to the plastic squeegee and that helped some, but I was still using more epoxy than was needed. The "rubber" squeegee scrapes it down to the surface of the wood and spreads a tiny amount of epoxy around farther that you can imagine. I do a finial scrape with the rubber squeegee when I wet out glass cloth and am amazed at how much it can still find to move around.
The next installment will be on the fitting of the interior parts. I'm trying out a new moveable center seat option (with or without a centerboard trunk) that I may incorporate into all my designs. It looks promising. Until the next time.
Warren Messer

|