|
Boat Building with a Difference XII |

|
| by Barend Migchelsen - Montreal,
Quebec - Canada |
The following is
Chapter 12: Rigging and Sailing from Barend's
new book, "On
Amateur Small-Boat Boat Building". Click
the title above for this and other books by Barend.
Rigging and Sailing
Mast- and sail-making are specialized crafts that
are not easy to master. They take up a lot of time
to learn. That is time you could be out sailing.
If you look into a catalogue, you will see that
ready-made masts, sails and the attached hardware
are very costly. They can be the cause of a financial
hemorrhage. An aluminum mast can cost you anything
between $400 and the sky is the limit.
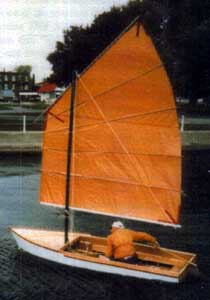
Trial Rig
To try out the boat immediately and without having
to visit your banker for a loan, make an inexpensive
trial rig.
With such a rig, you can trim, tune and try out
the hull to find out if she is worth the cost of professionally
made rigging. It is one of the most interesting and
thrilling parts of sailing. As it happened to me,
chances are that you have so much fun that you never
find it necessary to spend more money, and decide
to leave things as they are.
Trial Mast
This is the only time that I feel inclined to use
the word Instant Mast because of the quick results.
Materials:
- 1. 1 – 12' - 2"–ID PVC pipe.
- 2. 2 – PVC caps to close up the pipe.
- 3. 1 - 12' - 2"x 2" lumber, pine, or
spruce.
Round off the corners of the lumber enough to fit
the 2"x 2" into the PVC
pipe. Place one cap on top of the pipe. Attach the
second cap with a screw on the mast foot block on
the bottom of the hull.
Mast Attachments
Fasten the mast attachments to the mast with stainless
steel screws into the bearing edges of the
lumber. Instead of expensive pulley blocks that can
jam, run the lines through fairleads, a.k.a.
bull’s eyes. They are smooth, nylon fittings
with a round hole between shoulders with a screw hole.
The nylon is very slippery. The lines will never jam.
Fairleads cost substantially less than pulleys.
Spars
The boom and the top yard are made
from the same PVC material, but with a smaller diameter.
Choose PVC pipe that fits around 1"x
1" lumber.
For light spars, you can use also the 1",
or 1½" thick hardwood
that is used for digging tool handles. Some hardware
stores stock this material up to 10'
length.
Belaying Pins
The neatest and easiest way to secure a line, and
hang its loose end is on a belaying pin.
The pins fit into holes that are drilled into the
mast bench. The holes are drilled on each side of
the mast. Leave sufficient space between the holes
for the lines.
Drill a 2"-deep 5/8"-ID
hole into the length of a 6"
piece of 1"–OD dowel wood.
Into this hole, glue a piece of 8"
- ¼"–OD dowel wood. Round
the sharp edges at both ends of the pin.
Trial Sails
There are several products on the market that can
replace the expensive Dacron material for sail making.
One of them is Tyvek. Builders use it to seal new
constructed houses. It is not expensive but it comes
in rolls of 100'. That is probably
more than you will need in a lifetime.
Go to a building site where they use it and explain
to the supervisor for what purpose you need the material.
Nine out of ten, he will give it to you free of charge.
I tried once to make such a sail, but ran into difficulties
because I found the material too flimsy. Later I read
somewhere that it works well with contact cement.
I found that polyethylene tarp that you buy in the
hardware store works easy for me. The reason is that
it can be welded to itself in any form and without
experience with an electric cloth-iron. No glue,
or tape needed. Actually, the sections of the
larger tarps are factory-jointed that way. That makes
it neat and easy to reinforce at the corners and the
other places that need extra strengthening. Try it
out on a few pieces of scrap material, until you get
the knack of it.
In the hobby shops, they sell small, electric irons
with an accurate temperature-setting regulator for
gluing lamination tape to the edges of shelf planks.
They are ideal for this work and well worth the investment.
It prevents a lot of trouble also. When I tried to
use my wife’s cloth-iron the first time, I ended
up having to buy her a new one that cost twice as
much as the laminating iron.
Every local hardware store stocks the tarp in different,
convenience sizes and with bright colours that will
make your boat clearly visible. The price of the material
is conveniently low.
It is weather, water, and mold resistant besides
being strong, easy to clean, and does not tear easily.
Its surface is very smooth.
The relatively loose-woven strands allow the sail
to adapt an aerodynamic shape without allowing the
air to escape through the sail. No seam is needed
at the leech.
When higher heat than necessary for gluing is applied,
it melts. The molten edge hardens with cooling.
Burning with an electric soldering iron with a round
tip produces a perfect round hole with a hard edge.
Make it a quick stab. Reinforce the hole with a plastic
snap ring that you find in the camping section of
the hardware store. It makes an ideal, erosion-free
combination for line attachments.
These qualities make polyethylene tarps an ideal
material for trying out different sail forms and configurations
until you find the best performance rig for the boat.
That is the sail rigging that gives you complete
control, and, above all, with which you feel perfectly
safe!
Maybe, any other material, as Tyvek, or
similar building products are lighter and cost less,
but they require the use of tape. This is not half
as strong as polyethylene tarp that is hot-melted
onto itself. Test it yourself with some scrap material.
Rigging Hardware
Without compromising on safety, in principle, I
try to use as many cheaper substitutes for the rigging
hardware that the glossy magazine wants me (and you)
to believe that you cannot do without.
However, for two things I gladly pay the price of
the expensive marine stores. The first are the rudder-hanging
attachments, the pintles,
and the gudgeons. The others are stainless
steel screws. Altogether, they form only a small part
of my usually small budget
Sail Configurations
Sails come in many different shape and forms. From
the simplest lug sails to Chinese junk sails, or the
Polynesian sails cut out at the top.
If you like to try out other types of sails, the book
100 Small boat Rigs by Phil
Bolger will serve you a smorgasbord.
Low-ratio rigs with unstayed (freestanding) masts
are the easiest, and the safest for small craft that
are regularly car-topped, or transported on a light
trailer. Then, a long mast becomes a nuisance, and
a danger on the road.
The exception is a Gunter rig that makes it possible
to combine a short mast and short spars into a high-ratio
rig. However, for fine-tuning this rig requires a
jib.
Trimming and Tuning
Trimming a small boat is done by shifting
the weight of the crew.
A perfectly trimmed and tuned small boat lies horizontal
in the water and stays on a straight course without
any correction of the rudder.
A sailing boat is subject to four influences that
constantly change:
- 1. The crew moves around in the cockpit and/or
on the deck.
- 2. The winds shift in force and in direction.
- 3. The currents shift in force and direction.
- 4. A course change.
This requires constant tending of the sail(s).
Weather Helm, In Irons
Weather helm is the tendency of a boat
to veer off by itself into the direction
of the wind. Unchecked, the weather helm turns the
bow of the boat into the wind. The boat comes to a
dead stop. This situation is called “being in
irons. The sail starts to flutter with a lot of noise.
Let it not frighten you. Nothing will happen. Although
it may be a nuisance, there is no danger.
To get under way again, push over the rudder a few
times, or make a couple of strokes with the spare
paddle that you should always have with you (by law).
The more forward you strike with your paddle, the
faster you get out of this situation.
Lee Helm
The intention of a boat to turn itself in the
opposite direction of weather helm, away from
the wind is called lee helm. A boat with an unchecked
lee helm will continue to sail away with increasing
speed. This is particularly dangerous if you have
fallen overboard.
Safe Sailing
For safety reasons, a boat must be tuned
always for a slight weather helm. That small
tendency of course change to weather by itself is
corrected with the rudder. These corrections should
be within five (5) degrees.
If this limit is surpassed, it slows down the speed
and the placing of the rigging must be adjusted.
Mast Placement
The mast is the spine of the rigging and its place
is the most important. In all my designs, placing
the mast at one-third (1/3) LOA from
the tip of the bow works well.
By making the hole for the mast in the mast bench
not perfectly round, but longer in the longitudinal
direction, the mast can be raked with a wedge. That
is sometimes just sufficient for fine-tuning the boat.
Sail Adjustments, Tuning made Easy
With a single sail, increasing the sail area aft
from the mast increases the weather helm. Increasing
the sail area fore of the mast increases lee helm.
For these reasons, I favour the simple lugsail.
It is a powerful sail, easy to make and easy for
tuning the boat. Corrections are made by moving the
hoist attachment on the top yard without that a change
of the mast position is needed. It can not be done
in a simpler way.
The fine-tuning for course, or wind direction- and/or
wind-force changes is done with the inhaul attached
at the tip of the boom fore.
This line makes small changes in the ratios of the
sail areas fore and aft of the mast.
Effective Rudder
A rudder works only effective within a 25 degrees
range left or right.
If the rudder is turned wider, the “drag”
component of the forces vector of the rudder starts
to act as a brake. Snapping the rudder of a small
boat a full 90 degrees (flat against the transom)
is a sure way to slow the boat down fast.
Basic Sailing
This chapter is not the place to explain and elaborate
on the fine points, and the technique of sailing.
Even so, for your own safety, before you go out
on the water, you must be familiar with these three
basic movements:
- 1. Tacking,
- 2. Running,
- 3. Jibing.
Tacking
Sailing straight into the direction of the wind
is impossible. A zigzag course is then steered.
Tacking is the constantly changing of the
zigzag course by turning the bow through
the direction of the wind. It is tightly and easily
timed, and controlled. Before you tack, fall of a
bit. That will increase your speed and makes the turn
through the wind easier. Then you push the helm forcefully
over.
Running
Running is sailing with the wind fully
aft. In that case, you have to be alert for jibing.
Jibing, Jibe-all Standing
Jibing, a.k.a. gibing can occur
while the boat is running before the wind with the
boom at a (nearly) 90 degrees angle athwart.
Suddenly the boom of the mainsail swings over from
one side of the boat to the other side in a nearly
180-degrees turn. It happens when the wind from aft
gets into the other (wrong) side of the sail by surprise.
The forceful swing of the boom can knock you unconscious,
overboard, or both!
A controlled jibe is the fastest way to
change course 180 degrees. It is used deliberately
in emergencies, i.e. “man overboard.”
Always make sure that a necessary jibe is anticipated
by every member of the crew, accurately timed, and
controlled.
If a jibe happens involuntary, it is called a jibe-all-standing.
Correct Setting of the Sail(s)
Novices to sailing often have the tendency to pull
in the sail(s) too tightly.
- 1. Sail a boat as upright as possible,
- 2. Let the sail(s) out as far as it (they) will
go until you see a little dent developing into the
sail(s) at the tack (corner) fore. For the correct
setting, pull in the sail(s) until that little dent
just has disappeared.
“Geien” (pronounced Gy-jen)
Before WW II, very few of the Dutch barges were
motorized. They relied on wind power. Hoisting the
main sail was the biggest job of the day, even if
they had a multiple gear box at the foot of the mast
to reduce the required force.
Getting a loaded barge through the narrow canals
with their many bridges and locks was a real obstacle
course that required all the skills and cunning of
the crew.
Since hoisting the main sail was the biggest job
and letting it down completely to stop the barge was
a nuisance, the Dutch barge men found a simple compromise
that left the sail on the mast but took the wind completely
out of it.
All the mainsails of the barges have a loose foot
which is convex cut at the foot as is shown in the
picture below.

Instead of attaching the tack to the mast, this
corner of the sail, with a line from the top of the
mast, was hoisted halfway up the mast.
When the wind came into the sail it formed a kind
of baggy sack, not unlike a full blown spinnaker.
To take the wind completely out of this airbag without
having to drop the mainsail, they let the peak of
the gaff fall down halfway. The airbag collapsed.
The mainsail became a roll between the top of the
mast and the end of the boom.
That way they were able to stop the barge without
having to drop the mainsail completely. When the bridge
or the lock opened, all they had to do was raise the
peak of the gaff, and the airbag would slowly fill
up again and get them underway.
The trick was to get that loaded barge always stopped
at exactly the right place before the bridge or the
lock. Too close would cause a lot of damage, too far
required a lot of extra work to get the barge into
a lock. The fact that the wind is seldom constant
but blows in gusts made this whole operation even
more an exciting chess game that required split timing
action.

Other Articles by Barend Migchelsen:
Books
by Barend Migchelsen
|