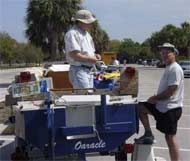
| One of the fun things about having a small boat
is customizing and experimenting with improvements
to make it more useable and comfortable. As Oaracle
approaches her third birthday, some small changes
have made her a more friendly and enjoyable craft.
 |
As Oaracle approaches
her third birthday, some small changes have
made her a more friendly and enjoyable craft |
A couple ideas for improvement have come from Phil
Bolger designs. Oaracle is a Jim Michalak-designed
Frolic2, and follows Bolger’s
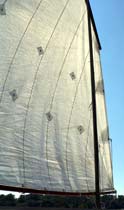
lead on Birdwatcher and other designs that have incorporated
a “slot-top” cabin, where an opening about
two feet wide or so runs the length of the cabin.
Great for allowing someone to walk upright the length
of the cabin and for ventilation, but coming with
the small problem of effectively covering the slot
on a wet sailing day, or for sleeping on a rainy night.
One common solution has been a segmented hard cover,
but storing and handling the many sections can be
a pain. A soft fabric cover, with curved battens to
shed water, stores easily but can be harder to use
and also is prone to damage if someone falls against
it.
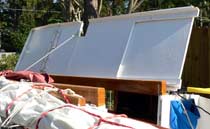
Bolger came up with a solution when he designed
the raised-cabin version of his popular Chebacco boats
– a modular hatch that’s hinged on one
side and folds over flat on the deck. Incorporated
into the unit are a sliding cover on the aft part
and a hinged opening hatch on the forward part. The
pictures show how it works better than I can describe
it. This system allows the crew to use the sliding
part when they need to reach into the cabin for something,
or fold the entire hatch unit out of the way when
they need the ventilation or to walk forward unobstructed.
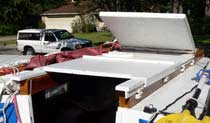 |
The modular
hatch has a forward section that hinges open,
and an aft sliding companionway hatch. You can
see the hinges mounted on the hatch side.
|
I reused a hard hatch made for covering the slot
when the boat is traveling on its trailer. The hatch
sides are ply, but the top is quarter-inch foam sheathed
in fiberglass and epoxy, because I wanted to experiment
with the glass covered foam. It’s probably a
bit lighter but not quite as strong than an all-ply
version. The geometry of the existing hatch wasn’t
quite right and the hatch won’t fold all the
way over and lie flat on deck. There’s a line
to stop the hatch before the edge hits the deck to
save strain on the hinges. The hinges, by the way,
are the nylon
ones sold by Duckworks, and seem more
than strong enough for the job.
 |
The whole unit
hinges to starboard when the mast is stepped,
someone needs to go forward, or just for ventilation.
|
So far the modular hatch seems to work well, including
allowing unreefing the sail on a recent blustery day
of sailing at Cedar Key. The sail can be raised and
lowered by standing in the aft part of the cabin,
with only the aft part of the hatch open.
A factor to keep in mind is the mast is raked, so
the mast opening cut into the port side of the hatch
has to be extra wide to clear the mast as it lifts
up. The “collar” around the slot is to
allow a mast boot to be installed to seal the slot
in rainy weather.
The second recent change was redoing the oar port
covers. Installing the ports – necessary to
have the proper rowing geometry – is simple
enough to do during construction but covering the
oarports is another matter. (Not covering them is
not an option; a modest gust will produce a moderate
heel that combined with a passing wave will dump gallons
into the cockpit through an open port.)
My first attempt was workable but slow to install
or remove. A clear plexiglass cover with rubber gasketing
around the edges goes on the outside and is held in
place with a bolt and wingnut to a piece of half-inch
ply that spans the oarport inside the cockpit. It’s
not necessary to completely remove the wingnut to
remove the port; it can be loosened enough to allow
the ply piece to slide out the oarport. But care is
necessary not to drop the whole assembly overboard.
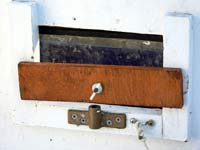 |
The old oarport
cover required loosening the wingnut so the
unit could be removed – slow and somewhat
tricky. |
A better idea surfaced when I discovered Bolger’s
Anhinga design, which also has cockpit oarports. He
used wooden turnbuttons to fasten the oarports in
place, and small blocks to properly locate the ports.
He also has a safety line to prevent loss of the ports
if they are dropped. It was a couple hours work to
modify the ports on Oaracle to this much improved
design. Now it’s a matter of seconds to remove
or install the ports.
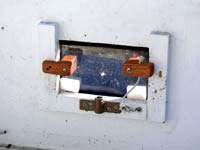 |
The new oarport
cover has two turnbuttons and a safety line.
Removal can be one-handed, if necessary. The
white plastic blocks at the bottom help locate
the port for easy installation.
|
The third improvement came from Chuck Leinweber
following our racing Oaracle in the Everglades Challenge
last March. He inquired why Oaracle didn’t have
any sort of tiller locking mechanism. I replied I
hadn’t found any simple and inexpensive way
to install one. He described the system he used on
his boats, but I couldn’t follow how it worked
until he sent me a picture. It is simplicity itself.
Perhaps it has been written about in Duckworks before,
but if so, it deserves another mention. It’s
that handy.
| 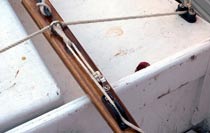 An
eyebolt and clam cleat are the main parts for
a quick an easy tiller lock that adjustable
without loosening anything. I used an eyestrap
to anchor the tensioning line so it won't get
lost, but you can use a hook or snap to attach
it to the line that runs through the eyestrap.
Note the cam cleat for the port line tie down.
That ensures instantly releasing the line which
is sometimes necessary in tacking because the
rudder and tiller are offset to port. An
eyebolt and clam cleat are the main parts for
a quick an easy tiller lock that adjustable
without loosening anything. I used an eyestrap
to anchor the tensioning line so it won't get
lost, but you can use a hook or snap to attach
it to the line that runs through the eyestrap.
Note the cam cleat for the port line tie down.
That ensures instantly releasing the line which
is sometimes necessary in tacking because the
rudder and tiller are offset to port.
|
Basically an eyebolt is installed in the tiller,
with the eye facing fore and aft. A jam or clam cleat
is installed several inches forward of the eyebolt.
A slack line is run from gunwale to gunwale, just
behind the eyebolt. Tie it so the line can be looped
a couple inches through the eyebolt. A second line
with a clip, hook or similar device tied to one end
fastens to the loop of the first line. Pull forward
on the second line until the first is tight in the
eyebolt, and drop the second line in the clam cleat.
Voila! The tiller is held in place. And part of the
beauty, as Chuck noted, is the tiller remains adjustable
with a firm push. That allows fine-tuning of the sail,
leeboard, and rudder without having to recleat the
tiller lock. I also use it to lock the tiller when
the boat is on the trailer.
A small problem is Oaracle’s rudder is offset
to port. When the tiller is pushed to port, the gunnel-to-gunnel
line restricts its travel. I replaced the traditional
tie down cleat on that side with a Duckworks’
cam cleat for a faster release and got a happy bonus.
When the tiller is thrown to port, as it approaches
the cleat, it pulls up on the line and yanks it out
of the cleat – an automatic release.
So far, the tiller lock has done well, especially
reaching and running where it has held course for
several minutes at a time. Hard on the wind is trickier,
but so far I’ve only tried it in choppy and
fluky conditions. On a light, unballasted boat like
Oaracle, it would be suitable for use close hauled
only in light winds.
The fourth improvement really isn’t a finished
product yet, call it a work in progress for accuracy.
I’m passing it along in hopes of getting suggestions
or inspiring someone else. And that’s making
a carbon fiber mast for Oaracle. In this case, I got
a broken, 18-foot two-piece Windsurfer mast. Two staggered
layers of heavy carbon fiber (about the weight of
light woven roving in regular fiberglass) interspersed
with sleeves of biaxial carbon cloth fixed the break
(which was just above the mast joint) and made the
two-part mast a one-piece. A foot was cut off the
top to match the designed height of Oaracle’s
mast. Then the whole mast was covered with two layers
of the biaxial sleeving, plus an additional layer
on the top half, at the partners and the top foot
of the mast. The final layer was a sleeve of regular
fiberglass. The goal was to ensure the mast could
take the strain of the 113-square foot balanced lug
sail (which was about the size of the Windsurfer sail
it originally carried) and add some stiffness to the
mast, which was built to be very flexible to match
the curved luff of the Windsurfer sail. The changes
probably more than doubled the weight of the mast,
but its still half or less of the wooden mast.
 |
The carbon fiber
mast shows more bend than the original wooden
spar, even through the wind, as this picture
was taken, was moderate.
|
The test was on a blustery, one-reef day and the
mast passed its strength test, but still seemed too
flexible. That in turn appeared to degrade the drive
of the sail on its “good” tack (when the
sail is leeward of the mast) when hard on the wind.
In retrospect, I think I should have used unidirectional
sleeving (which is more expensive), rather that biaxial,
which would have added both strength and stiffness.
I might even have had to use less of the sleeving,
which would have offset the higher cost of the unidirectional
sleeve.
So far the total cost of the mast (include the $20
to buy the broken original) is around $200. That’s
a lot more than the wooden one cost, but only a fraction
of the price for a manufactured carbon fiber mast.
I’m adding a layer of unidirectional sleeving.
It will increase more weight (and I’m pretty
sure it would be way overbuilt), but it will still
be much lighter and easier to handle than the wooden
one. (Note to anyone imitating this experiment: carbon
fiber laminates better with thin, watery epoxy than
with the thicker epoxies.)
Another upgrade was to install forward running lights.
We have a nice set of AA-battery powered LED lights
that work well. But it’s not always practical
or easy – especially if underway in bumpy weather
– to crawl through the cabin, open forward hatch
and lean out over the foredeck to fasten them (with
a velcro strap) to the forward cleat.
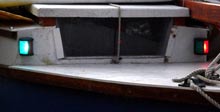 |
The lights installed
on Oaracle are plenty bright as darkness falls,
even if the boat is on the trailer in the driveway.
|
Chuck said he could special order a bi-color LED
bow light for around $50 that would wire into Oaracle’s
small 12-volt battery. However, there’s no convenient
place to install a single, permanent light where it
would have good visibility without installing some
sort of mount to the otherwise clear foredeck.
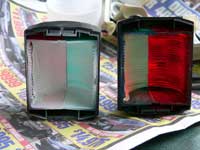
Finally I recalled that the regular Duckworks bi-colored
bow lights use incandescent festoon bulbs, which are
available from others sources (such as Superluminatiion.com)
with LED lights. Two bi-colored bow lights were ordered.
When they arrived, I took them apart and masked off
the red lens on one light and the green lens on the
other, and taped over the metal bulb contacts on both.
Then the inside of the base and lenses were painted
with several coats of white paint, in essence turning
the bi-color lights into single red and green bow
lights. Figuring the inside of these black plastic
lights might get hot, a heat resistant paint was used.
(For the life of me, I can’t understand that
if the purpose of a running light is to put out illumination,
why the inside parts are made of light-absorbing black
plastic instead of light-reflecting white plastic.)
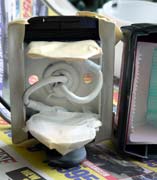
|  The
running light lenses are masked with tape on
one side, and then the interior is painted with
several coats of white paint. Here, the port
light has been masked and painted, and the starboard
light (with the green side masked) is ready
to paint. Painting tip: set the lenses for painting
and while drying so the paint can’t run
behind the masking tape using the grooves of
the lens. The
running light lenses are masked with tape on
one side, and then the interior is painted with
several coats of white paint. Here, the port
light has been masked and painted, and the starboard
light (with the green side masked) is ready
to paint. Painting tip: set the lenses for painting
and while drying so the paint can’t run
behind the masking tape using the grooves of
the lens.
|
The incandescent bulbs were replaced with bulbs
having nine LED lights, which were aimed at the now
white interior of the fixtures. The idea was a more
uniform, even light would be reflected out, and it
seems to work. The lights are brighter than the AA
unit they replaced (which used only two LEDs each
but still seemed plenty bright enough). And now all
I have to do is reach into the cabin from the cockpit
and flip a switch, and the bow lights are on.
(Get your lights before ordering the festoon bulbs.
The first light I got from Chuck, which is on our
30-footer, used a 39 mm long festoon bulb. The recent
lights used 44 mm. Go figure.)
 |
The mount/base
of the running light has its metal bulb contacts
masked and then it’s painted with the
white spray paint. This is the first of several
coats.
|
The AA powered stern light was not replaced because
it’s easy to install at night, and it also stays
on all night when Oaracle is at anchor.
The final improvement wasn’t made for Oaracle,
but rather for our 30-footer, Le Dulci-Mer. I’m
fond of Bruce anchors for their ease of deployment
plus their reliability and versatility in holding
in a variety of bottoms. But they aren’t the
easiest anchors to store, particularly on the deck
of a boat without a bow roller.
The answer was a two-foot length of 2 x 6 board,
pressure treated pine in this case. I cut a slot in
top to match the width of the anchor shank and six
holes set in pairs on either side of the center of
the board. The holes accepted hose clamps, which are
used to attach the board to a stanchion. A cleat on
one lower edge and some light line are sufficient
to securely attach the anchor to the mounting board,
but still ready to go in seconds. In a real emergency,
the line can be cut away in an instant. The board
was sealed with epoxy before painting as I once had
an unsealed, painted piece of pressure treated wood
rot out in about a year.
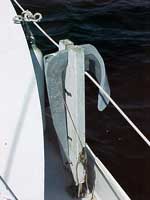 |
A two-by-six
board, some hose clamps and a cleat became a
convenient mount for a Bruce anchor.
|
Of course, the mount can be attached to any stanchion;
for years I carried it in the cockpit to keep an emergency
stern anchor at hand. It’s an inexpensive way
to keep the handy Bruce at hand.

Other articles by Gary Blankenship &
Helen Snell:
|