| Light bulb moments
are few and far between for me, but I experienced
one a few years back when it occurred to me that Xynole
polyester needn’t be limited to sheathing plywood
boats, that it could easily be used as a second layer
over a heat-shrink Dacron skin kayak. Maybe it was
more of a Homer Simpson moment, a bout with the obvious,
but however one might regard its conception, the Dacron/Xynole/Epoxy
Matrix©, as I have pompously named the method,
has turned out to be a good thing.
Skin-on-frame kayaks have come a long way since the
days of seal hides, but the search for a tough, durable
and manageable covering continues. Canvas was the
material of choice when non-arctic people first realized
what a triumph of ingenuity kayaks were and began
to build them for themselves in locally appropriate
ways. Since then, materials have ranged widely. On
the frivolous-to-dubious end of the spectrum one will
occasionally find varnished paper or a blue tarp.
On the other end are the strongest fabrics, such as
ballistic nylon, which provide skins that can be dragged
over mussel beds or lava with no ill effects, or so
it is claimed. And then there is aircraft heat-shrink
Dacron. I make no secret of my fondness for heat-shrink
Dacron, since it is light, strong, and easier to manage
than any other covering I have tried.
Nevertheless, many people seem wary of heat-shrink
Dacron, fearing that a fabric so light will be reduced
to tattered shreds if one merely looks at it the wrong
way. This is just not true - Dacron is very strong
for its weight - but reinforcing Dacron with a layer
of Xynole and epoxy is an attractive and viable way
of making a very strong covering using materials that
are easy to work with. Xynole is an open-weave polyester
laminating fabric that is available only (as far as
I know) from Defender Industries. Its greatest advantages
are its strength and its ability to drape gracefully
over difficult curves. An explanation of the method
follows.
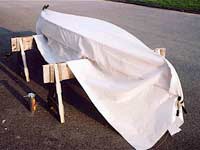 |
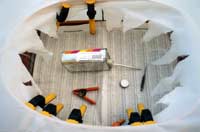
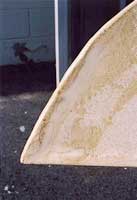
First the frame
is covered with the heat-shrink Dacron. |
First the frame is covered with the heat-shrink Dacron.
In a wind-free environment, drape the Dacron over
the overturned hull, leaving six or more inches of
excess at each end. Align the warp of the fabric parallel
to the keel. Pin the fabric to the keel at the outermost
ends where the keel meets the stem and stern pieces.
Slit the fabric down the faces of the stem and stern
pieces, starting a little fore and aft of the pins.
Begin gluing the fabric to the sheer stringers amidships,
first one side and then the other, alternating toward
the ends to keep it evenly spread across the hull.
(The glue is a contact cement that can be obtained,
along with the Dacron, from Aircraft Spruce, a supply
house for aircraft builders.) Press the fabric into
the glue along the stringers so that it adheres well.
You do not need to pull the fabric too tightly (the
heat will do that) but it should be glued as evenly
as possible over the frame.
When it’s glued along the sheers to the ends,
spread glue along the forward face of the stem piece.
Pull one side of the slit cloth across the stem and
press it well onto the stem. Allow it to dry, trim
its edge to about 1/2 inch from the stem, then repeat
for the other fold. Do the same at the stern.
Now go all the way around the sheer and ends and
make sure that the fabric is glued securely. If there
are any gaps, brush some more glue into them and press
firmly. When all is dry and secure, you are now ready
to shrink the hull fabric. I have found it best not
to trim the excess along the sheers until after shrinking,
because the skirt gives you something to hold on to
should any spots come unglued during the shrinking
process and need regluing.
The shrinking is done with a common household iron.
Personal experience leads me to advise against a heat
gun because the distribution of heat is too inconsistent,
and also because a moment’s inattention can
lead to burning a hole right through the fabric. It’s
a clean job, so if the builder needs to borrow the
iron from a domestic partner, it can be done openly
and with a clear conscience.
Set the iron at 250F (medium or slightly less; irons
vary) and begin the shrinking. Start at the center
of the boat’s bottom and work outward in circles
toward the end, doing the sides, too, as you progress.
The Dacron will shrink gradually, and you should pace
the process so that you cover the entire surface of
the hull with the iron more than once before it’s
taut. And don’t overdo it, either, because the
layer of Xynole will add plenty of stiffness. You
don’t want any bagginess anywhere (make sure
there is concavity at forefoot and sternfoot) but
don’t shrink it so hard that the stringers are
bent inward. It can be done, and you don’t want
to. It scrunches the lines of the boat.
When the shrinking is complete and you’ve gone
over every inch of the glued surfaces and made sure
there are no gaps, it is safe to trim the skirt. Use
a good sharp blade. My tool of choice is the old Case
pen knife, freshly honed, that was my father’s.
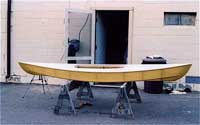
Once you’ve removed her skirt, she’s ready
to be turned upright and admired.
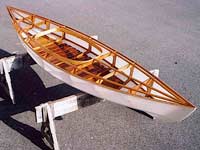 |
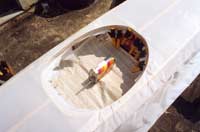
Once you’ve
removed her skirt, she’s ready to be turned
upright and admired. |
Covering the deck is much the same. Align, leave
some extra at the ends, and pin at the ends, overlapping
the hull fabric. Glue along the sheer as before, then
at the ends tuck the sides under the forward flap,
overlapping the hull fabric by up to an inch, stuff
full of glue, and pin until dry.
The cockpit opening is cut by slicing the fabric,
first fore-and-aft then athwartships, keeping the
cuts several inches away from the carlin to begin
with. Make four more slices between the first ones,
and probably four more, too. This will vary depending
on the shape and size of the cockpit. Start clamping
the Dacron to the carlin with spring clamps. Experimentation
will show how much the slits have to be enlarged to
allow the cloth to conform to the carlin. The farther
the slit ends are from the top of the carlin, the
better. When the opening in the fabric is sized to
the carlin satisfactorily, glue it, starting with
the ends.
Once again, check all around to make sure the gluing
is uniform, then shrink the Dacron as was done with
the hull, and finally trim the skirt. Special care
must be taken when trimming the excess from the deck
fabric to make sure your blade does not slice through
the hull fabric beneath. That would ruin your day,
if not more.
The Dacron part of the process is finished. You might
be tempted at this point by the airy lightness of
the Dacron-only kayak to forgo the additional strength
of the Xynole layer, and that would be a valid choice,
but this article does not have that option because
it is titled “The Dacron/Xynole/Epoxy Matrix”
and so must go on to describe the application of this
fortifying (and beautifying) second skin. Anyone who
has sheathed a plywood or strip-built boat, or has
seen the process described, is already familiar with
the underlying technique, although there are some
variations unique to its use on skin boats.
Begin as before with the boat upside down. Make sure
whatever it is resting on is well cushioned, because
the unfinished Dacron of the deck is prone to tearing
at this point. Even the tiniest snag will disrupt
the weave of raw Dacron when (not if) the boat is
jostled.
The first step is to wet out the hull Dacron with
unthickened epoxy. A 3” foam roller is the best
size, and a clean plastic microwave dinner tray holds
a usable amount of epoxy. Apply the epoxy evenly to
the fabric. The aim is to saturate the fabric but
no more, so don’t overload the roller with epoxy
or overlap areas that are already wet. You don’t
want it pooling on the inside of the skin or dripping
onto the woodwork. Slow-cure epoxy is recommended
because it gives you the most time to work and also
a better chance of achieving the best bond.
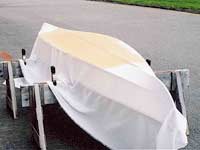 |
Slow-cure epoxy
is recommended because it gives you the most
time to work and also a better chance of achieving
the best bond. |
It is ideal to apply the Xynole when the initial
epoxy is at the green-cure stage, i.e. not yet hard
but no longer sticky. It can be applied later if this
is not possible, as long as blush has been removed
and the surface is clean, but the advantage to a green-cure
wet out is maximum adhesion. Trying to apply the Xynole
while the epoxy is still sticky is dicey and not recommended.
Align the weave of the Xynole and pin at the ends
of the keel, pretty much as was done with the Dacron.
Don’t slit the ends yet, as it will be more
apparent later how they will lie.
The Xynole is wet out with unthickened epoxy. Pour
some onto the center of the bottom and spread it outward
with an autobody squeegee. Apply judiciously, just
enough to saturate the fabric and make it adhere to
the Dacron; filling the weave will come later. Spread
the epoxy evenly, making sure that there are neither
dry spots where the fabric layers are not joined nor
pools of excess epoxy.
 |
|
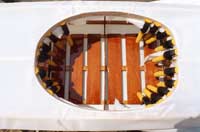
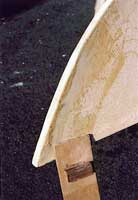
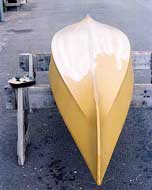
| As you begin to approach the ends (not at the
last moment) take the time to plan how to slit
and overlap the ends. |
As you begin to approach the ends (not at the last
moment) take the time to plan how to slit and overlap
the ends. It will differ from boat to boat depending
on the shapes of the ends, but the principle is similar
to the Dacron. Xynole is thicker than Dacron, so small
bumps will be inevitable where the slits end and the
overlaps begin, but they will be faired later, so
just try to keep them pinned down as best you can
while the epoxy cures. Check all around (especially
the sheers) to make sure adhesion is complete. Any
area where the Xynole is not joined to the Dacron
will cure into an unsightly hump, so be thorough and
keep checking as the cure progresses (especially the
sheers) because sometimes it will pull away when your
back is turned.
It is best to trim the skirt just as the epoxy reaches
the green stage, stiff enough not to pull away or
stick to the blade, but soft enough to cut through
easily. Cut a smooth line right along the hull-deck
joint, once again taking care not to cut through any
other fabric. Leave enough at the ends to complete
the curve of the sheer.
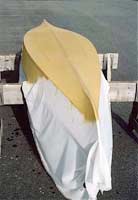
 |
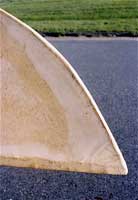
Now is the time
to for the final decision as to whether the
deck will be sheathed in Xynole, too. |
Now is the time to for the final decision as to whether
the deck will be sheathed in Xynole, too. It will
be lighter without, or stronger with, the additional
laminate. If you’ve elected to continue, it’s
best to do so while the epoxy is still green.
When it’s no longer sticky, set the boat upright.
There will probably be gaps between the Xynole and
the Dacron at the tops of the stem and stern, and
these gaps should be filled with a syrupy mix of Cabosil-thickened
epoxy to form a solid impact-resistant mass. Any other
gaps that escaped previous inspection should also
be filled before the deck fabric is applied. Make
sure the Xynole is trimmed smoothly along the sheer
and at the ends.
 |
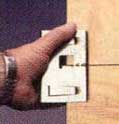
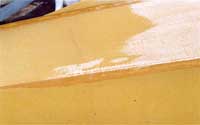
Gaps between
the Xynole and the Dacron at the tops of the
stem and stern should be filled with thickened
epoxy to form a solid impact-resistant mass. |
Drape and align the Xynole over the deck and mix
more unthickened epoxy. Spread as before. Another
fluorescent moment was when I thought of applying
masking tape 3/4” below the sheer line to assure
a smooth border between the hull and deck layers,
but I haven’t had much luck getting the tape
to stick, so some care is required when gluing the
overlap to keep it even. There is, of course, no reason
to wet out the cloth over the cockpit opening. Right
up to the edge and maybe a little past is best. When
the deck fabric is at the green cure stage, trim the
excess and cut out the cockpit opening.
Now it’s time to fill the weave with thickened
epoxy. Use epoxy thickened with Cabosil to the consistency
of mayonnaise. Cabosil is used in this first layer
because it is hard to sand, and thus protects the
Xynole, which becomes annoyingly fuzzy if exposed
by sanding during finishing. Subsequent filling layers
(until the surface is smooth) are done with microballoon-thickened
googe, because it does sand easily.
Spread the Cabosil mayo with an autobody squeegee,
thinly but thoroughly. You want to cover every square
millimeter of the boat (first hull, then deck, as
before) lest the dreaded fuzz ruin an otherwise perfect
finish. Spread it as smoothly as possible, eliminating
as much as possible the little ridges that trail from
the edges of the squeegee. You can fair (fill) in
the small step between the deck and hull fabric, but
you don’t need to make it disappear this time
around (if ever) since the rubrails will cover the
joint. Work just enough along the edge of the deck
fabric to bridge the gap and make both layers one.
When the Cabosil layer has semi-cured, go over the
entire surface with your hand to find any ridges or
other irregularities. Scrape them smooth with a cabinet
scraper, or with a chisel (held upright with the fingers
like a pencil) or with a penknife held sideways. Be
careful.
 |
Then mix up
some microballoon mayo. It is with this variety
of googe that the weave of the Xynole will be
filled to smoothness. |
Then mix up some microballoon mayo. It is with this
variety of googe that the weave of the Xynole will
be filled to smoothness. Do the entire hull as before,
applying as thin a layer as possible. It will take
two layers to fully cover the weave. Don’t try
to do it in one, because it’s hard to sand excessive
accumulations from the flexible fabric. As with painting,
thin coats are better. Build up a bead of epoxy along
the edge of the chine to make a protective corner.
It will be sanded smooth and round.
 |
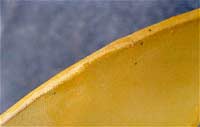
Build up a bead
of epoxy along the edge of the chine to make
a protective corner. |
The stem and stern are faired with microballoon epoxy,
too. File down the humps where the fabric crossovers
pucker a bit, but not so much that the fabric is compromised.
This time use a fairly thick mix, thick enough not
to sag. Build the epoxy out somewhat from the ends,
then fair it back to the proper profile when it is
hard.
When the microballoon layer has cured completely,
sand it smooth with 100 and then 150 grit sandpaper.
This is a hand-sanding job; over-sanding might raise
the fuzz. Caress the surface with your bare hand to
find irregularities the eye can’t see. A good
job of sanding will provide a smooth substrate for
a flawless paint job.
And there you have it: the essence of my skinnovation,
the Dacron/Xynole/Epoxy Matrix©, in all its revealed
glory. People have asked if I have patented this process.
I have not. Even if this particular type of lamination
could be patented, it is not my aim to prevent people
from using it. Rather, I would like to see the method
proliferate, preferably on boats of my own design,
though it’s also a good way to bring an old
frame back into use. I’d also be interested
to see one of Platt Monfort’s Geodesic©
sailing dinghies covered in this manner. Please go
ahead and try it. Just don’t forget who told
you.

Other articles about skin-on-frame
kayaks:
|