 |
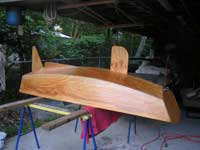
LOA
- 7’9”
Beam – 4’1”
Draft - 6” board up and 24” with
it down
Weight – 75lbs
Click
images to enlarge |
I’d like to share my experience in learning
how to use epoxy. Several years ago I decided I wanted
to master some of the basics regarding Epoxy and fiberglass.
I had touched on the basics off and on again through
the years while repairing small cracks and holes but
had never actually used the process for construction.
While preparing for the actual “hands on”
part of the education I read various articles and
books and in the end decided that rather than build
a box in the learning process, I might just as well
build a small boat.
I am not a master carpenter but I have owned several
houses over the years and have a fair level of knowledge
regarding basic power tools and general household
maintenance. Luckily for me, my expertise at covering
up my mistakes at home maintenance turned out to be
one of the primary skills needed for building stitch
& glue (and screw & glue) boats. Unless you
are building “Bolger Bricks” (a brick
shaped dinghy with no difficult cuts or bends), you
will likely have some pieces of wood that do not fit
together as precisely as you planned and you’ll
need to cover the gaps and round the corners. By the
way I have built a Bolger Brick and liked many of
its characteristics, so I’m not knocking that
design.
I used West Systems epoxy and filler on my first
boat but have experimented with several varieties
since that time. I use Epoxy
because the resin is absorbed by wood and virtually
ends the chances of wood rot due to water. That characteristic
allows me to use the cheapest plywood available in
my boat building projects. There are many other epoxies
out there but West Systems is probably the most readily
accessible to the average Joe (or in my case, the
average Pat). The West Systems fast hardener’s
quick cure properties were also a big draw since my
skills don’t include a lot of patience.
There are three things you MUST know before attempting
any of the following at home.
- A Belt and Palm sander are your best friends
- Plain white vinegar will clean epoxy off your
hands if you clean them before the epoxy begins
to harden (Yeah, I know you’re supposed to
wear gloves)
- Never mix more epoxy than you can use in five
minutes (ten minutes in the cooler months). It’s
easier to mix more than to spread a smoldering glob
of semi hardened epoxy.
There are a lot of boat-building websites. While
many of the boats will stir your imagination regarding
beauty and performance, remind yourself that simplicity
is the key to an enjoyable “first time”
boat-building project. After a good deal of searching
I decided on a dinghy called the “D4”.
I decided to buy the plans for $35 to ensure I got
it right. In retrospect, I might have done just as
well with the free plans that were offered, but it
pays to be cautious when doing something new. I also
decided to build the sailing version since the cost
was nearly the same and I would have a more versatile
boat at completion. I reviewed a bunch of online tutorials
on construction techniques from various websites.
A Bolger Brick (very simple) would have been a much
better first time boat (much simpler with few curves).
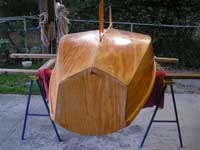
| I decided to build
the sailing version since the cost was nearly
the same and I would have a more versatile boat
at completion. |
|
Armed with the plans, the epoxy materials and a couple
sheets of plywood, I began. The first thing to do
was to draw the shapes on the plywood so that the
individual pieces could be cut out. The plans were
a little difficult to piece together for this process
and it took a little while to get it done. Subsequent
boat plans were much easier having had the initial
learning experience under my belt. I used a circular
(skill) saw to do most of the cutting and it was done
within an hour or so. Next the assembly steps were
begun. I attached the two sides to the forward/vertical
side of the center seat by drilling holes in the side
and the corresponding vertical piece and stitched
them together using 8 inch long electrical ties (this
is the stitching part of the “Stitch & Glue”
process). It is amazing how well the electrical ties
allowed the two pieces to be cinched together. They
held together well enough to be freestanding and with
a fairly strong joint. Attaching the bow and stern
was accomplished using the same technique and the
plywood had already begun to look like a boat 20 minutes
after the initial stitch. The next steps were to insert
the remaining vertical pieces and then flip it over
to attach the bottom. Before flipping the boat back
upright I used duct tape along the bottom edges to
keep the epoxy from running out of the crack. I had
put all the electrical tie ends on the outside of
the boat where they could be more easily cut off after
I finished the inside of the boat.
After flipping the boat to an upright position the
long awaited epoxy process started. Filling the seams
with a mayonnaise/peanut butter consistency mixture
of epoxy and filler
and then shaping it to a “fillet” was
done first. I did the filleting in small secitions
to ensure it didn’t harden while I went to the
next step. While the epoxy fillets were wet &
still curing I placed 3-inch fiberglass
tape over the fillet and painted it on
with a mixture of West Systems epoxy & hardener.
After the final filleting and taping were done on
the inside, I took the opportunity to epoxy all of
the interior plywood using a small 3-inch wide roller.
I left the boat to dry till the next day even though
the fillets were cured to a hard state within about
3 hours. The epoxy leaves a glossy varnish-like finish
on the wood. It is not quite as smooth as varnish
and requires further preparation before painting or
varnishing but I will get to that later.
The next day the epoxy had fully cured and I flipped
the boat upside down so I could work on the bottom.
First removed the duct tape and cut off all the electrical
ties that were sticking out. I used wire snipers to
cut them as flush as possible to the wood. After cutting
all the ties off I used a palm sander to ensure the
remaining portion of the electrical tie was flush
of below the surface of the plywood and a belt sander
to round off the sharp edges of the plywood joints.
Then I finished sanding the joints with a palm sander.
From beginning to end of the boat building project,
I never used anything but 50 or 60 grit (coarse) sandpaper.
A quick wipe with acetone removes the wax produced
by the epoxy curing (it will gum up your sandpaper
if not removed). The epoxy will cover the insignificant
scratches easily so fine sanding is not needed. Sanding
the epoxy that has already cured with coarse sandpaper
leaves a surface suited for painting or varnishing.
Once the bottom was shaped smooth, I used the same
epoxy/filler mixture to cover the relatively small
gaps on the bottom of the boat and again fiberglass
taped the joint with 3-inch tape. I then covered the
entire area of the exposed plywood bottom with pure
epoxy using the 3-inch disposable roller.
 |
From beginning
to end of the boat building project, I never
used anything but 50 or 60 grit (course) sandpaper. |
I let the boat dry over night to ensure the epoxy
had time to cure completely. Once again I flipped
the boat over. At this point the boat weighs nearly
50 pounds so it’s still easy to flip and yet
is already very stiff and has no noticeable flex.
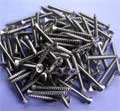
At this point I began considering what hardware I
would mount and where. It’s very difficult to
mount hardware after the area is enclosed with a seat
top and back. I epoxy glued a backing plate of 1x4”
to the lower portion of the bow and installed an eyebolt
towards the bottom and through bolted a towing ring
to it. By the way, always use stainless steel or bronze
for any metal hardware. I used stainless steel. I
also installed the lower gudgeon
for the rudder with a backing plate of 1x4”
wood. The bow and stern seat tops would seal access
to these areas so these pieces of hardware need to
be installed prior to gluing on the seats. I also
installed a mast step at this point. I used 2”
PVC end cap as a mast step and built up a little support
for the bottom in the deepest point of the bow. Then
I PVC glued a piece of 2” PVC into the mast
step with the top extending several inches above the
bow seat top’s level.
After installing the stern and mid seat tops, I drilled
a hole in the bow seat to go around the PVC mast step.
I then installed the seat top. Once the seat tops
had all cured, I cut the mast step PVC off about a
half-inch above the bow seat. I filled the gap between
the PVC and the bow seat with epoxy and carefully
wiped all the excess off the PVC. When this was dry
I applied a bead of silicone caulk around the bow
seat hole and I then PVC glued a PVC coupling onto
the protruding half inch piece of PVC pushing it down
onto the bead of silicone to ensure a watertight seat
around the mast step.
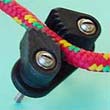
The next step was to epoxy glue a rub rail along
the top edge of the boat sides to add some protection
and to give me something to mount the oarlocks
to. This was pretty easy with the aid of a bunch of
clamps every 6 to 8 inches to hold the 1x2”
strip of wood to the curve of the boat side. Once
this had fully cured I was able to install the oarlocks.
I was careful about the placement of the oarlocks
to ensure they were far enough aft to allow a good
rowing stroke. I fabricated the rudder and attached
the pintles
then installed the upper gudgeon on the hull. I then
fabricated the dagger board. At that point everything
was complete with the exception of a mast and sail.
I had looked at lots of rigs for dinghies and had
selected a sprit rigged sail. I like the simplicity
of a freestanding mast. The low aspect of the sprit
rig and the corresponding short mast size made sense
for a small boat. The ease of storing the shorter
mast and the fact that the shorter sail plan would
cause less heel were big pluses for a small boat.
The ease of stepping the mast and the ease of furling
the sail when not in use were two other big advantages.
Having a free standing mast meant stepping the mast
would take about two seconds to slide the mast into
the PVC mast step. Doing anything in a small boat
in windy conditions can is a dangerous job so any
opportunities to simplify the design should be used.
Being able to roll the sail around the mast and tie
it off in less than a minute was a safety-plus as
well as being convenient. Also with a freestanding
mast that rotates in any direction, in an emergency
you could simply let go of the mainsheet and allow
the sail to weathercock away from the wind in a gust.
While the sprit rig sail won’t perform as well
to wind as a triangular sail plan, it will beat the
pants off anything going off the wind. The sprit acts
like a spinnaker pole and holds the sail out like
a barn door. The other reason I selected the sprit
rig was that I could easily make the sail myself.
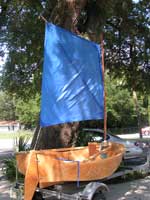
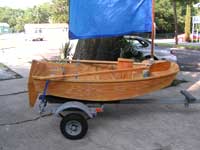
| I had looked at
lots of rigs for dinghies and had selected a sprit
rigged sail. I like the simplicity of a freestanding
mast. The low aspect of the sprit rig and the
corresponding short mast size made sense for a
small boat. The ease of storing the shorter mast
and the fact that the shorter sail plan would
cause less heel were big pluses for a small boat. |

|
A sprit rigged sail can be made from a flat piece
of material. I made my prototype from a 99 cent 6’X8’
tarp. I used one of the existing sides and grommets
for lacing the sail to the mast. I also used the existing
bottom edge and grommet for attaching the mainsheet.
I did have to cut and hem the top and trailing edges
of the tarp and install a single grommet in the top
peak so that I could attach a sprit to it. Sewing
a blue 99-cent poly-tarp can be done on any sewing
machine. In fact I have heard of people using double-sided
carpet tape instead of sewing the tarp. I used round
molding obtained from Home Depot for the mast and
sprit. I was concerned about their strength but after
a couple years of sailing in all kinds of weather
I can assure you they will do the job. I drilled a
hole in the top of the mast and rounded the edges
so I could use a short line attached to the top of
the sail to run through the top of the mast and back
to a cleat on the lower part of the mast. I also drilled
and rounded a hole in the end of the sprit to attach
the sail peak to. A rounded hole in the bottom end
of the sprit was used to attach the line that raises
& lowers the sprit. The 99 cent polytarp sail
has lasted for 4 seasons although it’s beginning
to show signs of wearing out. That’s 25 cents
a year for sail material so you better work that into
your boat building budget (ha! Ha!). I now use polytarp
for all my small boat sails. If one will last 4 seasons
I can’t justify the cost of buying Dacron.
I could make 40 polytarp sails for the same price
as one made from Dacron.
The D-4 sailing dinghy performs remarkably well in
heavy weather. Although I have to be a little cautious
with breaking seas, I regularly sail the D-4 in 15-20knot
winds but have been caught in squalls with 40+ knot
winds. I do take a plastic cup and a sponge to bail
with. Generally all I get is spray and an occasional
wave slap that spills into the cockpit. Even if the
cockpit were filled the boat would float with the
gunnels above water due to the three watertight compartments
contained within the 2 seats and bow area of the boat.
I have not tried to mount a motor on the D-4 but she
sails & rows easily. I figured the epoxy worked
so well on the boat that I might as well make the
oars as well. An 8’ 2”x2” and a
piece of scrap plywood made one of the prettiest $3.00
oars you’ll ever see. I made the oars approximately
7’ 5” long so I could really get a stroke
each time I row and still be able to stow them inside
the boat. Consequently I can easily row much faster
than the plastic dinghies sold in the local “monopolistic”
boat supply store. The oarlocks should be placed just
aft of where your knees reach when seated in the rowing
position. The handles should nearly touch when the
oars are positioned straight abeam. Finally, the longer
the oar is the better for ease of rowing.
Go build a boat. It’s a fun way to learn to
use epoxy and fiberglass. It has proven to be a way
to have fun boating without having to take out a second
mortgage. In fact, it can be a fun way to produce
a little extra money. Regardless, I really don’t
care what it is as long as there’s some fun
it somewhere. Most of us “Good Old Boaters”
are somewhat budget minded when it comes to our boating
experience and this is something every “Good
Old Boater” should know about. I spent approximately
$250 for epoxy, wood, hardware and sails when building
the D-4. I have built some simpler boats for half
that amount.
 |
Go build a boat.
It has proven to be a way to have fun boating
without having to take out a second mortgage. |
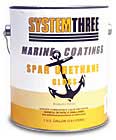
The only drawback to using West Systems is the expense.
West Systems is NOT cheap at nearly $110 a gallon
for epoxy and hardener. However, if you can find a
boatyard that buys it by the 55 gallon drum you may
be able to get a deal on having them refill your 1
gallon can. Locally, I have a yard that sells it to
me at nearly ½ what it costs at the West Marine/Boat
US stores. I initially used West Systems 406 Colodical
Sylica filler for my fillets but have since found
the generic equivalent Cabosil to be much cheaper.
A good source for cheap chip
brushes is www.harborfreight.com
Cabolsil filler and fiberglass
tape can be bought reasonably at www.fiberglasssupply.com.
About the author…. Pat Johnson builds
boats as a hobby and has built about 20 odd boats
to date. All of the boats are less than 16ft and
about half are power and the others are sail or
row boats. Pat enjoys helping others get started
building boats and offers to show people how it’s
done if asked. Pat lives in Pensacola Florida and
often sails in Pensacola Bay and surrounding rivers
and lakes. Pat’s most common advise to people
thinking about building a boat is to start small
and start now!

More Articles about D4
Dinghies:
|