After living aboard our 40-foot Cross trimaran in San Diego for several years, my wife and I sold the boat and moved to the south coast of Massachusetts. The area’s endless inlets and coves seemed perfect for exploring with a smaller boat, so once we were settled I built a 22-foot trailerable catamaran and a basic 9-foot flat bottom plywood skiff to use as a tender. The small skiff rowed well in flat water but had a tendency to pound in wind and chop. I became intrigued by the idea of building a catamaran skiff with similar lines to our 22-foot cat, and this is the story of that project.
 |
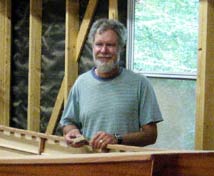
I became intrigued by the idea of building a catamaran skiff with similar lines to our 22-foot cat. |
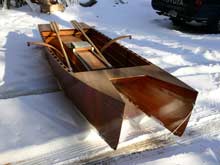
The catamaran skiff has two dory hulls connected by a narrow bridge deck that serves as a continuous seat, fore and aft. It is built with 1/4-inch luan plywood from Home Depot, which, at $12 a sheet, is a great choice for a cheap experimental design. The two dory hulls are simple to build, and each of them was put together in a day.
| The two dory hulls are simple to build, and each of them was put together in a day. |
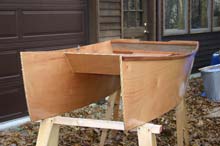 |
I began by setting up two temporary frames and the transom on my workbench. After shaping the two side panels to line up on the frames, I placed the bottom panel on top and scribed the piece. I placed thickened epoxy between the bow seams and tack-glued the bottom, using masking tape to hold it in place. Next, I filleted and taped the inside corners and glassed the hull bottoms. Bulkheads and beams at each end held the hulls together and created watertight compartments in bow and stern. I used quarter-inch plywood to connect the hulls and create the bridge deck seat. Finally, I sealed everything with a couple of coats of epoxy, then sanded and varnished the outside of the hulls.
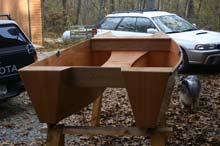 |
I used quarter-inch plywood to connect the hulls and create the bridge deck seat. |
The maiden voyage
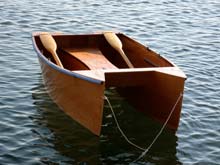
After launching the boat, and before taking her out for a spin, my first task was to find the balance point, and locate and install the oarlocks. I was finally ready for the moment of truth. I’m happy to report that the skiff rows perfectly and the catamaran hulls are incredibly stable. At less than 8 feet long, she carries my wife, our dog, our supplies, and me from ship to shore--and back again—quite easily. I’ve, always hated rowing dinghies with the stern dragging in the water, and the continuous seat and two rowing positions allow this boat to be in perfect trim at all times. The simple varnished wooden hulls draw lots of attention at the dock. I don’t think people are accustomed to seeing wooden boats these days, and definitely not with catamaran hulls. We have used the boat for a couple of seasons now, and love it. It’s a pleasure to row and does much better in wind and chop than the original skiff I built.
| We have used the boat for a couple of seasons now, and love it. It’s a pleasure to row and does much better in wind and chop than the original skiff I built. |
 |
One thing leads to another…
I confess that designing and building small boats has become something of an addiction. A couple of years and a trailerable trimaran later (another story), I thought it would be great fun to build a 12-foot version of my cat skiff just for rowing. It would have a sliding seat and some nice long oars, basically a stretched version of the 8-footer cat with lighter weight construction. I sketched the design, tackled the project, and am thrilled with the result.
 |
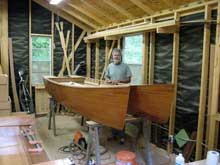
I thought it would be great fun to build a 12-foot version of my cat skiff just for rowing. |
The 12-foot rowing cat is built of 1/8-inch luan plywood with stringers and frames, and 1/4-inch luan plywood for the bottom and the seat. All the plywood came from the local building supply. In my opinion, a project like this doesn’t require marine plywood if you don’t have the extra money to spend. Most household quality plywood has exterior glue and should last a long time if epoxy coated and varnished. (I store all of my boats inside when not being used.)
| All the plywood came from the local building supply. In my opinion, a project like this doesn’t require marine plywood if you don’t have the extra money to spend. |
 |
Just for fun, I veneered the outside of this boat with ribbon grain mahogany, since even expensive marine plywood still looks like plywood, with nice color but wild swirling grain patterns. I was able to get large sheets of veneer, 22 inches wide and more than 11 feet long. It’s beautiful stuff and not too expensive, and about $1 a square foot. I vacuum bagged the veneer onto the 1/8-inch luan plywood with epoxy resin. Aerospace Composites sells nylon bagging tubes with special clips for making bags of any length, in this case, 13 feet long.
 |
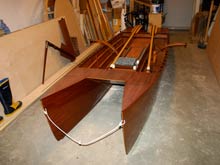
I veneered the outside of this boat with ribbon grain mahogany, since even expensive marine plywood still looks like plywood, with nice color but wild swirling grain patterns. |
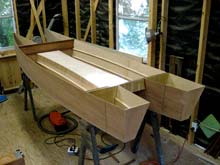
I cut out the frames and set them up on a long bench and added the 1/4-inch plywood stem and stringers. One side panel was clamped and marked. Once the first panel fitted correctly I trimmed the other three panels to match. I then glued the side panels onto the framework, one at a time, and scribed the bottom panel, gluing it on using masking tape to help secure the pieces. The hulls are joined with small beams fore and aft, and 1/4-inch plywood for the seat area. Shallow keels protect the bottom and give directional stability.
Having no experience with sliding seats, I found designing the mechanism a challenge. My final design uses four skateboard wheels on the seat, with a simple track on the bridge deck. I gave the outside of the boat two coats of epoxy, then sanded and varnished it. The veneered hull looks fantastic!
| I gave the outside of the boat two coats of epoxy, then sanded and varnished it. The veneered hull looks fantastic! |
 |
The outriggers are laminated out of 1/8-inch mahogany veneer, with the oarlocks approximately 10 inches outside the rails. The 9’4” oars are made with mahogany and framing lumber from Home Depot, which I find to be a great source of materials in my area. If I’m patient, I can usually find some nice, mostly clear lumber, cheap!
 |
The 9’4” oars are made with mahogany and framing lumber from Home Depot, which I find to be a great source of materials in my area. |
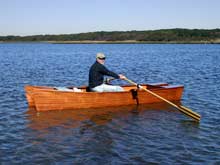
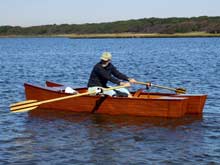
Rowing the boat for the first time was a thrill. I had never used a sliding seat and had no idea if my contraption would work, but after just a few strokes I got used to the motion. The combination of long oars and leg power add up to a turbo-charged rowing experience! Once I got the rhythm down I had a blast. My wife quickly got the hang of it and wants a rowing cat to call her own. The cat skiff rows great, and is a fun way to get some exercise, and enjoy our beautiful local waters.
| The combination of long oars and leg power add up to a turbo-charged rowing experience! Once I got the rhythm down I had a blast. |
 |
If you have any questions, contact me at mgumprecht@att.net.
|