|
It’s amazing how a simple idea can take on a life of its own once you start. Have a desire to build a boat for fishing at your local lakes and a bunch of American Ingenuity? Build a boat out of things American, Duct Tape, PVC pipe, and plastic.
I wanted a boat that would allow me to cast into the shore instead of from the shore. Being a mechanical engineer, one thing led to another and as the years passed I decided I would build a skin-on-frame kayak. The final kayak would be wood framed and fabric skinned. I searched for additional ideas and eventually made a balsa and tissue paper model of an 18 footer. Not wanting to invest more money and time than necessary in a prototype, I began thinking of a simple and quick way to test a design.
Again one thing led to another, and my son Daniel and I came up with the idea of a PVC pipe frame, duct tape for fastening the pipes together, and 4 mil construction plastic for a test skin. We arrived at an initial design that would use 10 foot sections of PVC pipe, since that was the length available at our local stores. Since fishing was the primary aim for this boat, shorter and wider would be more maneuverable.
We put our first prototype in the water in the summer of 2007 and it sat a little lower in the water than we wanted. The next design, shown in this article, was widened from 30 inches to 36 inches but the keel form stayed the same. Each boat was put in the water for less than $25.00. In addition to the change in width, we added the use of brackets formed from PVC pipe to help hold the pieces in the proper position, since the duct tape lashing on the original design had allowed two joints to shift slightly.
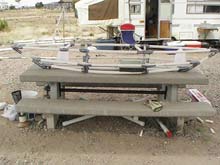 |
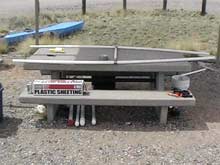
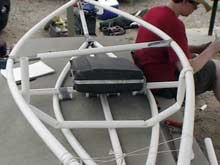
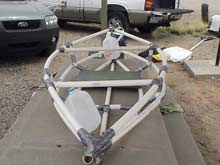
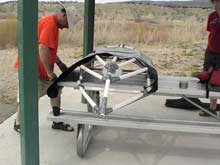
Completed frame on campsite table
click thumbnails for larger views |
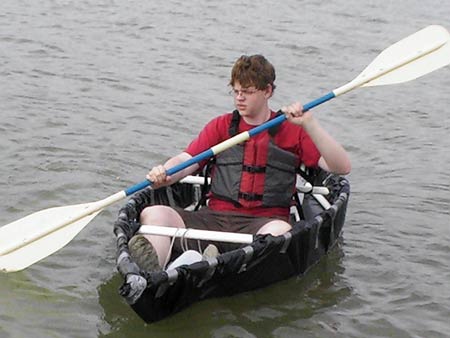
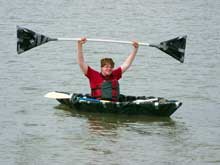
This boat was built at a Cochiti Lake, NM campsite in about 5 hours. We started the build at about 9 AM and were in the water at 2 PM. This included time for lunch and the pauses while we took pictures and made notes to document the construction. While I was completing the build of the boat Daniel designed and built a paddle from another piece of PVC pipe.
Daniel with his paddle |
|
I realized after our first boat launch last summer that I am having as much fun designing and building these boats as I do from fishing from them.
We consider this boat to be a success and our next step is to replace the duct tape with lashing and to provide a fabric skin. I’m going to try using garage sale bed sheets with exterior latex paint. Other tests have shown that while any paint will probably work, cheap exterior gloss latex is more flexible and will not stiffen the fabric to the point of brittleness. Once this passes the test then we go to the final build, but then the final build may change from wood and fabric to PVC pipe and fabric.
The materials I used were chosen for their versatility, price, and availability. I chose to use thin wall 1-inch PVC pipe (SDR21). This pipe is approximately half the weight of 3/4-inch schedule 40 PVC and almost twice as stiff. We used duct tape for its ability to be easily manipulated to fit the pipe bends and strength. (The final frame weighed 13 pounds.) We used 4 mil plastic, but you could use anything that won’t leak. Remember the thickness determines the durability, and I reskin the kayak every time it goes in the water. A full material, parts and tool list for this build is given in the following build instructions.
I designed and built this kayak as a test for the final design. Key is you have a safe, stable kayak. If you try this, please be safe and follow all appropriate common sense and safety requirements. You may think of other ways to build this kayak and wonder why I did it the way I did. Simply put, I did what seemed right at the time. I will probably change some things on the next build, but big deal, as this is why we have test boats. I hope this article will get your imagination going and you will try your own designs and construction methods.
REMEMBER: HAVE FUN AND BE SAFE. ALWAYS WEAR A LIFE JACKET IN THIS SIZE BOAT, AND HAVE SOMEONE THERE TO HELP IF NEEDED.
++++
Ben’s Design Materials, Tool, and Parts List
Materials List
- 10 – 10 foot, 1-inch SDR21 PVC pipe (1.3 inches outside diameter)
- 1 role 2 inch duct tape. (The good stuff)
- 1 role 2 inch duct tape. (The cheap stuff)
- 10 foot wide plastic sheeting to cover the boat. (We used 4 mil)
- Cord, to hold pipe together as you assemble the boat.
- Two empty one gallon milk jugs with lids. (For auxiliary flotation)
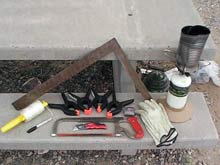 |
Tools used to build our kayak |
Tools
- Hacksaw for cutting PVC pipe. (You can use a PVC cutter for straight cuts.)
- Knife, we used a razor blade knife.
- Framing square.
- Tape measure.
- Heat source to soften PVC pipe. We used a portable stove with a tomato juice can modified to concentrate the heat.
- Marker
- Gloves, to protect your hands from hot PVC pipe.
- Clamps, C-clamps and / or spring clamps
- String
Parts List
- Keel – use one piece of 10 foot PVS pipe, bend both ends 12 inches up / 16 inches out.
- Bottom Stringer (2x) – start with two 10 foot pieces and cut to length. See step 4
- Tie strips (6x) – 6 inches long split lengthwise (will be used as joint brackets to strengthen the assembly.
- Top stringer (2x) - start with two 10 foot pieces and cut to length. See step 12
- Stringer mounting brace (4x) – 6 inches long split down the middle and then each half cut in halve halfway; 2 top and 2 middle
- Middle stringer (2x) - start with two 10 foot pieces and cut to length. See step ___
- Frames (2x) – start with piece longer than 46 inches and cut to size after being bent. See step 20
- Frame positioning bracket (8x) – 7 inches long split in two; 4 per frame
- Stern thwart – cut to width of boat
- Forward thwart - cut to width of boat
Assembly Jigs
- Bottom Spacer – One piece 36 inches long with four 3 inch pieces attached to hold the keel and the bottom stringers in proper position.
- Top Spacer – Width of boat minus 2 pipe diameters. Cut notch on each end to help hold top stringers in place
Procedures
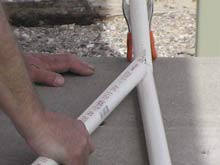
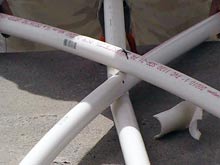
1. Mark and bend the keel.
a. Mark the center of the pipe.
b. Heat one end and then bend 12 up / 16 out.
c. Repeat for other end.
First Keel bend |
 |
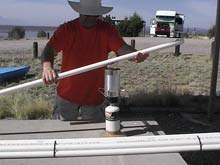 |
Heating pipe for bending |
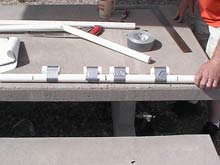
2. Build bottom spacer.
a. Cut 1 - 36 inch piece.
b. Cut four 3 inch pieces.
c. Mark center of 36 inch piece.
d. Attach two of the 3 inch pieces at the center of the 36 inch piece leaving space to center the keel piece in between.
e. Place the other two 3 inch pieces so that they are spaced 24 inch on center.
Completed bottom spacer |
 |
3. Insert keel into center of bottom spacer and clamp so it is in the vertical position. Center mark on keel should be at the bottom spacer. Tape the keel to spacer to hold in place.
4. Create bottom stringer. Use 2 – 10 foot pieces and mark the center on each. Place one piece on the center mark on the outside of the bottom spacer and tape in place. Place the other piece on the other side and tape in place. Bend the pipes so that they cross the keel and provide you the angle you need to cut one end. Mark and cut as required.
 |
First cut on bottom stringer |
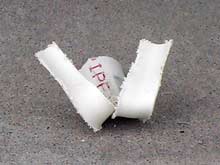
5. Cut 6 – 6 inch tie strips and split down the middle.
6. Using heat source heat one tie strip, and when flexible, place between both sides of the bottom stinger and hold in place till it retains the angle needed.
Tie strip in position on bottom stringer before taping |
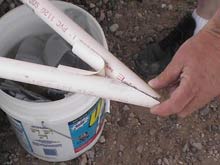 |
7. Tape the bottom stinger to the tie straps and then tape to the keel. If needed trim the raised portion of the tie strap so the bottom stringer sits flush on the keel.
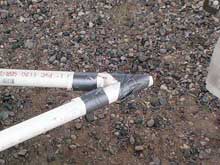 |
Bottom stringers taped |
Attaching bottom stringers to keel |
 |
8. With the one end of the bottom stringer connected to the keel. Bend the non-connected ends around and place them over the keel and then mark and cut as you did for the first end. Repeat the procedure for heating and bending the tie strip and then connect with duct tape.
TIP: Ensure that the keel remains vertical to the bottom stringer.
 |
Stringers marked for cutting |
9. Weight/clamp the assembly to your work surface to hold in place.
10. Mark the rise at both ends of the keel at 4 inches above the bottom stinger and then 1 pipe diameter up from the 4 inch mark.
11. Create the second top spacer. Cut a piece boat width minus 2 pipe diameters and cut a v notch in each end.
12. Create the Top stringers. Using 2 more 10 foot pieces and mark the center and attach to the second top spacer with duct tape so that you have big H
Top spacer attached to top stringers |
 |
13. Tie each end together with string so that you can pull them together.
TIP: It helps to use the string and tie the ends together to help hold them while you are marking and cutting. A more stable platform.
 |
String used to bring ends of stringers together |
14. Pull one end about half way together and then the other end. Now pull one end so that the ends cross. Lay on top of the boat to verify length. Mark and then cut the end that is crossed over. It helps to loosen the string so that you have more room to cut.
15. Pull the other end together and lay on the boat to ensure proper length and then repeat the procedure to mark and cut.
16. Heat one tie strip and then bend into place to hold one end of the top stringer together. Tape together like you did on the bottom stringer. Repeat for the other end.
17. Cut the top stringer mounting braces. And then heat to soften. Place the non-cut end on the keel and then bend the two split halves so that they meet each side of the top stinger. Repeat for the other end.
Bracket for attaching upper stringers to keel |
 |
18. Once cooled, tape the brackets to the keel first then to the top stringer. Ensure they are level with the top of the keel.
TIP: It helps to lightly tape each end and then tape securely.
19. Mark the keel and top stringers for frame placement 16 inches from center of keel.
20. Obtain a piece of PVC at least 46 inches long
a. Mark center of the piece and place on keel.
b. Mark center of each bottom stringer on the frame piece
c. Heat one side of the frame and then bend 6 up 4 out from the mark for the bottom stringer.
d. TIP: When bending the frames use a flat surface to ensure you match verticals and frame is flat.
e. Repeat for other side.
21. Frame will protrude over the top of the top stringer. Cut to length so that you maintain top stringer height plus at least 2 inches.
22. Once cut heat one end and then bend over the top stringer to form the frame end to the top stringer. Repeat for the other side. This provides a very strong connection.
 |
First frame showing one side formed and the other unformed |
23. Once cooled, secure the frame to the top stringer with Duct Tape.
24. Repeat steps 20 – 23 to build the other frame.
25. Remove the weight clamps holding the assembly down and turn over so that it sits on top of the top stringers.
26. Clamp each frame to the keel at the position marked and verify alignment; stem to stern should be vertical.
27. Cut 4 frame positioning brackets.
28. Heat one frame positioning bracket and then place over the bottom stringer at the frame to mold to fit. Repeat 3 more times for the other brackets.
TIP: It helps to clamp each frame positioning bracket in place as you go to ensure you maintain alignment.
Frame showing one positioning bracket uncovered and one with duct tape |
 |
29. Once cooled tape the brackets securely. Ensure you maintain alignment as you tape.
30. Tape keel to frames.
31. Remove the keel top spacer and string that was used to hold the top stinger in place.
32. Measure in 44 inches from the stern and mark the top stringers for the stern thwart.
33. Create stern thwart. Cut a piece of pipe, boat width, with enough extra pipe so that you can bend the ends over the top stringer. (We used 3 inches.)
 |
Rear thwart showing two methods of bending to mate with top stringer |
34. Heat one end and then bend over the top stringer forward of the location marked for the stern thwart. Repeat for the other end. Once cooled tape in place aft of the mark.
35. Create forward thwart. Measure in 30 inches from the bow and mark the top stringers for the forward thwart. Use the same procedure as you did to create the stern thwart only bend aft of the mark and secure forward of the mark.
36. Remove top stringer top spacer.
37. Build middle stringer. Mark 2 - 10 foot pipes in the center and using the same procedure as you did for the top stringer. Tape the center marks to one end of the top stringer jig feeding it through the center of the boat, then tape the other end. Using the same procedure for forming the top stringer form the middle stinger using the mark you made when you laid out the keel.
Note: you do not need to cut off the excess on the tie straps.
Fitting the middle stringer |
 |
38. Cut the middle stringer mounting braces. Heat to soften. Place the non-cut end on the keel and then bend the two split halves so that they meet each side of the top stinger. Repeat for the other end.
39. Once cooled, tape the brackets to the keel first then to the top stringer ensuring they are level with the top of the keel.
TIP: It helps to lightly tape each end and then tape securely.
40. Using the frame positioning brackets repeat the same procedure for attaching the bottom stringers to the frame to attach the middle stringers to the frame.
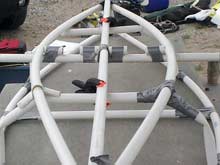
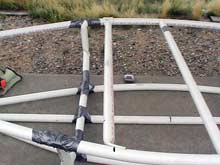
41. The frame is now complete! Double check all connections to ensure you did not miss any and tape is secure to your satisfaction. The boat is now ready for the plastic.
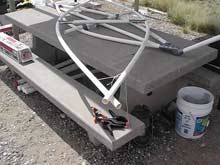
 |
Completed frame with milk jugs for auxiliary flotation |
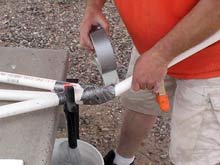
42. There is less chance of damaging the plastic if you wrap it at the launching location.
43. Once at the location lay the boat on the top stringers and then place the 10 foot wide plastic across the boat leaving enough room to wrap the plastic over the top stringer (we used 4-6 inches) and cut to the proper width. You must have overlap to tie to the stringers. Tape the ends with the boat on the top stringers and then flip over.
Cutting plastic to correct width |
 |
44. Arrange the plastic and once the plastic is to your liking. Tape the plastic together so that is securely fastened to the top stringer. Start at the middle and work your way to each end. We taped it so that the tape ran over the top stringer and then fastened to the plastic on the inside of the boat. Double check to make sure the plastic is secure everywhere.
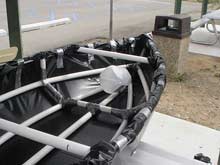 |
Plastic duct taped to frame |
45. Please avoid any damage. If you do damage the plastic you may be able to use the duct tape to cover the area or just re-skin with a new piece of plastic. Whatever makes you feel safe.
46. I placed two empty 1 gal milk jugs, with caps, into the boat. I tie one at each end as the auxiliary flotation.
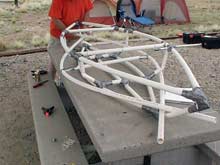
Completed kayak ready for the water |
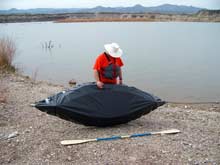 |
47. You’ll need a life jacket, paddle, cord, and other items as required by your local boating regulations.
48. Now take the boat and have some fun and watch everyone looking at you!
*** |