Part 2: Technical Details
The Second Season - Setting the Mooring Block
A local concrete supplier sells ready-made mooring blocks for about $50. I think the primary market is for fishermen who are setting crab traps and mussel beds. I bought a block about 2’ x 2’ x 1’ weighing, someone told me, about 600 lbs (that first year the price was only $35). Incidentally a 4 cu ft block will lose about 240 lbs of effective weight when submerged, but it is still far from floating. A denser material such as the cast iron of a scrap engine block would retain more weight underwater, but it must be environmentally cleaned before use. The concrete block fit just fine in the back of my ½ ton pickup truck for transport and the wharf here has a hoist/crane easily capable of lifting the weight. It was a simple matter to lower the block about 6’ down in the water and attach a rope from the block to my main winch to hold it there for the trip out to the mooring location. As best I can recall, I tied a nylon rope to the block (½” braided nylon because it was happened to be available and cheap). My research said anchoring should use 3-strand twisted nylon line to give elasticity that would even out the jerking from the waves. I attached a float to the end of the line made out of a Styrofoam lobster buoy (they frequently come off fishing lines and float ashore). In use, picking up the mooring involved catching the line just underneath the buoy with a boat hook, pulling the buoy up, and wrapping the line between it and the mooring block around a horn cleat on the bow. The line had to have relatively short scope (perhaps 5:1) to keep the boat from swinging out into the ferry channel or in to run aground at low tide. As the season progressed the place where the line went through the chocks had to be changed because of chafe, and there were a couple of times where the line almost separated because of the waves and relatively long times between using the boat. When the time came to take in the block, it was stuck in the mud too well to winch up, but by tying the boat directly over the block at low tide, the 6’ tidal rise was more than enough to pull it out. At the time I wasn’t sure if I would find the block lifted or the boat sunk. Actually, displacing 2800 lbs., the boat was well able to supply enough lift. Of course, be sure to add some anchoring so the boat and block do not float off into the sunset. With the block hanging off the front of the boat, it was a simple matter to motor over to the lift/crane and get the block up into the back of my pickup truck served as traction weight for snow ploughing over the winter.
Boat Hooks
Incidentally my first boat hook is somewhere down there because, despite stuffing the aluminium tube with Styrofoam, it sank! It was nicely telescoping but that usually meant it was likely to come apart just when you needed it most. The replacement hook uses a boat hook “repair” plastic piece screwed to a cherry handle from our woods, epoxy-coated and left somewhat rough for better grip. It is only about 4’ long and some day I want to make a second one closer to 6’ in length.
The Third Season
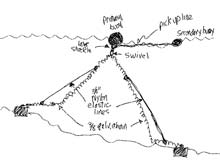
From my boating friend I got the idea to use two floats at the surface with a light line between making it easier to pick up the mooring--just catch the line on the surface anywhere between the floats. I first based everything on a 3” bronze ring from the local hardware store rated “1000 lbs.” Fastened to this ring were ¼” galvanized chains from the two mooring blocks (I wasn’t going to again take a chance with failure due to chafe down at the block!), a light line from the ring to the primary float, and a light line, perhaps 20’ long, to the second float (I think it may have been 3/8” polypropylene). When mooring, I would capture the line (floating on the surface somewhere between the two floats) with the boathook and haul up the lighter float to get enough line to make a quick wrap around the horn cleat. Once the boat was fully stopped I would then pull up the line until the ring under the primary float showed, so I could clip a nylon line from the boat to the ring and drop the original pick-up line. The boat connection was made using a spring-loaded clip permanently tied to a short (~6’) line (cut from the braided ½” nylon line left over from the first season). I even ran a chafe guard over the line where it passed through the chock. Everything was central. Incidentally, the boat snap (similar to duckworks Part SD146131) was convenient for connecting to the mooring, but the tiny spring that kept the gate closed popped out twice. > I have since gone to a much heavier snap hook made out of ½” stainless steel—it is much easier to grab and seems to have held up better.
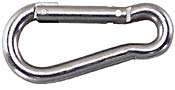 |
½” stainless steel Snaphook |
As mentioned, the connection failed on a windy night because the bronze ring (rated “1000 lbs.”) must have fatigued and opened. Investigation the next day revealed no trace of the ring—all the components went separate ways and showed clean, undamaged loops in the ropes where they had been tied to the ring. One of the “separate components”, the boat, was now safely tied at the wharf. The two floats were easy to find along the shore, but finding a 25’ chain with no attached floats in 10’ of muddy water was not easy. Eventually, on a calm day, using an anchor as a grappling hook, after several hours of dragging the mooring was found and the mooring was restored without the ring. The primary float was then tied directly to one of the chain links, the pick-up line was tied further on. Mooring then consisted of clipping to a shackle added to the middle of the chain—no more rings for me!
A few weeks later following another blow, as mentioned, the connection line between the boat and the mooring chain (the permanently attached braided ½” nylon line with a hook at the end) chafed through inside a chafe guard! Since the guard was opaque and difficult to get apart, I had assumed it was doing the job and had made no inspection! It was quite easy to see, when the boat was retrieved, where the line had worn through inside the guard without causing any harm to the guard itself.
As far as the “insurance” of dropping two anchors, I knew they were not fully set but I was getting tired of finding the boat where it did not belong and thought they might help. I hoped that if the boat came loose the drag would set them within a short distance—supposedly they should have set in 10 to 40’. It would have been very difficult to set the anchors in advance because it was already getting quite windy and the boat was securely attached to its mooring. I would have had to row the anchors out some distance, disconnect from the mooring, and then use the motor to dig them in. During the storm the boat must have dragged the (two 20 lb. Danforth-type) anchors until they finally set in the shallows to the west! I shudder to think what might have happened without them! Later the wind reversed and must have pulled the anchors out, in the process bending the shaft on the more firmly set anchor about 90 degrees. By the time I heard of it and got there all was calm. At least no damage came to the boat.
The Fourth Season
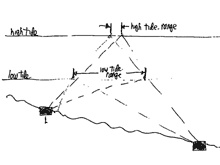
This past season I got a Bruce-type anchor that is supposed to re-set better in wind or tide reversals. In addition, I added very strong stainless U-bolts, solidly reinforced with epoxy-enlarged holes, at the bow and stern, low down to give better scope. I shackled a permanent chain to the bow U-bolt with a very large snap hook on the other end to make the connection to the mooring each time the boat tied up. The mooring process involved catching the pickup line with a boat hook, tying it to a horn cleat on the bow, and then, when the boat had stopped, pulling on the line until I could make the chain connection. To give some spring to the underwater mooring chain I paralleled most of it with a slightly shorter 3/8” twisted nylon line. The intent was to have the chain as backup if the elastic nylon line failed, but let the line provide cushioning for surges without chafe problems. Also, to give redundancy, a second mooring block was set to hold the stern and keep the boat from twisting around the mooring with wind and tide shifts. It was a nuisance to moor the stern as well, but it eliminated any twist problem and the boat stayed pointed to the west (from where the worst waves come). Early in the season I was prepared to do the chain/line connection to both blocks, but the block I traded for had been left over the winter with heavy 1/2” Dacron line attached and I couldn’t far enough down to replace it—the water here is cold even in June and at the lowest tide the block was in 5’ of water. So I let things ride and used the existing line on the front. That was the reason I didn’t detect the shackle pin coming unscrewed.
My Best Guess For Next Year
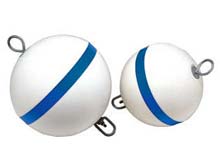
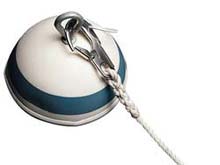
I will continue to use two mooring blocks, now with 3/8” chain between them. Heavier shackles will work with the heavier chain, making for a bigger eye for the boat’s connection. Of course the pins will all be held in with stainless steel wire. Along each 25” side of the 50’ chain I intend to again attach slightly shorter lengths of twisted 3/8” nylon line (small size so it has more elasticity—with properly formed eye splices and stainless-wire-held shackles) to provide the necessary stretch to reduce jerking and even up the pull on the boat due to waves from passing boats or storms. A large float, connected to the centre of the chain by a swivel and shackle, will hold up the chain. It would be nice to use official mooring buoys with a pickup ring on top, but they are significantly more expensive than simple net buoys.
| Commercial Mooring Buoys |
 |
A light floating pickup line, also attached above the swivel will go to a small float. With perhaps 25’ of 3/8” chain to support my 12” diameter buoy (with flotation of about 30 lbs.) will be marginal since that much chain would weigh about 28 lbs. A 15” diameter float (about 60 lbs. flotation) should give the recommended 50% immersion
 |
I will do it this way next time
click images for larger views |
I will make all long-term and heavy-weather connections with the same permanent 6’chain used this past year (coming from U-bolt low down on the bow to a ½” snap hook at the end). Making the mooring connection should be easier than last year because I only fasten the bow. With a heavy swivel, the floats, pickup line, and connection chain will freely twist as the boat rotates, avoiding tangles due to shifts in tide and wind. Leaving the pickup line attached will still offer a small degree of redundancy, although the all-chain link should be much more reliable. By using two blocks leading to a single point, I will reduce most east-west motion of the mooring float. Remember the tolerance in boat position is limited by the ferry channel on one side and by the shallows on the other side. I am rejecting last year’s separate bow/stern moorings because the capturing of the second mooring is a nuisance, usually requiring rowing out in the dinghy after the bow is connected to retrieve the stern chain and float and then man-handling the boat around to the correct orientation.
| Range |
 |
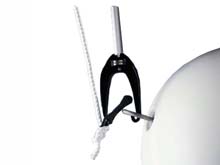
I have yet to come up with a convenient single-handed mooring pickup technique. I see that West Marine carries two brands of hooks that go on the end of boat hooks to make an initial connection to a mooring eye.
 |
Mooring Hook |
| Happy Hooker |
 |
When approaching under power it is not difficult to stop close enough to the float to run forward and catch the line with the boathook before the boat drifts away. The challenge is to be a “real sailor” and pick up the mooring by myself, using only sail. Getting the sail down at just the right time, quickly enough to still race forward and catch the mooring line, is difficult to impossible. Assuming it is windy enough to be sailing, that same wind will push on the hull enough to leave very little time to get to the front. And there are no brakes!
Sources on Anchoring and Mooring
Many books talk at great length about anchoring, although I notice a common thread in all the descriptions of short-term, stay-aboard anchoring. It is far easier to detect a drifting problem if you are on the boat, than if it sits untended for a week or more. An untended connection must be much more secure.
Perhaps the most technical, yet still accessible, treatment of mooring and anchoring is Don Dodds, Modern Seamanship, Gramercy Books, New York 1995 pp 143-212, 457-468. Here is someone who works out formulae to calculate the load you can expect on your anchor (and mooring). His conclusions are radically different because he determines that most boats have far heavier anchors than conditions require. By calculating the head-on area above water and the wetted surface area, he derives formulae for the maximum force to expect on the anchor line. In my case, given the proper scope and elasticity of the rode, I can expect a pull of no more than 160 lbs for winds up15 knots and no more than 565 lbs for winds up to 30 knots (4500 lbs in a 75 knot hurricane!). It tells me that I probably got into trouble this last year due to the pull not being on an elastic line rather than due to normal wind and tide forces being too much for the equipment.
A second excellent book is Earl Hinz, The Complete Book of Anchoring and Mooring, Cornell Maritime Press, Centreville, MD, 1986. The book lives up to its title and gives much detail on issues of ground tackle technology as well as the art of anchoring, although the mooring section is a small end portion focussed on the hardware rather than the art of picking them up.
A little about leaving and returning to a mooring is found in Bob Bond, Basic Sailing, Knopf, New York, 1987 pp 82-85.
Elbert Maloney, Chapman Piloting 63rd ed, pp 274-5 talks about moorings based on mushroom anchors and 3-way bridles of lightweight anchors. It includes some yacht club tables about required line and chain size.
Richard Henderson, Single-handed Sailing, International Marine, Camden Maine, 1976 pp163-166 addresses the problem of picking up a mooring single-handed that can either use a star hook that goes on the boat hook (like the ones in the West Marine catalogue, you clip to a ring on top of a pendant by catching it with the boat hook) or a light-weight grapnel hook to catch the line between the mooring float and the pick-up float. He suggests using a very long line on the boat so the mooring can be caught at the stern by the single-hander and then, after the connection is secure, pulled to the front.
West Marine Advisor has a brief article on mooring.
The most informative part is showing the two ways of connecting to the float—to a ring at the top with the chain going through the centre of the float, or at the bottom with a line permanently attached to the chain just below the float.
Tom Schultz
schultz@pei.sympatico.ca
*****
More Articles by Tom Schultz:
|