From Plans to Plywood
Review part 1
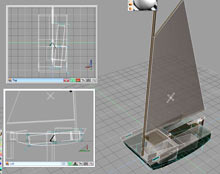 |
Computer 3D rendering of the proposed PDR-X “Ranger”. Created and rendered in Caligari “Gamespace v1.6”
click images go enlarge |
So, a full summertime’s worth of thought and fiddling and I had created a boat that I believed would fulfill all of my goals… on paper anyway. Now it was time to put it together for real. Fall was unseasonably warm for us so I took the opportunity to continue working out in my woodshop. When selecting plywood for the build I spent a few days poking around the various lumberyards. My previous ‘duck had been constructed entirely out of ¼” fir ACX and frankly weighed a TON! Well, not really, but over 100lbs for an 8’ boat with only about 8” of freeboard seems a bit excessive. Thinner luan plywood is available in my area, but I didn’t like the look of any I was finding (for small builds this far inland Marine-grade is effectively not available). It was just a single sheet of white wood sandwiched between mahogany veneers. Then I found this 5mm bathroom underlayment called “Sure-ply” that looked decent enough; same cheap white wood, but it was in three layers instead of a single layer and thicker veneers than the luan. Three sheets of that stuff plus a single sheet of ¼” ACX and I was on my way for less than a Ben Franklin. The remainder of the lumber would come from materials I had laying around my garage; leftovers from previous jobs and some salvage from a pair of mattress box-spring sets.
| PDR#286 “Ranger” is 3D, barely. |
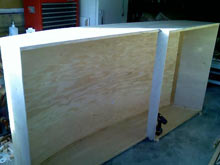 |
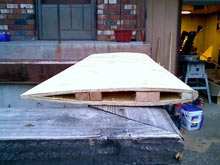
In a weekend’s time I had turned three of the four sheets of plywood into a pile of boat parts just waiting for assembly. By mid-December I had turned that pile into a 3D hull. The great thing about the PDRacer design is that they practically build themselves; no jigs, no forms, molds, strongbacks, or anything else. Assemble your four-sides and as long as they’re reasonably square, bend the bottom panel down over the port- and starboard-panels and fasten in place. Once the adhesive has cured remove your fasteners and you’ve got a 3D hull. I used PL Premium (a thickened polyurethane glue that comes in standard caulking-gun tubes) to assemble the hull with, though I keep telling myself I should probably get over my ‘Epoxiphobia’ one of these days. Oh well, maybe tomorrow, right?
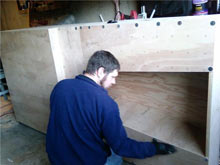 |
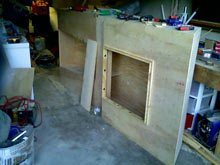
By mid-January the decks were in place and I was fitting the cockpit sides. If it looks small remember, you’re sitting up on the quarter decks in this design. |
The basic 3D hull of a PDR is pretty flimsy so they all require additional structures to stiffen up and gain the required strength; air tanks, seating, gunwales, decking, and other components are arranged in the hull in such a way that they help support the structure as a whole which minimizes the need for additional framing and bracing (which will only add weight).
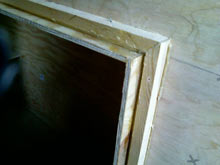
This is actually from the construction of PDR#206, but the foils for 286 are made the same way; plywood skins are bent around a set of sticks cut to NACA profile thicknesses. |
 |
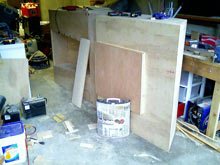
Severe snows stalled the work efforts for a few months, but once the snow was cleared and the sun showing itself once again I was back at it. In no time I had her decked over, the sides of the cockpit fitted, and the hole for the forward hatch was cut. The three panels that form the rear deck were left loose so they could be removed to facilitate installation of the daggerboard trunk and painting the interior spaces later on when the weather was nicer.
 |
Framing the foredeck hatchway was, oh, how should I put this? TEDIOUS! |
The foils (daggerboard and rudder) are a sort of composite construction approach. Referencing the NACA0010 profile, three sticks are cut to specific thicknesses and angles and two strips of plywood are cut. The trailing edge of the plywood is shaved to a 10-degree angle with around 1/16th of an inch thickness at the edge and then wrapped around the sticks with the shaved bits meeting at the trailing edge. The leading edge is capped with a piece of hardwood then rounded. Viola! Minimal effort and you have a near-perfect NACA foil shape. The hollow core is then capped-off with more hardwood and shaped with a plane. My first attempt at building the foils met with a bit of a disaster. I had cut a pair of panels from the 5mm underlayment for skins on the composite foil design. On bending them however I discovered a rather disconcerting fact about the stuff; it is brittle! With a sharp SNAP the failure of the first pieces was dramatically announced. Luckily for me I still had a half-sheet of ¼” ACX left over from building PDR#206 so I was still in business.
Close-up on the framing for the Maurice Griffith Hatch. Any spray that gets over the outer-lip gets stopped by the inner and directed to drains at the stern of the hatchway. |
 |
The foredeck hatch is the same Maurice Griffith Hatch that equipped Derek Van Loan’s 1988 boat “Sleeper” (which inspired this design) and is supposedly leak-proof. Well, leak-proof assuming the hatchway isn’t submerged anyway. The sides of the decks are 12” wide which will support almost 700lbs (which exceeds the PDR’s maximum safe loading by 70lbs) so it shouldn’t be a concern even in a knockdown. Mine was constructed by cutting a notch into one end of a stick of ½” x ¾” lumber with my tablesaw (a table router would have been more than a little bit safer) and attaching it to the deck around the hatch opening. Then I attached a 2” wide strip of ¼” plywood to the inside edge (leaving ½” sticking down below the deck, the rest sticking above it). The plywood around the hatch doubles as a girder supporting the deck (which is why I used more than the bare minimum). The mast partner pulls double-duty as well so there will be no need for any extra structures to support the deck.
 |
PDR#286 as of 3-5-09. Very little is left to finish constructing the hull; DB trunk, mast step and partner, and the rubrails will finish her up. Rigging and finishing work will complete her. |
The end of the construction phase of the project is firmly in sight with fewer and fewer details left on the ‘to-do’ list with each passing day (most of the remainder requires nicer weather than I can count on in March). With any luck I’ll be reporting on a successful launch and sail by the second week of May.
Sawdust and spray,
Jon K
***** |