A tale of three sheets to the wind
and a bit of folding piratical nonsense
To Part Two
The inspiration for this boat is the Dug from Hannu's boatyard
https://koti.kapsi.fi/hvartial/.
For those that do not know it, the Dug is an 18 foot replica Dugout
canoe that appears as if by magic out of a single 8 by 4 sheet
of plywood with little or no waste except sawdust. There are only
two problems with the Dug. Firstly, it does not fold flat (when
it so easily might). And secondly, it is not shaped like a pirate
ship. So here was my assignment - turn the Dug into a folding
pirate ship made from one sheet of 8 by 4 plywood. Unfortunately,
the result does fold but is structurally less than 100% stable
without extensively more bracing than I had time (or rather patience)
for and has the hydrodynamic qualities of the number 16 tram to
St Kilda, but it does kind of look the part. This vessel is recommended
for people who want to have fun in the water as well as on the
water, but may prove serviceable for those who only want to have
fun on (but not in) the water for a short time as I have serious
doubts about the durability of the prototype. Use only in extremely
sheltered waters.
Step number one, turn the Dug
Go to Hannu's boat yard and check out the Dug. Turn the basic
plan for a Dug through 90 degrees, double the measurements along
the side and halve the ones along the bottom and you get the idea.
This will generate a prism based boat roughly 8 feet long and
32 inches wide. As you may realise the plan can therefore be easily
adapted to any 3 equal sheets of roughly oblong material, from
a sheet of letter writing paper divided into three to three 8
by 4 sheets of 12mm marine ply. If you are even smarter you will
realise you can do a similar thing with two or even one sheet,
as long as the final oblong you use is at least 2 or 3 times as
long as it is wide. The one we are actually working with (after
we have rejoined our sheets into the oblong we need) is in a ratio
of 9 by 2. The shortest example is the Hattory
(even if it doesn't fold). If you are even smarter you will realise
you are working with a ring, only it is not possible to my knowledge
to buy pretty much any boat building material in large rings so
there goes all your fancy book learning, except to realise you
can shift bits from the end of one end of the plan to the other
end, making it possible to shift seams.
Note on cutting
Before making any cuts measure twice. In particular I come from
Australia which was built in imperial and renovated in metric.
8 feet is approximately 2438.4mm. As a result standard sheets
in my country come in 2400 by 1200 mm, 2440 by 1200 mm, 2440 by
1220mm or just occasionally 8' by 4'. Just for fun try stacking
2440 by 1220 mm sheets in an 8' by 4' box trailer. Almost all
the plywood I have seen has been 2440 by 1220 (even if it occasionally
calls itself 2400 by 1200 mm).
Now for part two - into a folding pirate ship.
In doing this we will steal inches from width and length into
length and width respectively with plain angles and then turning
the plain angles into glorious curves and bringing width from
the ends which are out of the water back to the centre which is
in the water and hence giving you more stability and a pointier
bow or stern. This is a proper pirate ship, which as we all know
has a pointy bow, with a curved bow sweeping majestically up from
the waterline and curving back out to form a magnificent prow
supporting a bowsprit with a mermaid or a flock of Unicorns capering
around as a figurehead to make it look fancy. The rear on the
other hand is more subdued and less dramatic. I was tempted to
go for a more rounded look but the stresses on the plywood would
have been a little large. If you like you can have a more squarish
rear, (see Jollii Ollii below)
At this point I feel compelled to disabuse people of their need
to correct my mistakes. I am well aware that this article has
mistakes in it, some intentional some not intentional. This boat
does not in fact have the hydrodynamic qualities of a number 16
tram to St Kilda. It is much more like the number 26 bus to Cooleman
court. Unicorns do not do not caper, they prance. They do not
come in flocks, they come in cardboard boxes, and they eat nothing
but the seeds of the wibble wobble tree.
Length and width
Firstly, let us steal some width and turn it into length. It
is simplest if you think about taking your middle piece and joining
it (if only on a temporary basis) to the front/side pieces. Firstly,
we start with my turned and multiplied version of the Dug.
To turn width into length all you need to do is to advance the
ends of your lines equally in opposite directions, moving them
out to make out end longer and thinner or in to make them shorter
and wider. The only limit is the length of the sheets we started
with and I have taken the maximum to extent my front end and left
the rear end more or less as in the original plan. Don't worry
if this looks a bit extreme, because it is. This is a Pirate ship
after all and we will take some of that width back when we generate
our curves.
Those of you with a small knowledge of the bending properties
of plywood and the structural strength of the materials involved,
will realise that a short curved rear end is only a dream for
a folding boat. The use of material thin enough to bend by this
much will, by it's very nature, not be strong enough for a practical
boat without extensive bracing and reinforcing. In an extreme
piece of good fortune we happen to be building a one sheet folding
pirate ship and in no way can this be described as a practical
boat. While my prototype has cracked fairly easily it has seen
excellent service as an International Talk Like A Pirate day prop
and we shall see later in the article how it performs on water.
Extensive curved reinforcing is hard to achieve in a folding boat
but may be practical if you make this plan using thin plywood
as a non - folding vessel.
This design calls for making cuts in which the sides of the boat
will be spun around and joined to the bottom. If we make our curves
symmetrically reflected along the line at which they will meet
then they will match exactly and (important for this design) still
fold. We will use this principle to make our boat curve a little
more sexily and keep as much of the timber we had in the first
place as possible.
How to make your symmetrical curve
Take the midpoint of the long diagonal line. Draw a curve from
the midpoint of the line to one end from A to B. Spin the curve
around the midpoint (A) to that B is now at the other end and
copy the spun curve to the other end of the line. Now the easiest
way to do this is to make a cardboard or scrap timber template
which only needs to be the length of the half curve. I just drew
mine freehand after testing the effects I could generate on some
cardboard models.
To keep the material you are making the boat out of happy it
will pay to keep the curves very shallow. There are two reasons
for this. Firstly, because the curve is symmetrically reflected
it is doubled in width. Secondly, because the act of unfolding
the boat causes the ends to bend in which accentuates the curves
we make. Only an inch or three of deviation is all that is required.
Here is how I did it in practice
I have used this method for my bow though you can use it on the
stern to give you a pointy rear end for more of a Viking longboat
look.
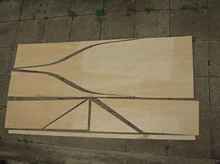 |
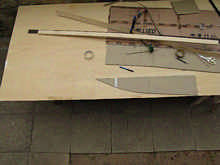
I fiddled with the pattern to minimise cutting
but introduce a bit of joining. Here are my pieces in the
original cut configuration including a 50 mm strip for making
block joins and get rid of a crack I put in the edge. |
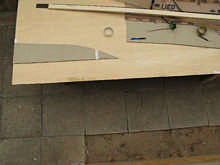
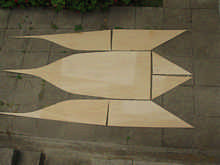 |
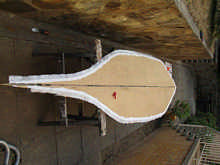
And here shows how the pieces are first put
together. |
Assembly
Join the sides and bottom pieces together using an appropriate
join (butt blocks with scrap or fibreglass. I used butt blocks.)
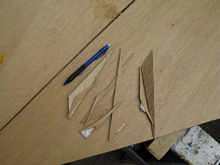
In the original prototype the bottom corners were smoothed so
that it would bend easier and the top of the rear end was trimmed
slightly to give a more rounded shape. Because this was a wastage
cut and I wanted the bottom and top/sides to curve identically
to allow the boat to fold, it was be easier to do after stacking
the pieces in their final configuration. A little smoothing of
the symmetrical no waste cuts was done with a rasp at this point
as well due to measuring and cutting being a little on the inaccurate
side. Here is a picture of the plywood I cut off at this stage.
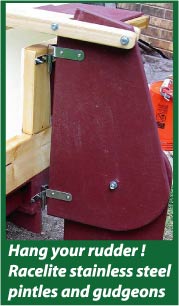
To join the folding sides to the bottom we need appropriate hinges.
Folding boat hinges have been made of:
- fishing line (sealing the outside of the hinge with a waterproof
flexible tape (usually some sort of vinyl fabric held on with
contact cement, staples and battens).
- Actual steel hinges (and more waterproof tape).
- The waterproof fabric which forms the outer membrane
- Nothing – it all just bolts, clamps or straps together.
In my experiment I used a flexible polyurethane sealant/adhesive
with a reinforcing tape embedded in it as both hinge and seal.
As a reinforcing tape I used a 1 square meter sheet of fibreglass
cloth and cut it into strips. There are a number of flexible polyurethane
glues on the market - I used Bostik Gold but Sikaflex 11FC or
perhaps PL Concrete (which I have never seen) may work as well
if not better. These glues are waterproof and hold extremely well
when spread thinly between two solid lumps of wood. When you use
them thickly it is like having a soft rubber pad between the two
surfaces. A thin film of the glue in thin air is not so strong
which is why we need reinforcing tape embedded in the glue to
hold it and our boat together. Flexible glues like these have
very different stress distributional properties to hard glues
like Epoxy or foamy glues like gorilla glue. As long as you are
aware of what you are building and how, they are as interchangeable
as steel and rubber.
This process was slightly messy and difficult to achieve a waterproof
seal on but probably outperforms canvas soaked in the excretions
of Laccifer (Tachardia) lacca Kerr dissolved in denatured
alcohol.
Now for a simple test. Take a two inch length of sticky-tape.
It does not matter what type, this is only a demonstration. Stick
the sticky-tape on to the edge of your desk or workbench leaving
an inch hanging over the edge. Try pulling the tape off by pulling
down, or at right angles to the desk, now try pulling up. It comes
off much easier. If it came of equally easily when pulled in any
direction, clean the dust off your work bench and then repeat
the experiment.
Fibreglass embedded with polyurethane glue is effectively an
extremely strong form of double sided sticky tape. If you just
have a single layer going over the top it will eventually peel
off like sticky tape because in some circumstances all of the
stress is being absorbed by a very thin section of glue. By making
sure the joins in our boat can take stress in as many directions
as possible we can have the strongest boat. Zigzagging of reinforcing
tape over and under the two different sheets should give us a
very strong join in all directions. Another option might be to
make the plywood grow hair but this was considered impractical.
Another option would be to make matching curved battens as the
battens would then be forcing the whole of the surface to lift
instead of just the leading edge. These would probably not have
bent easily enough for my design and I still would have needed
some way to ensure I has sufficient space for the membrane to
bend in (see below) plus I would have had to have got something
to make them out of.
To make this method work there needs to be a slight space between
the two plywood sheets for the flexing to take place in, otherwise
the membrane does not have enough room to flex in and it does
not bend and will probably snap your plywood before it gives.
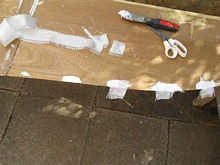
To achieve a gap I used some old cardboard packing cases. I traced
the base of my boat onto the cardboard and cut with the width
of the scissor blade as my guide outside of the line, making my
cardboard spacer just slightly larger than the base piece of the
boat. Sealing the edges of the card board with brown packing tape
which seems to be the only thing this glue does not stick to.
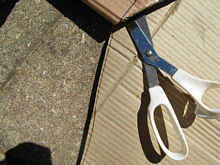 |
Here is a picture showing how far outside the
line I went. |
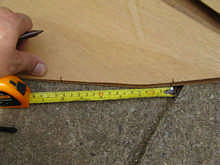 |
In this picture I marked out every 15cm (6”)
on the top and bottom |
This photo shows the sequence of putting down dob of glue, smearing
that into the grain of the ply putting a 5cm(2") square of
fibreglass cloth and embedding the cloth in glue. This I do to
the right of the marks I made earlier - this way when I turn my
top piece over it will be underneath to the left and my fibreglass
will be able to zigzag over and under. This glue is not very runny
so it sticks better if you work it into the surface of your plywood
a bit.
 |
I did make things a little messy for myself
by not spending the time to go to a fibreglass shop to get
fibreglass tape with a nice sealed edge and settling on what
I could get off the shelf at my local hardware store. |
 |
Now I stack my sandwich |
 |
Now I clamp it together, take the fibreglass
from under and glue it to the top piece. If there is a next
time I would use temporary screws rather than all these clamps
that don't work very well. |
 |
Now I flip the assembly over and glue the other
way. Another layer of fibreglass this time all the way round
and polyurethane glue all round first one side then the other
and then saturating the fibreglass to make it waterproof.
|
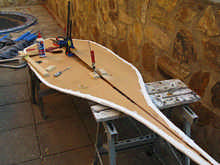 |
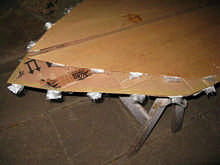
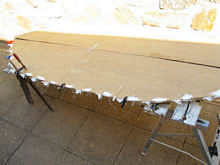
Now I glue on some blocks of wood to attach
bracing to. I put the blocks just a little in from where the
majority of the curving would be - there was no mathematics
or clever design here just a bit of seat of your pants have
a go and see what happens. |
After this the cardboard was removed from the sandwich.
To be continued tomorrow...
*****

|