Preface
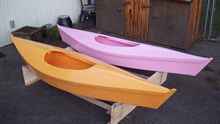
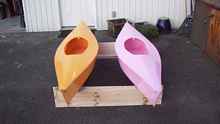
A while ago I decided I wanted to build a couple of small boats
for my grandkids (8 & 4 years) and looked and thought until
I came across Philip McCrackens "One
Sheet Wonders" in the July 2009 Duckworks Magazine.
Philips "Bojak" wasn´t exactly what I wanted,
but it pushed me in the right direction. I wanted decks, which
can´t be done with one sheet,and I used my own dimensions,
but I (we) must thank Philip for the basic idea (Thank you, Philip).
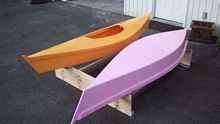
I built two over winter in Canada, so no trial run as yet. I left
off the 1x1 keel thinking it might not be necessary, but the more
I think of it the more necessary it seems, so at step 6 please
mark a line down the center of the bottom before putting it on
and put a 1x1 keel on after you have glassed the bottom.
 |
Kids Kayaks |
For those of you who might want to chase the kids and don´t
have your own boat, this design can be expanded by butt blocking
the plywood sheets to get length. I would make an 8´cockpit
section with the bow and stern added, with the fore and aft bulkheads
(see plan) attached to the butt blocks on the cockpit side (thereby
hiding the butt blocks, which offend my aesthetic sense). For
a 16´boat your bow angle will be 28º and the stern
angle will be 32º, the temporary bulkhead will be 25"
at the bottom and 30" at the top and 8 1/2" high. Don´t
forget to cut out for the chine log. Temporary bulkhead back 4´9"
from the fore edge of the cockpit sides. I´d go with 12"
high sides fore and aft and 9" at the temp.bulk, but do it
your way, it´s your boat. If you can´t figure out
the rest using the plan, email me and I´ll send a plan,
but try to work it out. You´ll feel pretty good about yourself
if you do (this of course doesn´t apply to those of you
who have boatbuilding experience).
PLEASE, keep in mind that this (these) boat(s) have been designed
by a professional carpenter, not a professional boat designer!!
The design parameters were-cheap and easy. These boats will not
perform well in rough water. The idea is to get on the water.
Depending on the materials used and where you buy, the Kids Kayak
should cost about $125 and the big kayak about $200. I built my
two Kids Kayaks at the same time, which saves time because you
set up your tools once for both boats (or three or four, depending
how many kids you have), in about 18 work hours in a reasonably
equipped shop, so if you were to work a couple of hours a night
after work and started monday, you might be doing your trial run
sunday (or two weekends). I think of these boats as toys, kind
of like a starter boat, not an ultimate boat, although if you
don´t want much from your boat, one of these might be it.
The idea is to get on the water. From there you will see what
kind of boating you want to do and can go to a professional boat
designer and get the right boat for that purpose. If all you want
to do is fool around on a calm lake, one of these will do fine.
If you want more, check out the pro´s, but do get on the
water!
Preliminary Observations:
1. I drew this boat for my grandchildren (8 & 4yrs.). It
is simple to build because it has a flat bottom, which makes it
unsuitable for rough water, but kids under 10 shouldn’t
be soloing in rough water anyway.
2. As I am not the builder, I take no responsibility for the quality
of work. Built according to plan they will float and perform reasonably
well. It is your responsibility as the builder to insure that
they will stay together. It isn’t difficult, just pay attention
to what you are doing.
3. I am assuming that prospective builders have basic carpentry
skills, i.e. can read a tape measure and keep a cutting tool more
or less on the mark. The trick to any building project is to take
the time YOU need to build to a level of quality acceptable to
you. The closer you need to be to museum display quality, the
more time you will need to spend.
4. Table and band saws are nice to have but not really necessary
for this project. Most building supplies will rip your plywood
for you. The other rips may have to be done at a woodworking shop,
but shouldn’t take 15 minutes, so shouldn’t cost much
to have done.
5. Because epoxy is expensive and (for most of us) messy, I used
Titebond III and PLPremium for gluing. These are small boats and
it is unlikely that they will be subject to high levels of stress,
so I feel that with the fibreglass and epoxy over everything there
will be no problem. If you don’t use epoxy throughout, use
Titebond III and PLPremium because as far as I know they are the
only ones that are waterproof rather than water resistant.
6. Epoxy is U.V. sensitive and MUST be coated with a U.V, inhibitor.
Paint is best, marine spar varnish is pretty good.
7. I’m not expert enough to give fibreglassing lessons but
all you need to know is on line.
8. My boats are not display quality. I spent about 18 hours building
and about the same time waiting for glue, epoxy and paint to dry.
 |
Material list
1. One sheet 6mm (1/4”) plywood, exterior grade or better,
good one side, as few voids as possible
2. One sheet 3mm (1/8”) plywood
3. 7 8 foot 1x2 as clear and straight as possible
4. 2 feet of 2x4
5. 5 litres (5 quarts)marine epoxy or 3 litres (3 quarts) marine
epoxy and 1 litre Titebond III and 1 tube PLPremium glue
6. 3 yards 48”-54” 4 oz. fibreglass cloth
7. 1# 1” drywall screws
8. 1 6’x1”dowel
Tools
1. Jig saw (sabre saw)
2. Block plane
3. Tape measure
4. Drill - preferably cordless with screwdriver bit
5. Screwdriver (if not with drill)
6. Clamps - at least 4 C or bar clamps and 10 spring clamps
7. Sander - quarter sheet palm sander is cheap and effective
8. Table saw, band saw, belt sander- nice to have but optional
Building Instructions
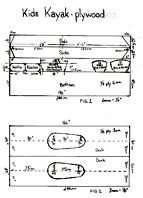
1. Do your ripping or have it done. You want 2 pieces 9”x96”
and 1 piece 19”x96” from the 6mm (1/4”) plywood
an 2 pieces 24”x96” from the 3mm (1/8”) plywood.
Rip the 4 clearest 1x2 in half to get approx. 5/16”x1 ½”x96”.
The stem and stern posts are cut at 18 and 22 degrees from the
2x4. Cut your 1” dowel to 60”-66” long and rip
a slot ¼”wide and 6” into the dowel from each
end to accept the paddle blades. Remember that the blades should
be at 90 degrees from each other.
2. Put the good sides of the 9” sides together (bad sides
out) and put a screw in 2” down and 2” in from each
top corner. Measure 4” in from one bottom corner and 6”
in from the other and draw a line from the top corner to the mark.
The 6” mark is the bow (stem). From the bow measure 54”
top and bottom and draw a line from one to the other. Mark 2”
down from the top edge. Put a nail or screw in this mark to help
bend the batten (5/16”xi i/2” board). Use spring clamps
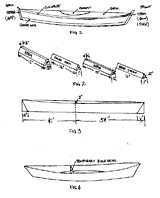
at the ends of the plywood. See FIG 3. Mark the curve and cut
with the jigsaw. Cut the ends and remove the screws.
3. Attach the stem and stern posts to the bad side of one side
letting the post extend beyond the plywood to be cut off later.
Use PL and 4 screws at each end. Use a box to hold the other side
at the correct angle (FIG 8) and glue and screw the stem to the
other side making sure the tops and bottoms line up. Remove the
box and glue and screw the stern post to the other side, making
sure to align the top and bottom.
4. From the leftover piece of 6mm cut your temporary bulkhead,
7” high and 21 ¼” at the top and 18”
at the bottom, cut ¾”x1 ½” from the
bottom corners to allow the chine log to pass trough.
5. Put one 5/16”x1 ½”x96” piece from
stem to stern posts (FIG 10) and mark the angles. Cut the stern
angle and clamp at the stern. Bend around to the stem and mark
the length to cut. Shift the marked angle to the length mark and
cut. Fit it. If it won’t come a bit higher than the plywood
it is too long. Trim it. When it fits well (half inch short is
still O.K.) cut the other 3 to the same length. Spread Titebond
III on the side and 3 sides of the chine log and install. One
end will have to go deep into the hull to allow the other end
to enter (FIG.11). Clamp both ends and 2 places in between with
C or bar clamps and the rest with spring clamps. Let the glue
dry for at least ½ hour, better one hour. Do the other
side.
6. Cut the stem and stern posts flush with the sides and plane
the chine logs flat and smooth. Lay the bottom piece (19”x96”x6mm)
on the bottom and screw the stem and stern to the stem and stern
posts with one screw each end. Mark around the outside. Remove
the bottom and cut the bottom to rough shape with the jigsaw.
Stay about half inch outside the line to be cut perfect later.
Put PL around the chine logs and replace the bottom using the
screw holes to fin the position and screw every 8”.
7. Use the same procedure to place the gunwales as was used to
place the chine logs. Using the stem and stern for guides, cut
the gunwales to an angle that suits you. I used 45 degrees.
8. Cut the stem and stern posts flush and lay the straightest
of the 1x2 from stem to stern and mark the angles (FIG 10) and
cut to length. The top of the 1x2 should be flush with the top
of the stem and stern posts. Turn the 1x2 upside down to mark
the length exactly. Glue and screw .
9. Using a straight piece of scrap to check your angle (FIG 10),
plane the gunwale smooth. You should have about ¼”
of space at the outer edge to aid the curve of the deck.
10. Measure back 22” from the bow and up 24” from
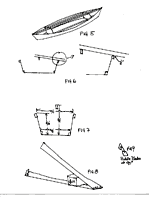
the stern and measure for and glue in the bulkheads. FIG.7 shows
the measurements. To get the curve of the deck, put a bit of 1x2
into the cutout of the bulkhead for the 1x2 centre piece and bend
a thin piece of wood or a metal ruler or something similar over
the 1x2 bit to each of the marks on the side. Glue in with PL
and glue both sides as well as you can. The airspace created fore
and aft is extra floatation. Put a 1x2 between the bulkheads at
each side right up against the side (FIG5).
 |
11. Place your deck pieces (3mm ply) one on top of the other.
And put a screw through two corners to hold in place. Draw a line
down the long center, 12” in from each long side. Measure
30”and 60” from the stern and mark your cockpit opening.
I used a 13” diameter at the back and 9” at the front
because I had lids that size to use as templates. It is a good
size and I would suggest you stay close to those dimensions, but
as it has no bearing on the structure you can do whatever you
like here. Put the front edge of the base of your jigsaw on the
plywood about an inch from the line you want to cut and in the
waste part of the plywood with the blade parallel to the ply.
Start the saw and slowly lower the blade into the plywood. See
FIG12. This is called a plunge cut and saves you drilling a 3/8
hole to put the blade in. Don’t try to start a plunge cut
on the line.
12. Remove the screws and fit the deck (bottom piece only) the
same as we fit the bottom. The back edge of the plywood should
line up with the sternpost. Mark around the edge and screw the
top and bottom together again using the same screwholes as before.
Cut the edge of the deck about half inch outside the line, as
with the bottom, and put PL glue around the gunwale and along
the center 1x2 and place the deck. Put a screw in the sternpost
and another into the centre 1x2 at the front of the cockpit. Bend
one side down to the gunwale and screw it down at the side of
the cockpit, then do the other side. Finish screwing it down working
side to side and centre to front and centre to back. Put as many
screws as you need to hold the deck down nicely with no waves
in it.
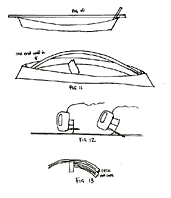
13. Trim the edges of the bottom and the deck planning from the
widest point to the narrowest. After 24 hours the glue should
be set enough to remove the screws so as to avoid damaging the
plane. Plane a radius of about 3/8” on the bottom and the
deck to help the fibreglass cloth to lay over nicely. Install
the false stem and stern with PL and hold in place with masking
tape or similar.
14. Using the offcuts from the deck (3mm), build up 4 more layers
of ply around the cockpit opening to protect a small body if it
is thrown by a wave or wake against the cockpit edge (FIG13).
Cut to shape with the jigsaw and sand smooth. Round the top edge
for fibreglass.
15. Prepare for fibreglass by filling screw holes with a thickened
epoxy mix. Mix sanding dust or talcum powder or anything of that
consistency with the epoxy (after the epoxy is mixed) to get a
consistency of peanut butter. Sand when the epoxy is hard and
sand the whole boat.
16. Cut a strip of fibreglass cloth 3” wider than the widest
point on the bottom by 3 yards long and drape it over the bottom
so an inch and a half overlap the sides at the widest point and
the rest covers the boat from end to end. Cut from the front to
the point of the bow and from the back to the point of the stern.
Mix your epoxy and begin applying it in the centre of the bottom
and work your way out to the sides and the bow and stern. Always
work away from the saturated areas so as not to make wrinkles
or bubbles. When the cloth becomes transparent it is saturated.
Trim the cloth where necessary but cover as much of the boat as
possible.
17. When the bottom is tacky, give it another coat, then a third
if any of the weave of the cloth still shows.
18. When hard, turn the boat over and place the remaining cloth
over the deck. Mix your epoxy and beginning either before or behind
the cockpit begin to saturate the cloth, moving around the cockpit
but staying clear of the edges and saturate the other deck. Cut
a slot with a knife an inch or so into the cockpit and cut out
the cloth staying about an inch from the plywood, then cut from
the centre to the plywood every 4” or so, closer when the
curve is tighter, so the cloth will lay nicely. Cut the outer
edge of the cloth using the bottom of the gunwale strake as a
pattern. Finish applying epoxy and recoat when tacky as with the
bottom. When hard, sand the whole boat with 6o grit. Make up some
epoxy filler and fill any low spots or other faults until you
are satisfied. Coat the inside with whatever epoxy is left, as
many coats as you have epoxy for.
19. Sand the epoxy to give the paint something to hold on to and
paint. You will probably need to prime first. Follow the manufacturers
instructions.
20. Cut your paddle blades 6”x12” and glue them into
the slots in your dowel with PL. Center the blades. Paint or varnish,
your choice.
21. Expand these plans to make one for yourself to chase the kids
with or get yourself something to be on the water in in case the
kids need help. You can use the same building procedure and stretch
this boat to about 15’, but don’t make it too much
wider than 26”. To make longer sheets of plywood you can
butt two pieces together and epoxy a 6” wide strip of cloth
over both sides and I’m told it is as strong as the wood.
Go have fun!!!!
Addendum:
I just read Michael Storer's article about his Quick Canoe 155.
The skegs or fins he uses might be the answer to a tracking problem
- if there is one in the Kids Kayak. Also, his canoe is probaqbly
a better chase boat than an extended Kids Kayak. I'll send Chuck
a letter this summer after trials to advise about keels and/or
skegs.
Questions-luisgrauer@gmail.com
*****

|