Well it's a Wa'apa that is shorter and wider, so it's not a Wa'apa.
She is 132" LOA and 24" Wide. The total beam with floats
is just over 8'.
I was reading Trimaran
Sailing for those with Disabilities on the Web and
thought, there is an idea. I am not exactly agile and the extra
legs (floats) add some comfort to the thought of sailing. I was
looking at various plans and most were too complicated for what
I wanted. I had built a Wa'apa
and decided to build another modified one. The Wa'apa at 16' was
just a little big for me on my own but makes a great motor canoe
for the two of us. So I decided to build a smaller canoe for just
me, but designed accommodating enough so my movable ballast could
come for a short sail if she so deemed. (I did this build on my
own and Gary Dierking was not consulted and is in no way responsible.)
The Design
I decided to increase the freeboard to 23" and make floats
8' long (shorter but to Gary's plans), which I could also use
on my motoring Wa'apa. I will put holes higher up on the float
struts to compensate for the higher sides.
16' Wa'apa with motoring floats.
The seats are to be 18" high, about 5" below the gunnel.
The waterline height with one person, according to Carlson's
Hulls, was 8" and with two for a short jaunt,
12". I was going to use Jim Michalak's leeboard
design, and I made the parts, but Mark Bowdidge of
Bowdidge
Marine Designs said a daggerboard would be better
on this tri.
Spotted gum lower Michalak guard left and upper
plywood guard (1" thick) right. I put these here as close
up pictures of these parts are hard to find.
I decided to use Joe Dobler's pivotingdaggerboard
design but modify it because of the depth of the
boat.
Joe Dobler's Pivoting Leeboard Design
My variation of the design. Note the bevel is
cut higher on the left where the arrow is pointing because
of the depth of the hull. Bow is on the left. It pivots fully
as long as there is some upwards force.
My rig is a Malibu
type lateen cat rig with a free standing mast and
my sail is a 10' sided equilateral triangle (43.3 sq ft). I decided
to use a small motorwell for the 2hp outboard.
Seats set below gunnel at 18" high.
It has three seats. One for me in the middle when on my own to
trim the boat and a seat front and back for me and She when she
is with me (the middle seat will then be for our dog).
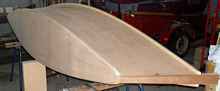
The Build
I made the box beams smaller using 50 x 19 hoop pine Coramba
Timbers (nice quality wood and easy to work) and
6mm plywood for the sides. I used 20mm dowel for the ends of the
beams with a 1" x 1/16" aluminium sleeve over it. I
got some nice spotted
gum (hard durable wood) for the outer stems. I used
6mm pink plywood (Pacific
Maple or Meranti hardwood) from Boatcraft Pacific.
It is heavier than 9kg. Mine weighed about 12kg per sheet, but
is is strong and more durable than other plywoods. It does splinter
easy so use plywood blades. You can also get plywood blades for
the skill saw and it splintered less than the jigsaw.
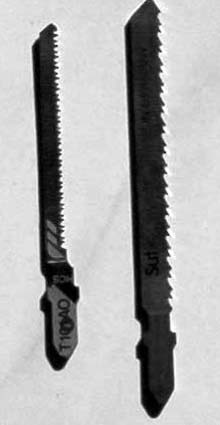
I found these blades quite good for cutting
plywood. They are designed for the job with extra teeth sort
of offset to each other. Just ask for plywood cutting blades
at your store. They are sometimes called clean cut or precise
cut blades. The thin one cut 3/4 pine to a 2" radius
easily.
I used fixit
mate glue and found it great. It comes in a caulking
tube and you can shove the nozzle between the frame and plywood
with the screws loose and then screw tight. And, it has no smell
that I can detect. It needs moisture to cure so I used a little
water spray bottle. I used epoxy where I felt I should on the
mast partner etc. Chuck shipped me a Japanese
pull saw and a shinto
saw rasp and the later surely rips the timber off.
The pull saw is great for trimming things flush.
This is time I made all the components before gluing anything
in the hull. If you can't hide it make it oblivious works and
I like the look of the rivets in the stems.
Spotted gum stems with bronze ring nails that
look like rivets. Looks "Rustic" as my neighbour
would say.
The mast step connects to the bulkhead, sides and rests on the
bottom.
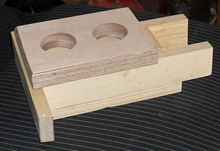
Mast step above and mast step in place left.
Note the 6mm aluminium plate to rest the pivoting mast and
stop wear to the timber.
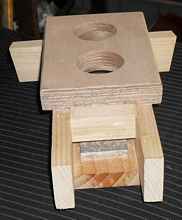
My mast partner and step has two holes. It is hard to get the
Centre of Lateral Area and Centre of Effort exactly right when
you have the drag from floats, so I added an extra hole for safety.
Mast partner
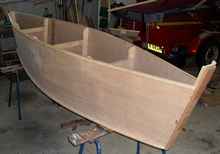
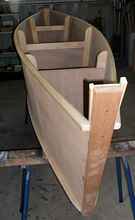
Ready to finish painting. Three seats, daggerboard
case middle and outboard well aft at bottom of picture.
Mounting a rudder on this canoe sterned boat proved easy once
I discovered the vertical rudder hardware for the Weekender.
This is heavy hardware with 1/4" mounting holes which will
easily stand up to the punishement I'll give it.
Rudder with tiller extension. It also has rope
steering in case I need to sit further forward.
Floats are a little aft of centre to make sitting
in the boat easier.
Plenty of sail for a little boat.
Pool noodles as temporary hiking seats until
I work out where I need to sit.
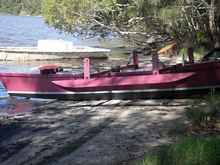
Set to go!
Jake is a boy's name
I called her Jake (not my original idea but a trimaran has three
legs and this will help you get it - see Video of Australian Rolf
Harris). Well Aussies do spend our lives hanging upside down on
this planet but it will put a smile on your face even if you have
seen it.