| Part One - Part Two
I needed a dinghy as tender for my main build, but feeling less than rich after buying a load of white oak, I decided to try and construct this boat on a budget. After looking at a few designs Joe Dobler's Pepita was chosen from Duckworks Magazine. As usual it was not an easy choice involving a lot of agonising over pro's and con's, though having experienced the same indecision on the main build I suspect it was more to do with me than aspects of the plans. The short list consisted of:
Tender behind – John Welsford
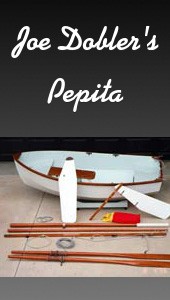
Pepita – Joe Dobler
Redshank – Paul Fisher
Greenshank – Paul Fisher
Although I prefer the look of Paul Fisher's clinker designs I felt they would take too long to build, the requirement was for something that would build really quickly in the winter between other jobs, while waiting for better weather to start constructing the Noyo Trawler. It would need to be available to use in the summer for days out. It had to car top and be light enough to sit on the wheelhouse roof of the Noyo without causing stability problems, or a hernia trying to get it up there. While I love and admire all of John Welsford's work the pointed stem of the Pepita design was more appealing in this instance, the fact that it only had two strakes per side make it a quicker build, and it was also a bit lighter. Plans ordered and received, it took a couple of weeks to study them before beginning the build. Although I was determined to make this dinghy at a minimum cost, the crucial bit was not wanting to compromise too much on the quality. So, how could this be achieved?
When my order of expensive Gaboon ply was delivered the timber yard threw in a 4mm sheet as protection for the main order, it was a bit scuffed and one edge was broken off, my first though was that it would be OK for pattern making, but on closer inspection it proved to be good quality 5 ply. So with a bit of jiggling around that would do for the strakes.
|
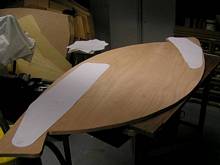
The damaged ply which provided the four strakes, it doesn't look much at present but it soon will. |
I had a part sheet of 3/8" left over, sufficient for a transom and daggerboard cheeks, also a few ¾" offcuts, if I could get a rudder and daggerboard out of these the boat was practically made.
| Dagger board and rudder sketched out of a spare piece of 18mm ply. In case you wonder at the strange shape it is an 8 x 4 from which two stem pieces have been cut for the Noyo Trawler. |
|
So far the title 'Dinghy on a budget' may sound a bit misleading as I already paid full price for some of these items, call it artistic license if you will, but they were offcuts. Apart from the many minor habits I have that my wife finds irritating, the one she really dislikes is the magnetic attraction I have to other peoples skips (it also rankles that I converted my brother-in-law to this fruitful pastime). If anyone is throwing out rubbish, or as I would have it 'redistributing their possessions' I like to check if any of it is of use. Old age, or a large stack of castoffs, must have mellowed me as I now sometimes find that there is nothing worth having. You never know if you look around, or visit your neighbour's workshop, what you may find! Well, as luck would have it, just down the road from me, a house extension was being built, and in the skip was just what I needed for the dinghy, some blue polystyrene foam for the seat strengthening and filling the floatation chambers. In addition to this was some very thin ply, no good for structural work but ideal for the encapsulated seat tops. On the Pepita build the rear seat top can either be 6mm ply or doorskin ply strengthened underneath with fibreglass and 2" polystyrene foam (just what I had found ). A scrap piece of drain pipe rounded off the haul, just right for the mast step.
To complete the hull all that was needed was some 6mm ply for the floor, I actually had a moment of weakness and went out and bought this full price. It did feel like I was betraying the spirit of this article a little, but at the same time remember me saying that I was not willing to compromise too much on the quality as it was to be the tender to my main build. Some of the many off cuts of white oak that were lying around would be ideal for the gunwales, knees, breasthook and floor braces. Now where could I get the mast and spars? Lets leave that problem for the moment while cutting, stitching and gluing the structure together.
|
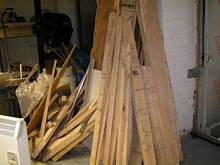
Some of the many oak offcuts left over from the frames of the main build. |
The Pepita plans are very well drawn, a bit complicated at first view until you figure out what goes where and how, as most plans tend to be until you get to know them. The plans need to be redrawn full size from the scale drawings which are copiously marked with sizes. I chose to do the drawing on fan fold computer stationary (of which I have had a full box for many years) cut the parts out and trace round them onto the plywood, this worked very well as it allowed these paper templates to be moved around to get the best fit on the damaged sheet of ply. If they were full sized plans I would have used my normal method of hammer and nail to transfer the pattern, which I find works well for me. Having used stitch and glue in the past one tip I will share with you is on selection of wire. If you have some 2 core + earth scrap by all means use it, you will probably find 2.5 sq mm power cable of suitable thickness. The earth will probably need to be discarded as it will be too thin to use for a strong stitch. A better choice, particularly if you are buying it, is to use the green and yellow earth wire, it will supply you with multiple wires, all of usable size unlike the twin + earth which will only supply you with two wires. To strip it, trap the wire in a vice and hold it two or three foot away. Use a Stanley knife and slide the blade AWAY from you along the wire to cut the outer plastic coating. Now pull the wire from the coating and cut into six inch strips before unwinding it. I find this is just about the ideal length to cope with plywood to plywood joints. For any other type of joint e. g. with battens, then the wire may need to be cut a bit longer.
| It didn't take too long to get to this stage, with the strakes cut out and some copper wire I was well on the way. |
|
I did modify the boat plans a bit, don't we all, in the form of a kick-up rudder. The same on the dagger board would have been good, but the long casing and extra lead weight did not seem to be a good idea on a light 7' 3" dinghy.
Building my own gudgeons and pintles was the original plan, but then I managed to get them at a very good price at a local boat jumble, along with an anchor and rode, all the rigging pulleys and two buoyancy chamber inspection hatches. Have a good look in your local boating magazines or ask at the marina about boat jumbles. Some of the items offered for sale are rubbish, and look like rubbish. Some are discontinued lines or end of reel rope oddments, at very good prices. Most of it seems to be used goods in various condition, and at a fraction of the price you would pay for new.
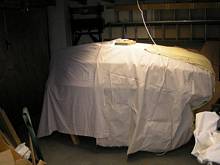
Just because we are snowed in for Christmas is no reason for the building to stop. I rigged a few dustsheets to make a warm enclosure in the unheated garage so the epoxy can cure at a good temperature, the shape of the dinghy on two trestles is ideal for this.
|
Snug and cosy, some epoxy curing with sub zero temperature outside the garage. |
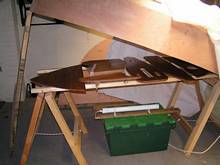
| What it looks like inside, the two pieces of timber, soon to become oars, make an ideal shelf on which to stack components. I changed the greenhouse heater for a more powerful one timed to heat 15 minutes per hour. |
|
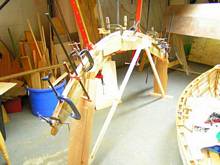
It's now time for our two week holiday in Madeira, I hope you enjoyed the previous article written from there 'Black Scabbard Fish'. The boats they use for fishing were not that much larger than Pepita but must be at least seven or eight times heavier due to the construction being thick wood with iron runners on the keels for dragging up the pebble beach. Back home again and a few more jobs to do to finish off the hull. Cutting and bending the composite gunwales is a good idea at this point, a jig needs to be made for laminating these two items, this avoids distorting the thin plywood as would be the case if they were laminated in situ.
|
A gunwale laminating on its jig. |
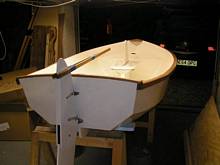
A little bit more construction on the seats and rudder, then some painting give a very pleasing shape to the final dinghy. The oars are borrowed from my other dinghy for the moment, I may make a set for this boat later.
| The final product waiting to be tried out though spars and sail will need to be made. |
|
As it took longer than expected and is now getting cold here I hope to try out the boat in the next few weeks after which part two of this article will document the rigging and how well it sails. As an aside I might add, this should be fun (at least for you if not for me) as I have never sailed anything like this before so lets hope it's not too difficult.
To sum up my advice for building on a budget:-
1. Don't throw away too many offcuts especially the larger ones, they can always be used for something if they are good quality.
2. If you feel you can do a good job and have the time, make what you can rather than buy new, it will nearly always save money.
3. Always check skips for usable surplus goods, its amazing what people throw away.
4. Try to get as many items as possible from boat jumbles but check the condition before you buy.
5. Keep an eye on local adverts or put a few words in the wanted section of your local paper or boating magazine.
6. Always be generous with your neighbours, especially the ones with workshops, you never know when it will be their turn to be 'generous' with you.
7. Try and get items you buy locally to save on postage and packing.
8. If you are buying several items ask about a discount, a lot of places are happy to encourage you to spend with a 5% or 10% discount.
9. Check prices before you buy as they can vary considerably from shop to shop.
Now to answer the question I can hear you all asking "But how much did it finally cost?". Please read the 'Notes' at the end of the schedule, in conjunction, for an explanation of how it was calculated.
Description |
Cost £ |
Plans – duckworks ($55 + P&P = $83.50) |
54.14 |
1 sheet Gaboon ply 4’ x 8’ x 4mm – free |
|
1 sheet Gaboon ply 4’ x 8’ x 6mm (£46, half sheet used) |
23.00 |
1/2 sheet Gaboon ply 4’ x 8’ x 9mm (left over from main build) |
|
Oak offcuts – free |
|
2 inspection hatches |
15.00 |
Assorted bronze screws |
3.00 |
Graphite powder (500g for £10) |
0.50 |
Stainless steel pintles and gudgeons, two sets |
10.00 |
Main sheet and halyards – left over from previous boats |
|
Anchor and rode |
12.00 |
Epoxy – estimated |
35.00 |
Fibreglass – estimated |
25.00 |
Stainless steel shackles, blocks, eyebolts and thimbles |
11.00 |
2 part Epoxy paint – left over from a previous build |
|
Rowlocks |
10.00 |
Total |
198.64 |
Notes:
1. I have not included a cost for any materials which were already owned and were surplus, or would not be used on the main build;
2. The cost for bronze screws is included as they would have to be replaced at full price for the main build;
3. An apportionment has been included for items like graphite powder, epoxy and plywood in ratio to the amount used.
Bearing in mind that I need to build the spars and sails did I succeed with my original aims to build the dinghy on a budget? I leave that for you to decide!
Click HERE for a list of articles by Mike Machnicki
*****
|