 Custom Search
|
|
| sails |
| plans |
| epoxy |
| rope/line |
| hardware |
| canoe/Kayak |
| sailmaking |
| materials |
| models |
| media |
| tools |
| gear |
 |
 |
| join |
| home |
| indexes |
| classifieds |
| calendar |
| archives |
| about |
| links |
| Join Duckworks Get free newsletter Comment on articles CLICK HERE |
|
|
| Make and Make Do |
By Rob
Rohde-Szudy - Mazomanie, Wisconsin - USA Three Ways to Share GPS Tracks |
 click for bio |
A lot has changed in the world of Global Positioning System (GPS) receivers since I first started looking at them back in the bronze age. We have moved from little yellow boxes with cryptic screens to smartphones with apps that let you upload a GPS track to Google Maps and send an email to share it with all your friends while you’re sitting in your boat. Pretty amazing, if you think about it. However, there are a few disadvantages to the smart phone GPS approach.
What I want from GPS Fortunately, I’m not what you’d call a GPS “power user”. I sail within sight of land, so I don’t really need charting ability while I’m on the water. My GPS is basically a speedometer that also allows me to easily share a map of exactly where I went. (This is a huge step forward from trying to puzzle positions on the water by attempting to take bearings on known points, which is a giant pain in a small boat). The GPS map approach also lets me measure on-screen the angles I’m able to tack through when sailing. I consider it pretty advanced to use the tracks to figure out how fast I was able to get where I was going! So let’s bend the little yellow box to our will. But since I have a smart phone at the moment, let’s see what it can do first. Smart Phone GPS The application I’m using is called “GPS Tracks”, and it very simply records and shares GPS tracks. For what it’s worth, I also tried an application called “Backpacker” but found it to be a pain because you have to create a login on the developer’s website, and I really have enough logins already.
GPS Tracks makes it simple to record and stop recording a track, which is an advantage over the old yellow box. Sharing the track is easy, simply select “Send to Google”…
…then select “map”…
…then decide how to share the map. I do it by emailing it to myself.
When the map is opened from the link, this is what we get.
Not bad. It does a fine job of sharing a graphic of the track, but if we want any analytic capabilities we need something more powerful. Now let’s take another look at the little yellow box. Recording a Track Here I’m afraid you’re largely on your own, since this will vary depending on what unit you have. Find the instruction manual – most exist online. Mine is an old Garmin etrex with no mapping and a black & white display. It isn’t fancy at all, but it was inexpensive and it works. Getting GPS data to your computer This too varies based on what kind of GPS you have. Many Garmin units require a special cable to connect to the computer via the serial port. (On some newer laptops you may not have this option, so you might need a USB adapter.) I didn’t want to pay for Garmin’s cord, so I wired one. You can find instructions online for this simple job if you have a similar unit. I used GPS Utility, a small freeware program, to handle the data transfer. I like the style of this software developer – they still offer a Windows 3.1 version for those who like the old bloatware-free operating systems. They don’t support all GPS units, but they seem to cover the old and cheap variety pretty well. Just my style. (More on the developer later…) Once you’ve downloaded and installed the program, you need to get it talking to your GPS. To do this, first select the appropriate receiver under “GPS – Setup”, then select “GPS – Download All”.
The software will ask you to confirm the download.
It make take a minute or so to load, depending on how long your track was. I should mention here that I completely clear the GPS unit’s memory between uses to minimize the editing of a track before proceeding. We then save the track as a .gpx file.
GPS Utility includes some cool reporting features as well. First, I like to change the units of measurement from meters to statute miles. This can be changed under “Options – Data Set”, and unfortunately needs to be done each time you open the software. (This may have been fixed, as I do not have the most current version.) Then we can view a table of the track data by clicking the button with a blue trail and red markers, or typing “Ctrl+T”.
Note the elapsed time and speed fields at the far right. Useful stuff. We can also get summary information under “View – Reports”, but be careful! Mine showed a maximum speed of 16 mph, but looking at the track table I can see that this speedy number didn’t occur in the water! It was going through the campground on the way to the ramp. This, of course, also means that the average speed cannot be trusted, since it will include non-water travel time as well as time spent sitting still. My top water speed was only around 11 mph, which I knew from looking at the gps unit on the water. I used to get 16 mph, and I think this old, beat-up propeller isn’t moving water like it used to. We also learn that the total distance covered was 5.631 miles. I didn’t think to check my fuel burn after this trip, and I didn’t record the track for the subsequent trip. If I had captured one of those data elements, I would have been able to calculate average mpg to see if it made sense for this boat and motor. With a two-stroke, gph is usually more useful, however. This means skimming the speed column to remove any long periods of close to zero mph when it is likely the motor was shut off, either beached or adrift. Obviously any change in fuel burn may mean something is up with the motor. (…or the propeller.) So far, so good….but we want a map. GPS Utility actually does have the ability to plot your track on a map, but you have to load a map graphic into the software and calibrate it with known points. If you are concerned about the volume of data that Google collects about you, this might be worth the trouble. There may be other advantages as well, which we’ll look at below. However, if we’re going to load to Google Maps as we did with the smart phone, we need to convert the file format. Another conversion GPS Utility saves a .gpx file, but Google Maps wants to see a .kml file. This conversion can be accomplished by another piece of freeware – ITN Converter. Once installed we simply open the .gxf file…
…select which day we care about…
…and save as .kml format.
Now we upload the data. Google Maps Open Google maps and sign in so they can do the Big-Brother-is-watching-you data tracking they specialize in. Then click on “My Places”.
Then click on “Create Map”.
Note that the default is “public”. I changed it to “unlisted” for this test. Next click “Import” and select the .kml file we created and upload it.
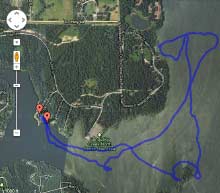
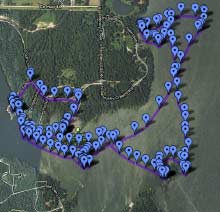
Here’s the result.
The location balloons at every change in direction are annoying, but when you zoom in you can see the lines OK.
Now let’s have a closer look at GPS Utility’s mapping functions. GPS Utility Mapping As I mentioned above, GPS Utility allows you to load bitmap images of maps, then calibrate them for accuracy. Under View-Reports we can make use of the “North, East, Maximum” and “South, West, Minimum” points as calibration points. At least we should be able to. When I enter these points into Google Maps, it rounds them to the nearest point on a road! This is, of course, useless. Mapquest fails in truly epic manner, telling me the points in question are in Barnetby, England! I think the residents of southern Illinois might be surprised to learn they’ve changed countries. OK, let’s go at this a different way. I saved a copy of the gpx file so I can delete some bits I don’t need. First, the report under View-Reports-Track Information tells us the points furthest north, south, east and west in the track.
Back in the trackpoints view, I delete all but these extreme locations. I am not sure what the plus signs mean, but I used them to mark the points I wanted to keep.
By highlighting the track point numbers and pressing the delete key, the unwanted points are eliminated.
After loading this file to Google Maps, we can perform a screen capture (use your “Print Screen” key) and paste the result into Microsoft Paint. When saved as a .bmp, this is something we can import into GPS Utility. Once we load the bitmap, we need to calibrate it with actual map points. Double click two of the known points on the map, and for each one enter the actual coordinates and click “OK”.
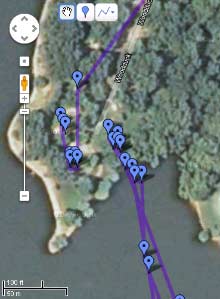
Well looky there!
This was accurate enough to remind me that we took a look at an unused beach (the bit in the black circle). I had completely forgotten about that part. You are probably wondering why I bothered to load a Google map back into GPS Utility. There are a couple reasons. First, by hovering with the cursor over the track at any point, a small pop-up pane tells you your speed and elapsed time and distance at that point. This extremely cool feature is not available within Google Maps.
Second, this software will work with any map image, even with a scanned fishing map or topograpic hiker’s maps. You only need to be able to find points to calibrate to. I guess the best way to do this might be to find some clearly identifiable single-point locations on your map, then go to them and mark waypoints on your gps receiver. I suppose you could write down the coordinates too, but why not make the receiver do the remembering for you? Intersections and the ends of bridges are probably simplest. (I didn’t think to mark such points while I was at Rend Lake, so I can’t demonstrate this particular feature with this track.) Do however keep in mind the age of the map, as roads can be re-routed and shorelines can erode over time. If your map is correctly proportioned, two points will suffice. A third point will correct for stretch or skew in your scan, and a fourth will correct for any “fanning” distortion. GPS Utility is a really nice piece of well thought-out software, particularly for something you can use for free! (Even the help file works well!) This focus on truly useful functions might be because the developer, Alan Murphy, is one of us – a home boatbuilder! Check out his Hunter Pilot 27 kit boat project. I guess one might say he only fit out the bare hull, but fitting out such a hull is at least as much work as building a plywood instant boat. His trailer sailing page has some interesting trip logs as well. These are mostly text, so bookmark it for winter reading. Good show, Mr. Murphy, both on the boat pages and on the software. Well, there you have it folks, I hope you find your way back home. |