
 Custom Search
|
|
| sails |
| plans |
| epoxy |
| rope/line |
| hardware |
| canoe/Kayak |
| sailmaking |
| materials |
| models |
| media |
| tools |
| gear |
 |
 |
| join |
| home |
| indexes |
| classifieds |
| calendar |
| archives |
| about |
| links |
| Join Duckworks Get free newsletter Comment on articles CLICK HERE |
|
|
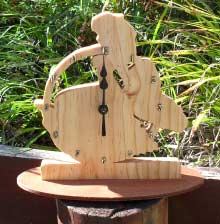
| Mermaid Clock |
by Mike John - Lake Macquarie, NSW - Australia |
| I have a thing for all things nautical and I guess I am not on my own there. When I finish building a boat I have a pile of ply and timber scraps and I thought there must be something I can do with that lot. I made a few gifts for last Christmas out of the scraps with my scroll saw and the wood pile started to disappear but then I built another boat and I was neck high in wood again.
Chuck the duck and Sandra being on the other side of the world are in a different time zone and I thought a clock would be handy showing their time. It had to be something nautical I thought. A mermaid seemed to interest me for some reason and I drew up a plan for a clock.
I ordered a quartz clock mechanism from Lets Make Time here in Australia and it came with plastic gold colored numbers. You can choose from a range of numbers and hands. For this project you will need a 3/4" dial thickness and hands about 3" long. Three are other dial thicknesses if you want to use different thickness material. (Mechanisms are online everywhere and in craft stores but I found Lets Make Time okay. I choose N2G 10mm Gold Arabic Numbers and M10B Hands 76mm.)
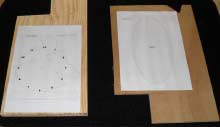
Here's a free pattern designed by me: A4 Format or Letter USA. It's two pages - the clock pattern and the base pattern. The A4 version is slightly smaller because the A4 format is narrower but this does not matter. You will need Adobe Acrobat or other PDF reader to read and print the patterns. When printing check your printing options, that you have set print scale 1:1 or scale = none when printing these patterns. They are full size patterns. These patterns are prepared to be printed and stuck to the wood directly. Use 3M Scotch Spray Mount Adhesive or like (I use Material Art's Materials Spray Adhesive) to attach the pattern to the wood. Spray the paper only and then attach it to the wood. Let it dry. Wrap the pattern and wood with some clear box or packing tape. This helps hold the pattern and the glue of the tape lubricates the blade and makes cutting easier and the blades last longer. You can omit the glue if you wish but it will make it a bit harder to cut. The numbers on the clock pattern above are to give you an idea of where to place your numbers. The hole in the centre depends on your mechanisms instructions but mine is going to be a 3/8" hole. The numbers on a clock are at every 30 degrees. A word on scroll saws. They are great for all sorts of things on boats. They will cut very small curves and with quite thick material. I you don't have one, choose one that takes pinless blades. It makes it easier to insert the blade through the holes for internal cuts and with pinless blades you can go through very small holes and not the 3/16" hole of a pinned blade.
Also, pinned blades tend not to have reverse teeth. Reverse teeth make for a cleaner cut and a whole lot less sanding on the reverse side. I get my blades from Harris Traders: Owen & Helen Harris,
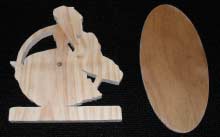
Murray Bridge, South Australia I used pinned blades for this project. By the way, the best site on scroll sawing is Steve Good's site in my view. He has a video channel and a pattern catalogue as well. So now you go ahead and glue your pattern to the wood. Laminated ply up to 3/4" is great but pine should do. Knots are good and add character with these projects as long as they are not in a real bad place. I prefer using plywood myself. It is much stronger and that is handy for the clock circle on the left but with mine I chose 3/4" thick pine and a 1/4" thick base. It does not matter a whole lot what you use and while I am at it this project, unlike rocket science, is meant to be fun and not perfect. We are using scraps remember. If the hands are a bit long or such, who cares.
I normally use blade sizes 3-7 depending on how small the cut is and how thick the material is. The higher number is used for thicker wood. I used a 5 for the internal cuts and a 7 for the external cuts on this clock. It's just a simple matter of cutting the white of the pattern out and leaving the grey. Drill the centre hole first. Drill holes for the internal cuts. Mark the numbers positions with a sharp nail. Cut the internal cuts first and then cut around the exterior. Your can approximate some of the wiggly small bits and pieces if you want. My biggest scroll sawing tip is if you wander of the line slowly wander back to the line. Nobody else will know you strayed from the path unless you go abruptly back to the path with the blade. It's a different matter with a perfect circle so be careful there.
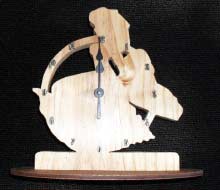
Simply glue and screw the base to the bottom of the clock. I glued mine, clamped it and then put the screws in when the glue was dry. You may want to round the corners of the base with a router and sand the edges of the clock a little round. Sand everything and wipe clean with a clean nearly dry but slightly damp cloth. Let the wood dry well. Or, use your partner's vacuum cleaner while she is out is another option that works most times to clean the wood. Dip and dab the clock in a bath of lemon oil or orange oil furniture restoring oil found in grocery stores - the beautification. (Myer or Home Depot has it in the US or Mitre 10 in Australia.) This method makes a fast easy finish. Wipe off the excess with a paper towel and let it dry overnight. Seal with three coats of a clear lacquer in a spray can or the oil may stain other things - the protection. It comes in satin, semi-gloss and gloss. Rub the clock with a little triple lot steel wool between coats and a very light rub after the final coat to make it feel smooth - the smoothing. Fit the clock mechanism according to its instructions. Fit the numbers to the clock. I used superglue.
Be sure to wind the hands around a full 24 hours manually with the change dial on the back so to be sure the hands do not bind on each other. Now you have a clock then you call your own and you most likely made it in a couple of days. If you do make this clock please send Chuck a picture. Download a free pattern book of 25 scroll saw patterns with a nautical theme. |


To comment on Duckworks articles, please visit our forum
|

 |