
 Custom Search
|
|
| sails |
| plans |
| epoxy |
| rope/line |
| hardware |
| canoe/Kayak |
| sailmaking |
| materials |
| models |
| media |
| tools |
| gear |
 |
 |
| join |
| home |
| indexes |
| classifieds |
| calendar |
| archives |
| about |
| links |
| Join Duckworks Get free newsletter Comment on articles CLICK HERE |
|
|
| A PuddleDuck and the Everglades Challenge - 4a |
by Scott Widmier - Kennesaw, Georgia - USA |
Part One - Part Two - Part Three -Part Four A - Part Four B
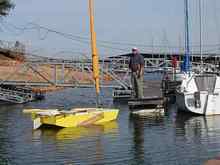
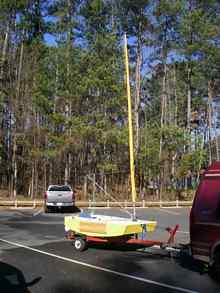
Testing and TweekingYes, you heard me right. There WILL be a Puddle Duck Racer doing the 2012 300 mile Everglades Challenge. Who is crazy enough to do this? Well, his tribal name is Plumbcrazy (a name bestowed by his loving wife) and he is me. If you are just twigging to this attempt now, I suggest you go back and read my first three articles. Part 1 covers Puddle Duck Racers in general, the Everglades Challenge, and my experience with both. Much needed background to understand why this attempt is getting so much attention. Part 2 covers the design process for the PDracer I was going to build to take on one of the toughest endurance races around. Part 3 is a bit of a dry description of the build process and, for those few who hung in there through all three parts, this current article will detail the outcomes! So, this article begins with me hoisting Knot Yacht, a self-designed and built 12' speedster, off of the boat trailer and, with much grunting and groaning, putting my bright yellow boxed shape boat in its place. What a contrast and not only in color. Where Knot Yacht has a sharp bow that easily cuts its way through waves, the PDracer has a broad front transom sure to produce spectacular fans of spray in chop. Where Knot Yacht is designed with an open transom and very little freeboard designed to be sailed on not in, the PD racer has high freeboard and a long cockpit designed to sit and sleep in. Finally, where Knot Yacht has been tested on the waters the, as yet unnamed, PDracer is a big question mark. I carefully strap down the boat, run through a checklist of needed parts (got the mast and rudder), hook it up to the car, and head down to the lake to start getting familiar with this future "vacation" home. I decided to do the first launch of the duck in Lake Allatoona, a 14,000 acre lake northwest of Atlanta and only minutes from my home. I had the launch ramp at Harbortown marina all to myself as I rigged the boat for the first time. No, I didn't sail the pavement on my driveway but rather trusted that I got the mast step and boom right and that all the parts would fit together. For the most part they did though the boom proved to be a little short. No big problem as I could simply roll up the rig sail a little using the around mast furling. The list of needed improvements did get its genesis on the launch ramp but I did get the boat in the water and it floated - always a big plus! Don't laugh, I remember a gentleman in Norway that lovingly restored a lap strake motorboat and then invited all his friends and acquaintances to a big launch party. Evidently, no-one with experience with old lap strake boats were among his friends otherwise they may have told him launching one of those boats after it has been out of the water for a while is a slow multi-day process to allow the wood to swell. Low and behold, after a speech, breaking of a Champaign bottle on the prow, the proud skipper climbed on his boat and rode it down the slip into the water ... and below the water. Seeing this left an impression which is why I am glad when my boats float when first launched, don't tend to invite people to the first launch, and prefer no witnesses to be around at all. So, put a check in the "it floats" column. Next, I wanted to try out the fishtail drive system I had rigged out of scrap laying around the shop and some lexan for the fin. Hours of research and I put together something in a few minutes to test the principles out. Well, it worked after a fashion but was complex to rig, hard to store, and required more effort to move the boat than a set of oars. After playing with it for a bit, I beached the boat and threw it none to gently in the back of the van. I used oars to row out to the main body of the lake. Another tweak, move the oarlocks further back or get rid of my knees. Other than problems with geometry, oars worked fine despite the healthy 20 mph breeze I was rowing against. Yes, the wind was a bit higher that I preferred for the test sail of a new boat particularly in winter. Hence the reason I monkeyed around with the fish-tail drive desperately listening for a drop in the whistling of the wind through the rigging of the boats in the marina. Maybe I should play with the worthless hunk of metal and plastic a little bit more. Before heading out on the lake I went over to the dock to scrounge a PFD off of my Compac Suncat which was parked forlornly in its slip. Its wide comfortably padded seats glared at me accusingly since I had chosen a thin pad in a tiny flashy yellow boat over them. While I was doing this, the designated witness to the first sail and my rescue boat showed up in the form of John Bell and his lovely Core Sound 15. John became a legend in the Everglades Challenge for his determination in singlehandedly launching an O'Day Daysailer 2 off the beach. I think that experience got him to sell the Daysailer and buy the CoreSound. He snapped some pictures of me and my new boat at the dock.
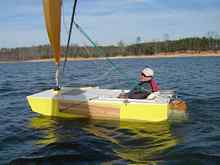
Finally, I couldn't come up with any more excuses so I climbed into the boat and rowed to the storm tossed seas ... well white capped lake at least. I decided to row past the wave barrier before unrolling the sail primarily so I wouldn't run into anything while making any needed adjustments. Of course, this gave me some experience rowing into the teeth of the wind. Of course, the fact I was hitting my knees and unable to make a full stroke slowed me down a bit. Once I cleared the barrier by a good distance, I unrolled half of the sail and. I was sailing! The boat was already showing a decent turn of speed with the wind over one beam. No big drama happened. I moved the tiller steering ropes and the boat went where I wanted it to go.
A compilation of videos John Bell took of the launch: So, the launch was very successful despite having the normal long lists of tweaks and fixes. The duck was nice and stable, behaved very well when hove too, balanced on the helm, easy to get out of irons, and sailed well. The cockpit was a very comfortable place to sit and far enough back to stay dry despite the high winds and bashing into some waves. I was able to adjust the balance to the boat mostly by moving my legs but sometimes by shifting my body. I didn't try hiking out on the first sail. I didn't have a GPS onboard to measure speed but I was marginally slower than John Bell's reefed Coresound 15 on a broad reach with him doing around 5mph. We didn't sail for long before heading back to the dock with a long list of adjustments but the main ones fall under the categories of: the sail, leeboard, boom, propulsion, rudder, and name. Sail: I had this issue on another boat equipped with this escape rig and I think it may be a too-tight leech line is creating a cup at the back of the sail which captures the wind rather than letting it flow nicely off the trailing edge. I have had recent experience fixing this on another boat. My Suncat, as delivered from the factory, made horrible leeway and I noticed the sail was cut very full for a four-sided gaff rig. I ended up buying another sail (bigger one also) that was a lot flatter and now the boat tracks great. I also need to install a cleat for the roller rig and work a bit with the mast step to get the collar on the roller mast to lock in fully. Leeboards: I am not going to limit the fix to the leech line, however. I also plan on making new wider leeboards for the boat. I also had issues with the board staying down when the boat was charging through the water. I depended on a shockcord to keep the board down with a line to a cleat to raise it but the force of the boat moving through the water proved too much for the shockcord. I will use line to hold the boards down and run them through autorelease cleats sold at duckworksbbs.com so that the leeboards will kick up if they hit bottom. Boom: I gave the mast more rake on this boat than on the previous boats I have used the escape sailboat rig on. This lead to the boom being too short which wasn't a problem given I had to reef the sail to keep the boat upright yesterday. So, I need to lengthen the boom. I also need to swap out my 2:1 mainsheet for something with a bit more purchase and possibly (gasp) a cleat so I can block the sheet off. My arms are still aching from holding that mainsheet. Propulsion: I need to raise the oarlocks and move them aft to get clearance for a full stroke. The breakdown oars worked well and store easily down-below. I may also try sculling the boat as a way to move it while sitting facing forward. Rudder: The rudder worked well in the high winds though I need more than the one very solid gudgeon and pintle. I have a duckworks gudgeon for a weekender and it held up well but I want to add another purchase at the bottom of the rudderbox to take the slack out of the system. I may build a new rudder system using one of the butcher-block laminated leeboards as the blade for looks and sturdiness. The rudder lines worked but there was a lot of friction in the system making the boat a little tiring to steer. I believe this is due to an angled pull on the rudder done in order to keep the transom clear for the fishtail drive. If I drop the drive, I can definitely remove this friction. The Name: The boat is revealing its own character to me and it is a good one. This also will help me decide on a name for the boat. One that rose strongly to my mind given first launch experience is "Steadfast." The definition of this adjective is: "Resolutely or dutifully firm and unwavering: "steadfast loyalty" So, I returned the boat to my garage with a nice list of "tweaks" to improve the sailing of the boat. The first item on my list I decided to tackle was the leeboard. John Bell came up with the simple fix of cutting the boards down the middle and adding another width of wood and this ended up working quite well. I put the leeboards back on the boat having cut much larger HDP washers to reduce friction. I also replaced the shock cord with line using autorelease cam cleats I got from duckworksbbs.com which would allow the board to kick up should I ground.
Second item on my list is the rudder. As much as I liked having home-made rudder assembly on the boat, I decided to replace it with the more solid commercially made assembly. First, I ordered gudgeons from duckworksbbs that would work with the pintles on the rudder. When these arrived, I attached them to the transom so the rudder head cleared the top by an inch and a half. The tiller that came with the rudder assembly was well used. I cut it to a fairly short length and reinforced the old wood with thickened epoxy. I then attached a cross-piece of wood to the back of the shortened tiller creating a T shaped assembly that would fit into the mount on the commercial rudder assembly. I repositioned the fairleads and reran the rudder lines. I added a line to hold the rudder down and another to hold it in a raised position. Garage sailing indicated I had removed the friction but another sail on the water would be in order. Third, I addressed the length of the boom by adding a splice. Fourth, I put a real main-sheet on the boat with plenty of purchase. Fifth, I moved the oarlocks further aft on the boat. I was ready for my second test sail with the exception of the leech line which I decided to adjust at the launch ramp. So, I packed everything up and headed back out to Lake Allatoona. Finally, I decided to try out one of those racheting folding cushions from Westmarine for the boat. It had nice thick cushions on it and could be laid flat to double as a ¾ length sleeping mattress. The lake was drawn down for the winter so that I could catch spring rains before they flooded Rome, GA. I ended up having to launch from Galts Ferry landing. First, I raised the mast and loosened the leach line from the on-sail jam cleat. Amazingly, one firm tug removed the cupping of the aft part of the sail and I kind of felt stupid for not having tried it sooner. Queequag's coffin might have made the full distance of the Florida 120 if I had done this one-minute operation. I had a devil of a time backing the boat down the now real long ramp given I can't see the duck behind the van. Finally, I got it in the water and parked the van.
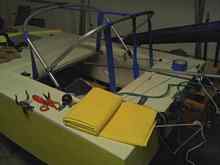
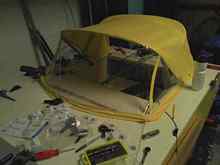
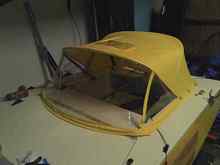
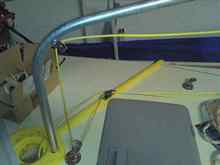
Once again I faced whitecaps on the water with sustained wind around 12mph. I got in the boat and rowed away from shore and unrolled the full sail. The oarlocks need to be raised. The boat moved out smartly and I shot the video below. However, as it shows in the video, my boom splice started to fail. I rolled up the sail and made an expedient repair using lashings to a point on the boom below the failing splice. I partially unrolled the sail and continued to try out the other modifications. To test leeway, I chose points on shore to sail to. The boat exhibited NO leeway when sailing hard on the wind. The rudder lines worked well allowing the boat to turn into the wind when released. Good for safety but I need to figure out some sort of tiller tamer so I can have both hands for eating and/or using the bailing bucket (not for bailing) during the Everglades Challenge. I only had time for a short sail but it was worth it. Of course, I found myself with yet more tweaks needing to be done. One thing was for sure, the ratcheting mechanism was just as annoying on the blue seat as it is on the cheap lounge chairs you most often find it on. In order to reset the seatback, you had to first fold it all of the way down, then fold it completely flat before you could start ratcheting the back up. A bit of a pain especially when you have no other place to put your body when doing this! Video just after leaving the dock: Back at the shop, it was time to turn my attention to making the dodger that would enclose the cockpit providing shelter both when sailing and sleeping. During one of the BEER cruises I did a bit of dumpster diving picking up a dodger and frame that was taken off a large boat. This provided nice aluminum tubing to use in building the dodger. I bent it into a two-bow frame and used some bimini hardware I had around the shop. Once again, I turned to duckworksbbs.com and got snap on/off bimini side mounts which I had used to great effect on my catboat "Little Gem." I used these and some masking tape to prop the frame on the boat.
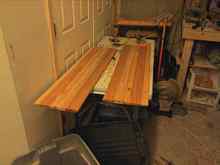
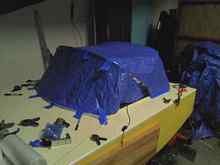
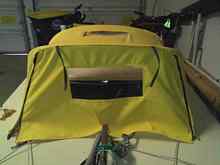
Making a dodger is fairly difficult as you are trying to make a 3 dimensional shape by sewing in 2 dimensions. I took some old blue tarp I had laying around and used it to create a template. I then transferred the pattern to some nice yellow waterproof fabric I bought from Seattle Fabrics (https://seattlefabrics.com/marine.html) and some clear marine plastic for the front panel. I had learned, from a previous dodger for Little Gem, that fitting requires a lot of trial and error so I made sure to install zippers in one side of the bimini frame pockets. To attach the front of the bimini to the boat, I planned on using bolt rope track which makes for a nice watertight seal. Before sewing on the bolt-rope portion I attached the track and did a test fit of the dodger and then marked where the fasteners for the bottom should be sewn. The initial test-fit went surprisingly well though I my dodger was a bit long in front and a bit short in back. Easy enough to fix with another trip to my 1940's black singer sewing machine. Before too long, I had a mess around the sewing machine and a nice tight dodger on the boat.
This is when I screwed things up. I decided to sew in a sunroof so I could see the trim of the sail. For some reason, this caused an ugly wrinkle across the top that an additional re-sewing didn't remove. Functionally, the top was fine but aesthetically... I added a back flap that could be closed by zippers and the dodger was ready for testing. Of course, I had some additional tweaks to do to the boat before hitting the water.
The first major item was the broken splice on the boom. I was just not happy with the strength of the boom and, I have learned through hard experience, I need to pay attention to my feelings on things like this. So, I decided to make a new, stronger boom by putting ½" galvanized conduit inside of the ¾" conduit before bending it into boom shape. While I was at it, I decided to make the bend further up giving both better clearance and a better pull on the leech of the sail. I also spliced on the end of the boom using ½" conduit inside and a conduit coupler on the outside. The next tweak was to change the way the reefing line worked so it could be used from the cockpit and the sail could be more easily tightened. Also, I needed to remove the tendency of the reefing line to try and choke me and/or sweep off my hat on each tack. I already had lost a good hat on the first test-sail to this line. I bought some real nice yellow yacht braid line from duckworksbbs. com which arrived later that week and, along with an assortment of pulleys and cam cleats, allowed me to create a single line reefing system along the lines of the original reefing system the Escape Sailboats, from which my mast and sail had come from. Again, I decided not to raise the mast at home but, rather, to test out the changes at the lake.
To be continued tomorrow... |


 |