
 Custom Search
|
| sails |
| plans |
| epoxy |
| rope/line |
| hardware |
| canoe/kayak |
| sailmaking |
| materials |
| models |
| media |
| tools |
| gear |

| join |
| home |
| indexes |
| classifieds |
| calendar |
| archives |
| about |
| links |
| Join Duckworks Get free newsletter CLICK HERE |
|
|
| Mike's Maritime Meanderings |
by Mike Machnicki
- London - England Building an Aluminium Trailer - Part Two |
 click for bio |
Part 2 of 4 - Detailed DesignPart One - Part Two - Part Three - Part Four The previous part of this article set the rational for making an aluminium trailer and discussed the components required. Now we need to look at the specific design and size of the trailer. A book that I found very useful in this respect was published by Haynes, a well-known publisher of car manuals, ‘The Trailer Manual’ by Brian Bate. It gave a lot of extra information on different types of trailers that were not relevant, but the general advice and specifics were spot on, and totally relevant to British towing. At this point the only firm part of the design is that we need a rectangle with a triangle set on the short side. The rest of the design is a bit confused at present as it is difficult to grasp the details. Fortunately, there are some constraints that will help us to complete these missing details.
The law helps us define the size the trailer can be, the length of the I beams also provide constraints we can use to develop the design as does the weight and the fact that we need two axles to carry this weight:
Using these constraints lets fill in a bit of design detail. After trying in vain to get my head around exactly where to place the suspension supports, I decided to ask my local experts at Autow. The place they chose to start was with the tyres and recommended the Avon 950, which were 13” tyres rated at 1900 kg per axle or 1800kg at 130 kilometres per hour (about 80 miles per hour), that sounded good as our roads are limited to 70 miles per hour, towing this weight my rig would be limited to 60 miles per hour so the loads and weights would be fine. These tyres have an outside diameter of 22” and a gap of about 4” will be needed between the tyres to allow for movement of the suspension. From the details on the suspension there is an offset between the suspension unit centre and the tyre centre of about 4”. This information plus the location of the engine allows me to place the suspension supports at 9’ and 11’ 5” from the rear of the trailer.
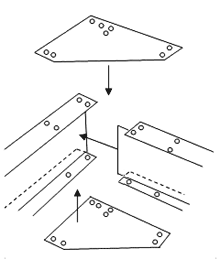
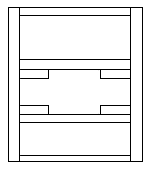
Now more design details are firm, I find that it is possible to build the trailer from 5 beam, not the 6 that I had initially thought. I had initially decided to build a winch post from the same profile, but on reflection I can use something cheaper. On concept that I had initially toyed with for a long time was to build in an extendable draw bar to allow the car to be a bit further away when launching the boat. On reflection it was going to be more complex, which indicates less reliable. I was concerned that the loads may deform the aluminium where pins were used to lock the sliding mechanism and It would take time to make the adjustment e.g. de-coupling the brakes. As an alternative I can always carry an external extension or lower and retrieve the boat on a rope. This would only be for the last 10’ to 15’ as the boat enters and leaves the water. Now how do I join it all together? As I mentioned previously my welding skill are not the best, so this will all be bolted together. By bolting the top and bottom of the joints to aluminium reinforcing plates this should prove to be very strong and durable (see exploded diagram above). At this point it is worth mentioning that I will be using BPZ nuts to hold the structure together temporarily while building, when everything fits OK I will then replace these, one by one, with the 316 stainless steel nuts and Locktite. The next problem is how to hold the suspension units on to the support frames as their 8 holes are wider apart than the 3” bottom of the I beam. The end two holes (nearest the wheel) are not a problem as they will bolt onto the side frame, the other six holes are a headache. My initial solution was to weld a plate underneath each end of the middle two cross beams and use this to bolt the suspension units to. Even getting the welds done professionally I still had doubts about the strength and durability due to fatigue, as the suspension will be subject to some stress and a lot of vibration from the road surface. I called Simmal and asked their fabrications unit, who had similar doubts, so then considered either using spacers held together with bolts, before finally deciding to doubling up on the I beam in the form of a foot long stub over the suspension units, see drawing below. At this point a few words of explanation / justification of my choice might be in order. As already mentioned I chose not to have any welds on the trailer because this would weaken the structure of the aluminium, leading to stress fractures. In addition to this I would have to either, get a very expensive welder and take a course, or hire the job out which would be equally expensive. A further problem is the grade of aluminium chosen for the trailer is 6082 – T6 which is a high tensile structural alloy that does not weld very well. The bolts are to be A4 stainless steel which will not rust in sea water, but these must be isolated from the aluminium, otherwise it will corrode due to galvanic action. I didn’t choose high tensile bolts because these would have rusted quite quickly and made the job look a mess, not to mention the loss of strength. I did think of using HT bolts for the coupling, but on checking found that the bolts that Autow recommended (and sold me 6 of) were ZL 8.8 which has a tensile strength of 800 Mpa. My A4 – 70 stainless bolts have a tensile strength of 700 Mpa, but for the coupling I can get grade A4 – 80 with a tensile strength of 800 Mpa same as the HT bolts. I may be wrong, but I recon the corrosion resistance is well worth having, even if you need to use a few more bolts to make up the strength. The design of the joints and the number of bolts should mean that each bolt has to take very little loading.
The boat will sit on a 2” x 6” wooden plank in the centre of the trailer covered with bunk carpet or maybe some low friction plastic, with some form of side supports to stop it tipping. At this point I am not sure whether to place a single plank either side or make a series of frames that will bolt to the trailer and possibly have 3 or 4 ribs of 2” x 4” either side to support the boat along its length. These details, and others, like where to place the electric wires, can be worked out later. Now the trailer dimensions are decided upon I have a starting point for the build.
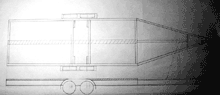
The best method of laying out, I find, is to draw a plan and elevation to the same scale as the boat plans, this way the boat can be fitted to the trailer for size, and hopefully see any problems that may need attention
‘Measure twice cut once’. Everything seems to be coming together nicely, if only I can measure it a sufficient number of times to avoid cutting it wrongly as I don’t have much spare material, which in any case will not be long enough for a second attempt. I only have one size of bolts and shoulder washers so I will need another size for the suspension units which take 12mm bolts the coupling unit takes 14mm bolts, so I may need some different again for here. Next article will be on the fabrication, this is no doubt where I find the problems that are not currently apparent. A fourth article will be written on wiring up and finishing off. Click HERE for a list of articles by Mike Machnicki |
|