| Over the years as maturity advances along with an increasing number of grey hairs a few pennies eventually drop. One is that for most jobs there are many ways to tackle a problem; another is that there are only two sorts of wooden boats in the early stages of construction. Those that require a strongback and those that don’t; it’s after this that Pandora’s Box opens for different styles and techniques.
It is many years since I was a student, and a teacher myself now, I am fortunate doing what I enjoyed more than a just few years ago (hell, it was last century!); except this time the boot is on the other foot. My new senior class are now about to start construction of their boat after previous classes built Oughtred’s “JOHN DORY” and Lillistone’s PHOENIX III and a strongback was a key requirement both of these hulls.
 |
Oughtred’s 18ft long John Dory was a pain to move due to a column in the middle of the workshop which made manoeuvring difficult. Mahogany open gunwales installed with Huon Pine and Silky Oak highlights elsewhere. |
 |
The strongback makes a convenient platform to store tools on and move Phoenix III, now right side up, into and out of the workshop while interior fit-out is underway. |
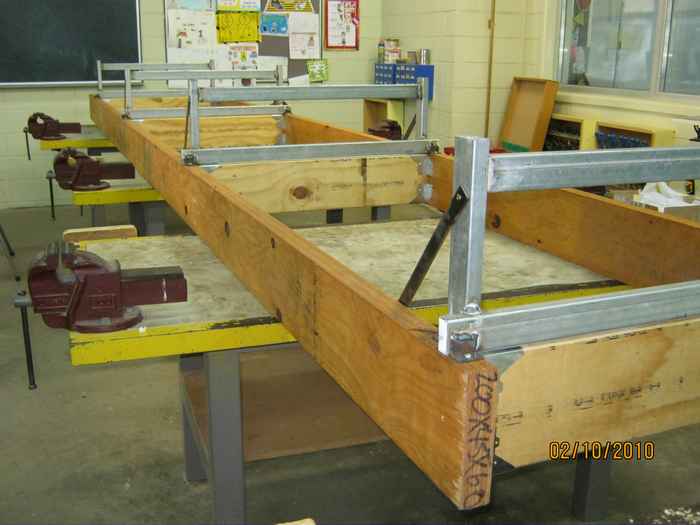
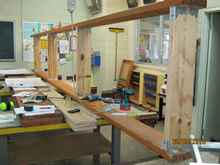
As we have limited workshop space we needed our strongback capable of being moved about. Yes I know this goes counter to the standard prerequisite for rigidity. This would however allow other classes to use our shared teaching space, but have to be made rigid enough to take the wear and tear of it being moved every few days. The workshop’s concrete floor was pretty level but no masonry bolts to the floor here! Portability was the constraint I had to live with and after some research and advice LVL was chosen as the main construction material for our strongback; LVL stands for Laminated Veneered Lumber, and RHS (or Rectangular Hollow Section) steel was used for the legs.
 |
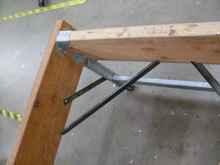
Sheet metal joist bracket in position, this is much easier if the ends of the LVL cross pieces are perfectly square; the veneers are just visible while the knots are in this surface veneer layer only. |
LVL is a wonderful material and surprisingly cheap considering you get a product which is manufactured precisely to dimension and the exact length you need i.e. no waste! Our school ordered two 45 x 200mm sections by 6m long with four 0.8m cross pieces which cost $170 delivered to the college. It is stable, straight and stiff, enabling a good working platform to be constructed. A radial arm saw ensured the four cross pieces were all equal in length and exactly square across their ends. As this structure has to last for at least five years and for a number of different craft screws and joist brackets were used in its assembly which enable the structure to be easily altered when required.
 |
The strongback was easily assembled once the locations for the cross pieces were precisely marked. Battery drill and screw gun made this task a cinch. |
 |
Upside down strongback having the steel legs fitted with wheels about to go on too. Bracing was fitted to give piece of mind when rolling over joins in the floor slab. |
It was important to carefully locate and then use a sequence when fastening the brackets in place as their positioning and fit would have a bearing on the precision and rigidity of the overall structure. The brackets fitted the LVL precisely and were large enough to take any diagonal strain and could easily be relocated if they get in the way of a station location.
Once the LVL components were put together in a ladder type frame the legs were attached. Now many may be aghast at using steel for this component but there were good reasons for this; firstly the school workshop has a good selection of equipment and I am quite happy OXY, ARC or MIG welding; also steel is very strong and will last for years while the LVL ladder frame above it is modified. Lastly we had many readily available steel off-cuts to use (it’s a school remember), and I only needed to buy in a few extra pieces from the local metal merchant. As I also teach the welding course putting the parts together was easy. To make construction simpler a jig was made up from thin MDF (that’s Medium Density Fibreboard) and wooden blocks with wedges to ensure consistency and accurate positioning of the leg parts when welding them together. In this instance I used one of the new style portable Inverter Arc welding machines which have the brilliant feature of eliminating the dreaded electrode stick problem when the arc is first started.
 |
The Inverter Welder used for the legs; the magnetic earth clamp was a helpful addition to the more normal peg clamp. |
These machines are also half the size and incredibly light in weight when compared to the old ARC welding gear, and hence very portable, they even come with a shoulder strap.
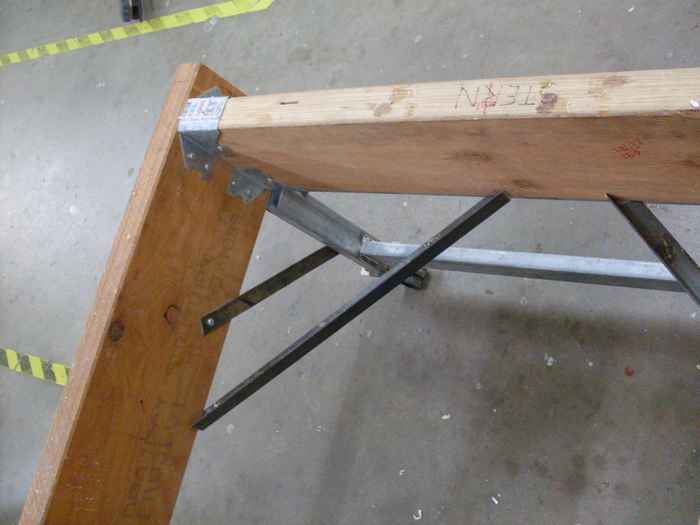
With both the metal and timber components ready I made up some angle steel braces and tek screwed them in place as added diagonals for security, though in retrospect I could possibly have left them off.
 |
L section angle steel corner bracing screwed in place, this helped prevent diagonal loads bending the joist brackets out of shape. |
The legs fitted directly over the cross pieces (I assembled the frame upside down) as I wanted to make later access under the hull as easy as possible with a view to applying and cleaning up epoxy. To move the whole structure about swivel wheels were fitted. Unfortunately I goofed on the casters and bought items which couldn’t take the load adequately and after 8 months they had to be upgraded. My students were very helpful in pointing this out to me. The structure was rigid enough to highlight variations in the concrete of less than a few millimeters and it was this which caused successive wheel failures. Initially the strongback was fitted with lockable swivel wheels; however in reality this was unnecessary.
With the strongback constructed my yr12 students had a chance to do their bit and start their course with the knowledge that everything should be straight and true for their first stage of construction.
 |
Geoff Leedham is a Department Head and Industrial Arts teacher at Saint Philips College and his first experience of boatbuilding was at Plympton High as a student; he then undertook boatbuilding as a course major during his Industrial Arts B.Ed. degree in South Australia. |
|